🧢 Beautiful ✨ Detailed πŸ’ Adorable

Adorable Deer Rattle Amigurumi Pattern

Adorable Deer Rattle Amigurumi Pattern
4.3β˜… Rating
5-7 Hours Time Needed
2.9K Made This
βœ‚οΈ

Intermediate Level

Ideal for those with basic knitting experience, featuring slightly more advanced stitches and techniques to expand your skills.

⏱️

Weekend Treat

Takes 5-7 hours, making it an enjoyable project to finish over a couple of days.

🧸

Cute Companion

An adorable friend to cherish, handcrafted with love to bring comfort and joy for years to come.

About This Adorable Deer Rattle Amigurumi Pattern

This charming deer rattle pattern brings woodland magic to life with its peaceful sleeping expression and delicate antler details. The design cleverly incorporates a wooden teething ring that babies can safely grasp and explore, while the internal rattle adds gentle sound stimulation. Each element, from the two-tone head piece to the elegant crocheted collar, has been carefully crafted to create a timeless keepsake that's both beautiful and functional.

Adorable Deer Rattle Amigurumi Pattern crochet pattern - detailed view of completed project

Working with soft cotton yarn in natural beige and brown tones, you'll create a soothing color palette perfect for any nursery. The pattern includes detailed photo instructions for every assembly step, ensuring your finished rattle looks professionally crafted.

Why You'll Love This Adorable Deer Rattle Amigurumi Pattern

I absolutely love how this pattern combines practicality with pure sweetness. The sleeping deer face creates such a calming presence, and I'm always amazed at how the simple color combination creates such depth and character. What really makes my heart sing is watching the decorative collar come together with those beautiful shell stitches, adding an elegant finishing touch that elevates this from a simple toy to a treasured heirloom. The way the wooden ring integrates seamlessly into the design is genius, and I love knowing that every stitch contributes to creating something both safe and beautiful for the littlest hands.

Adorable Deer Rattle Amigurumi Pattern step 1 - construction progress Adorable Deer Rattle Amigurumi Pattern step 2 - assembly progress Adorable Deer Rattle Amigurumi Pattern step 3 - details and accessories Adorable Deer Rattle Amigurumi Pattern step 4 - final assembly and finishing

Switch Things Up

I love experimenting with different color combinations for this sweet deer rattle! Instead of the classic beige and brown, try using soft pastels like mint green and cream for a modern nursery look, or go bold with coral and gray for something contemporary. You could even create a whole family of deer rattles in different seasonal colors.

For added texture and interest, consider working the collar in a contrasting metallic thread alongside your yarn, or add tiny French knots to the upper head piece for a dotted fawn effect. Some makers love embroidering small flowers around the collar or adding a tiny bow between the ears for extra sweetness.

If you want to make this rattle extra special, try using organic cotton yarn in natural plant-dyed colors for an eco-friendly gift that parents will appreciate. You could also personalize it by embroidering baby's initial on the back of the upper head piece before attaching it.

For different developmental stages, adjust the wooden ring sizeβ€”smaller rings for tiny newborn hands, larger ones for older babies who can grip more confidently. You can even skip the ring altogether and attach the head to a fabric loop or ribbon for a different style of toy that's easier for very young babies to hold.

Common Mistakes & How to Fix Them

βœ— Not maintaining consistent tension when crocheting around the wooden ring, which can cause the fabric to shift loosely or bunch up unevenly βœ— Forgetting to insert the rattle before closing the head completely, requiring you to carefully reopen and restuff the entire piece βœ— Placing the eyes asymmetrically in relation to the nose, creating an unbalanced facial expression that's difficult to correct after embroidering βœ— Under-stuffing the head and nose pieces, resulting in a floppy appearance that doesn't hold its adorable shape properly βœ— Sewing the upper head piece before embroidering the eyes, making it much harder to hide thread knots and secure stitches neatly βœ— Using too large a hook when working around the wooden ring, creating loose stitches that don't grip the ring securely

Adorable Deer Rattle Amigurumi Pattern

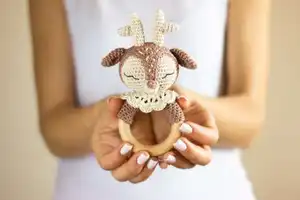
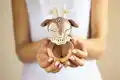
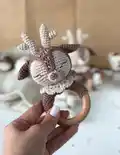
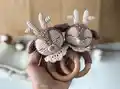
Create this enchanting deer rattle toy that combines gentle woodland charm with practical baby entertainment. This thoughtfully designed pattern features a sweet sleeping deer with delicate antlers, soft ears, and an adorable decorative collar, all attached to a natural wooden teething ring. Perfect for handmade baby gifts or nursery keepsakes, this rattle combines safety, comfort, and timeless appeal in one cuddly package.

Intermediate 5-7 Hours

Materials Needed for Adorable Deer Rattle Amigurumi Pattern

β€” Main Fabric

  • 01
    2 hanks of Vita Cotton Lily 100% cotton yarn (1.75 oz/50g, approximately 137 yds/125m per hank)
  • 02
    Main color yarn in beige and contrasting color yarn in brown
  • 03
    Suggested substitute yarns: Scheepjes Catona or Alpina Anabel (approximately 87 yds/80m needed)

β€” Tools Required

  • 01
    Crochet hook 2mm
  • 02
    Crochet hook 2.5mm
  • 03
    Wooden teething ring approximately 2-3 inches (60-70mm) in diameter (beech wood recommended)
  • 04
    Baby-safe rattle insert approximately 1 inch (24-30mm) in diameter
  • 05
    Polyester fiberfill stuffing
  • 06
    Scissors
  • 07
    Black embroidery floss or fingering weight yarn for facial features
  • 08
    Tapestry needle for sewing
  • 09
    Stitch markers or contrasting yarn

Progress Tracker

0% Complete

β€” Working Around the Ring (Option 1) :

Info :

Chain 10 using hook 2.5mm, then switch to hook 2mm to work around the ring

Info :

Join chain with slip stitch around the ring, then single crochet in each stitch around

Info :

Work in continuous spiral with tight tension until half or slightly less than half of the ring is covered

Info :

End with slip stitch, weave in ends inside the ring

β€” Working Around the Ring (Option 2) :

Info :

Chain 20 and work in single crochet for 9 rows to create a rectangle

Info :

Fold rectangle over ring and sew tightly with seam inside the ring, weave in ends

β€” Head :

Round 1 :

6 sc in magic ring (6)

Round 2 :

(inc) x 6 times (12)

Round 3 :

(inc, sc in next st) x 6 times (18)

Round 4 :

(inc, sc in next 2 sts) x 6 times (24)

Round 5 :

(inc, sc in next 3 sts) x 6 times (30)

Round 6 :

(inc, sc in next 4 sts) x 6 times (36)

Round 7 :

(inc, sc in next 5 sts) x 6 times (42)

Round 8 :

(inc, sc in next 6 sts) x 6 times (48)

Rounds 9-15 :

48 sc (work even for 7 rounds)

Round 16 :

(dec, sc in next 6 sts) x 6 times (42)

Round 17 :

(dec, sc in next 5 sts) x 6 times (36)

Round 18 :

(dec, sc in next 4 sts) x 6 times (30)

Round 19 :

(dec, sc in next 3 sts) x 6 times (24)

Info :

Stuff the head and insert rattle inside

Round 20 :

(dec, sc in next 2 sts) x 6 times (18)

Info :

Stuff the head tightly, using tweezers for convenience

Round 21 :

(dec, sc in next st) x 6 times (12)

Round 22 :

(dec) x 6 times (6)

Info :

Bind off remaining 6 stitches using needle, leave long tail approximately 18-20 inches (45-50cm) for sewing to ring

β€” Upper Head Piece :

Round 1 :

6 sc in magic ring (6)

Round 2 :

(inc) x 6 times (12)

Round 3 :

(inc, sc in next st) x 6 times (18)

Round 4 :

(inc, sc in next 2 sts) x 6 times (24)

Round 5 :

(inc, sc in next 3 sts) x 6 times (30)

Round 6 :

(inc, sc in next 4 sts) x 6 times (36)

Round 7 :

(inc, sc in next 5 sts) x 6 times (42)

Round 8 :

(inc, sc in next 6 sts) x 6 times (48)

Rounds 9-13 :

sc in every st (work even for 5 rounds) (48)

Round 14 :

(dec, sc in next 6 sts) x 6 times (42)

Round 15 :

sc in every st (work 1 round even) (42)

Info :

Turn the piece and start to work flat

Row 16 :

ch 1, sc in next 6 sts, turn

Row 17 :

ch 1, sc in next 6 sts, turn

Row 18 :

sc in next 5 sts starting from 2nd st from hook, turn

Row 19 :

sc in next 4 sts starting from 2nd st from hook, turn

Row 20 :

ch 1, sc in next 4 sts, turn

Row 21 :

sc in next 3 sts starting from 2nd st from hook, turn

Row 22 :

sc in next 2 sts starting from 2nd st from hook, turn

Rows 23-25 :

ch 1, sc in next 2 sts, turn

Info :

Sc in every st to end of upper head piece, slip stitch in next st, fasten off leaving long tail approximately 25-27 inches (65-70cm) for sewing

β€” Nose :

Round 1 :

5 sc in magic ring (5)

Round 2 :

(inc) x 5 times (10)

Rounds 3-5 :

sc in next 10 sts (work even for 3 rounds) (10)

Info :

Slip stitch in next st, fasten off leaving tail for sewing

Nose Tip :

With contrasting color work 6 sc in magic ring, fasten off and sew to nose or embroider tip, stuff nose firmly

β€” Small Horn (Make 2) :

Round 1 :

6 sc in magic ring (6)

Round 2 :

inc, sc in next 5 sts (7)

Rounds 3-4 :

sc in every st (work even for 2 rounds) (7)

Info :

Slip stitch in next st, fasten off leaving long tail for sewing, stuff horn, repeat for second horn

β€” Large Horn (Make 2) :

Round 1 :

6 sc in magic ring (6)

Round 2 :

(inc, sc in next 2 sts) x 2 times (8)

Rounds 3-10 :

sc in every st (work even for 8 rounds) (8)

Info :

Slip stitch in next st, fasten off leaving long tail for sewing (leave approximately 27 inches/70cm on one horn for embroidering stripes), stuff horns, repeat for second horn

β€” Ears (Make 2) :

Round 1 :

6 sc in magic ring (6)

Round 2 :

(inc, sc in next 2 sts) x 2 times (8)

Round 3 :

(inc, sc in next 3 sts) x 2 times (10)

Round 4 :

(inc, sc in next 4 sts) x 2 times (12)

Round 5 :

(inc, sc in next 5 sts) x 2 times (14)

Rounds 6-9 :

sc in every st (work even for 4 rounds) (14)

Info :

Slip stitch in next st, fasten off leaving long tail for sewing, repeat for second ear

β€” Collar :

Setup :

Chain 22 with main color yarn

Row 1 :

sc in 2nd st from hook, sc in next 20 sts, turn

Row 2 :

ch 4, dc in 1st st, [skip 1, dc in next st, ch 1, dc in same st] 10 times, turn

Row 3 :

ch 2, 2 dc in next ch space, sc in next st, [5 dc in next ch space, sc in next st] 10 times, 3 dc in last post

Info :

Collar is complete and ready to sew

Assembly Instructions

  • Sew nose to head at level of row 6 from last increase, temporarily attach upper head piece to check positioning before embroidering facial features.
  • Outline eyes on head, remove upper head piece, then embroider sleepy eyes using black embroidery floss, ensuring symmetrical placement relative to nose.
  • Sew upper head piece around edge to main head, attaching it securely as shown in photo instructions.
  • Sew small horn pieces to large horn pieces, then attach assembled horns to head as demonstrated in photos.
  • Using long tail from one large horn, randomly embroider decorative stripes across nose area following photo guidance.
  • Fold ears and fix in folded position, then sew to head approximately 2 stitches away from horns, mirroring placement on both sides.
  • Sew completed head to wooden ring using long tail, pushing slightly while sewing to prevent neck from becoming too thin, sewing around twice for security.
  • Attach decorative collar around neck area where head meets ring, sewing securely in place as shown in final assembly photos.

Important Notes

  • πŸ’‘All pieces are worked in continuous spiral without joining rounds, use stitch markers to track beginning of each round
  • πŸ’‘When working around wooden ring, switch to smaller 2mm hook for easier stitching and tighter fabric
  • πŸ’‘Maintain consistent tight tension when crocheting around ring to prevent fabric from shifting or becoming loose
  • πŸ’‘Insert rattle into head before closing completely during Round 19 to avoid having to reopen the piece
  • πŸ’‘Stuff head and nose pieces firmly but not excessively to maintain proper shape and structure
  • πŸ’‘Embroider eyes before final attachment of upper head piece to easily hide thread knots on back of head
  • πŸ’‘Pin all pieces in place before final sewing to ensure correct positioning and symmetry, especially for horns and ears
  • πŸ’‘Leave extra-long tails as specified for pieces that require sewing or embroidery work for easier assembly

This precious deer rattle pattern was lovingly designed to bring gentle woodland enchantment into baby's earliest days. Combining the soothing beauty of natural materials with the timeless appeal of handmade heirlooms, this pattern creates a keepsake that will be treasured long after baby outgrows it. The sleeping expression and soft textures make it perfect for little hands to explore, while the attention to detail ensures it's beautiful enough to display in any nursery. 🦌✨ Happy crocheting! πŸ§ΆπŸ’•

You ask,

we answer.

FAQs

What size will my finished deer rattle be?

The finished deer head measures approximately 3-4 inches in diameter when worked with the recommended yarn and hooks. The overall size depends on your wooden ring diameter (2-3 inches recommended) and your personal tension. The deer sits comfortably on standard baby teething rings.

Is this pattern suitable for baby toys and safe for teething?

Yes, when made with baby-safe materials! Use 100% cotton yarn, a natural wooden teething ring, safety-tested stuffing, and securely attach all pieces with strong stitching. Ensure the rattle insert is firmly enclosed and regularly inspect the toy for any loose parts or wear.

Can I use different yarn weights or colors for this pattern?

Absolutely! While the pattern specifies cotton yarn with specific gauge, you can substitute with any yarn as long as you adjust your hook size accordingly to achieve tight, baby-safe stitches with no gaps. Feel free to customize colors to match nursery themes while maintaining the two-tone design for visual interest.

I'm having trouble crocheting around the wooden ring. What should I do?

The pattern offers two options: continuous spiral around the ring (Option 1) or a rectangular piece sewn around it (Option 2). If Option 1 feels challenging, try using the smaller 2mm hook, maintaining very tight tension, and starting with fewer chain stitches. Option 2 is more beginner-friendly and produces excellent results.

How do I create the sleeping eyes to look symmetrical and sweet?

The pattern recommends temporarily attaching the upper head piece first to mark eye placement, then removing it to embroider. This ensures proper positioning relative to the nose. Use the photo instructions as a guide, work slowly with black embroidery floss, and mirror the eye shape on both sides for perfect symmetry.

What if I don't have a rattle insert for inside the head?

You can make a simple rattle by placing dried beans, rice, or small bells inside a small fabric pouch, then securely closing it before stuffing the head. Alternatively, omit the rattle entirely for a quiet sensory toy that's still perfect for teething and cuddling.