๐Ÿงถ Beautiful โœจ Detailed ๐Ÿ’ Adorable

Adorable Panda Amigurumi Pattern

Adorable Panda Amigurumi Pattern
4.0โ˜… Rating
8-10 Hours Time Needed
2.8K Made This
โœ‚๏ธ

Intermediate Level

Ideal for those with basic knitting experience, featuring slightly more advanced stitches and techniques to expand your skills.

โฑ๏ธ

All-Day Adventure

Requires 8-10 hours, ideal for a full day of immersive knitting.

๐Ÿงธ

Cute Companion

An adorable friend to cherish, handcrafted with love to bring comfort and joy for years to come.

About This Adorable Panda Amigurumi Pattern

This charming panda amigurumi pattern combines classic techniques with modern jointed construction for a truly special creation. The pattern includes detailed instructions for creating moveable limbs using plastic joints or cotter pins, giving your panda lifelike posability. Each component is carefully designed with proper shaping and color changes to capture the panda's distinctive appearance. The included striped sweater adds an extra touch of personality and warmth to this already loveable character.

Adorable Panda Amigurumi Pattern crochet pattern - detailed view of completed project

Working with fine yarn and a 2mm hook, this pattern produces beautifully defined stitches and smooth color transitions. The comprehensive guide includes helpful photos showing proper joint placement and assembly techniques for professional-looking results.

Why You'll Love This Adorable Panda Amigurumi Pattern

I absolutely love how this panda pattern brings together traditional amigurumi techniques with modern jointed construction - it's like getting the best of both worlds! The way the black eye patches frame those sweet safety eyes creates such an expressive face that just melts your heart. I'm particularly fond of how the striped sweater adds personality while also serving as a clever way to practice color work. The jointed limbs make this panda incredibly poseable, so you can create different scenes and poses for photos or play.

Adorable Panda Amigurumi Pattern step 1 - construction progress Adorable Panda Amigurumi Pattern step 2 - assembly progress Adorable Panda Amigurumi Pattern step 3 - details and accessories Adorable Panda Amigurumi Pattern step 4 - final assembly and finishing

Switch Things Up

I love experimenting with different color combinations for this panda pattern to create unique personalities! Instead of the traditional black and white, I've tried making pandas with brown and cream colors for a vintage teddy bear look, or even pastel colors for a dreamy, kawaii aesthetic. The striped sweater is perfect for seasonal variations - imagine tiny red and green stripes for Christmas, or orange and black for Halloween! I've also discovered that changing the sweater to solid colors and adding embroidered details like hearts or stars makes each panda completely unique.

For advanced crocheters, I recommend trying different textures by mixing smooth cotton with fluffy yarns, or even adding a slight sparkle with metallic thread worked alongside the main yarn. The jointed construction also opens up possibilities for creating different poses - you could make a sitting panda, a panda waving, or even one holding tiny crocheted accessories like bamboo or a ball.

Common Mistakes & How to Fix Them

โœ— Forgetting to stuff gradually as you work can lead to lumpy or misshapen pieces that are difficult to fix later โœ— Placing joints incorrectly without proper measurement can result in limbs that don't move smoothly or sit properly โœ— Not maintaining consistent tension throughout color changes can create visible gaps or loose stitches in the striped sweater โœ— Skipping stitch markers when working in rounds can cause the piece to become twisted or off-center as you progress

Adorable Panda Amigurumi Pattern

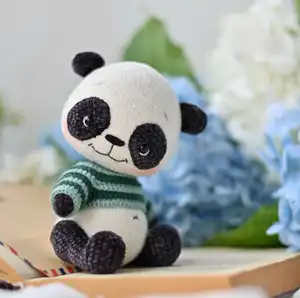
Create this irresistibly cute panda amigurumi with its signature black eye patches and charming striped sweater. This delightful pattern features jointed limbs for posability and includes detailed instructions for crafting the perfect companion. The finished panda measures approximately 16cm tall and makes an wonderful gift or addition to any amigurumi collection. With clear step-by-step guidance, you'll master essential techniques while creating this loveable bear that's sure to bring smiles wherever it goes.

Intermediate 8-10 Hours

Materials Needed for Adorable Panda Amigurumi Pattern

โ€” Main Fabric

  • 01
    Fine/4ply yarn Katia Velvet Fine 50g/160m in cream (200), black (211), dark green (444), and mint green (439)
  • 02
    Fine/4ply yarn YarnArt Baby Cotton 50g/165m as alternative option for softer texture

โ€” Tools Required

  • 01
    Crochet hook size 2mm
  • 02
    Polyester toy filling (fiberfill)
  • 03
    Scissors
  • 04
    Sewing pins
  • 05
    Eyes with loop 6-7mm (2 pieces)
  • 06
    Plastic joints 25mm for hind legs (2 pieces)
  • 07
    Plastic joints 15mm for forelegs (2 pieces)
  • 08
    Disks 25mm (4 pieces)
  • 09
    Disks 15mm (4 pieces)
  • 10
    T-shaped cotter pins 20x2 (4 pieces)
  • 11
    Round nose pliers
  • 12
    DMC embroidering floss in black and white
  • 13
    Wire for frame 0.9mm diameter - 20cm (optional)
  • 14
    Blush or dry peach pastel for tinting
  • 15
    Buttons 5mm (3 pieces)

Progress Tracker

0% Complete

โ€” Head :

Round 1 :

6sc in a MR (6)

Round 2 :

6inc (12)

Round 3 :

(1sc, inc)*6 (18)

Round 4 :

1sc, inc, (2sc, inc)*5, 1sc (24)

Round 5 :

(3sc, inc)*6 (30)

Round 6 :

2sc, inc, (4sc, inc)*5, 2sc (36)

Round 7 :

(5sc, inc)*6 (42)

Round 8 :

3sc, inc, (6sc, inc)*5, 3sc (48)

Round 9 :

(7sc, inc)*6 (54)

Round 10 :

4sc, inc, (8sc, inc)*5, 4sc (60)

Round 11 :

(9sc, inc)*6 (66)

Round 12-13 :

66sc (2 rounds)

Round 14 :

(21sc, inc)*3 (69)

Round 15-16 :

69sc (2 rounds)

Round 17 :

11sc, inc, (22sc, inc)*2, 11sc (72)

Round 18-19 :

72sc (2 rounds)

Round 20 :

(23sc, inc)*3 (75)

Round 21 :

75sc (75)

Round 22 :

12sc, inc, (24sc, inc)*2, 12sc (78)

Round 23-27 :

78sc (5 rounds)

Round 28 :

(11sc, dec)*6 (72)

Round 29 :

5sc, dec, (10sc, dec)*5, 5sc (66)

Round 30 :

(9sc, dec)*6 (60)

Round 31 :

4sc, dec, (8sc, dec)*5, 4sc (54)

Round 32 :

(7sc, dec)*6 (48)

Round 33 :

2sc, dec, (4sc, dec)*7, 2sc (40)

Round 34 :

(3sc, dec)*8 (32)

Round 35 :

(2sc, dec)*8 (24)

Round 36 :

(1sc, dec)*8 (16)

โ€” Eye Spots (make 2) :

Round 1 :

4sc, 3sc in the last chain, on the other side of the chain: 3sc, inc (12)

Round 2 :

inc, 3sc, 3inc, 3sc, 2inc (18)

Round 3 :

1sc, inc, 3sc, (1sc, inc)*3, 3sc, (1sc, inc)*2 (24)

Round 4 :

2sc, inc, 3sc, (2sc, inc)*3, 3sc, (2sc, inc)*2 (30)

โ€” Ears (make 2) :

Round 1 :

6sc in a MR (6)

Round 2 :

6inc (12)

Round 3 :

(2sc, inc)*4 (16)

Round 4-7 :

16sc (4 rounds)

โ€” Forelegs (make 2) :

Round 1 :

6sc in a MR (6)

Round 2 :

(1sc, inc)*3 (9)

Round 3 :

(2sc, inc)*3 (12)

Round 4-6 :

12sc (3 rounds)

Round 7 :

6sc, inc, 5sc (13)

Round 8 :

13sc (13)

Round 9 :

6sc, inc, 6sc (14)

Round 10 :

14sc (14)

Round 11 :

7sc, inc, 6sc (15)

Round 12 :

7sc, inc, 7sc (16)

Round 13 :

16sc (16)

Round 14 (Left) :

11sc, ch2, skip 2sc, 3sc (16)

Round 15 (Left) :

11sc, 2sc on the chain, 3sc (16)

Round 14 (Right) :

3sc, ch2, skip 2sc, 11sc (16)

Round 15 (Right) :

3sc, 2sc on the chain, 11sc (16)

Round 16 :

(2sc, dec)*4 (12)

Round 17 :

6dec (6)

โ€” Hind Legs (make 2) :

Round 1 :

3sc, 4sc in the last chain, on the other side of the chain: 2sc, inc (11)

Round 2 :

inc, 2sc, 3sc inc, 2sc, 3sc inc, 2sc, 2inc (18)

Round 3 :

1sc, inc, 3sc, 3sc inc, 4sc, 3sc inc, 3sc, (1sc, inc)*2 (25)

Round 4 :

25sc (25)

Round 5 :

24sc - short round

Round 6 :

8sl st, 9sc, 8sl st (25)

Round 7 :

5sc, (1sc, dec)*5, 5sc (20)

Round 8 :

5sc, 5dec, 5sc (15)

Round 9 :

6sc, sc3tog, 6sc (13)

Round 10 :

6sc, inc, 6sc (14)

Round 11 :

14sc (14)

Round 12 :

7sc, inc, 6sc (15)

Round 13 :

15sc (15)

Round 14 :

7sc, inc, 7sc (16)

Round 15 :

(7sc, inc)*2 (18)

Round 16 :

(8sc, inc)*2 (20)

Round 17 :

20sc (20)

Round 18 (Left) :

12sc, ch2, skip 2sc, 6sc (20)

Round 19 (Left) :

12sc, 2sc on the chain, 6sc (20)

Round 18 (Right) :

6sc, ch2, skip 2sc, 12sc (20)

Round 19 (Right) :

6sc, 2sc on the chain, 12sc (20)

Round 20-21 :

20sc (2 rounds)

Round 22 :

(8sc, dec)*2 (18)

Round 23 :

(1sc, dec)*6 (12)

Round 24 :

6dec (6)

โ€” Body :

Round 1 :

7sc in a MR (7)

Round 2 :

7inc (14)

Round 3 :

(1sc, inc)*7 (21)

Round 4 :

1sc, inc, (2sc, inc)*6, 1sc (28)

Round 5 :

(3sc, inc)*7 (35)

Round 6 :

2sc, inc, (4sc, inc)*6, 2sc (42)

Round 7 :

(5sc, inc)*7 (49)

Round 8 :

3sc, inc, (6sc, inc)*6, 3sc (56)

Round 9-10 :

56sc (2 rounds)

Round 11 (Plastic) :

12sc, ch2, skip 2sc, 28sc, ch2, skip 2sc, 12sc (56)

Round 12 (Plastic) :

12sc, 2sc on the chain, 28sc, 2sc on the chain, 12sc (56)

Round 11 (Cotter) :

56sc (mark stitches 13-14 and 43-44) (56)

Round 12 (Cotter) :

56sc (56)

Round 13-16 :

56sc (4 rounds)

Round 17 :

13sc, dec, 26sc, dec, 13sc (54)

Round 18 :

54sc (54)

Round 19 :

18sc, dec, 3sc, dec, 4sc, dec, 3sc, dec, 18sc (50)

Round 20 :

50sc (50)

Round 21 :

22sc, dec, 2sc, dec, 22sc (48)

Round 22 :

7sc, dec, (14sc, dec)*2, 7sc (45)

Round 23 (Plastic) :

10sc, ch2, skip 2sc, 21sc, ch2, skip 2sc, 10sc (45)

Round 24 (Plastic) :

10sc, 2sc on the chain, 1sc, dec, 13sc, dec, 3sc, 2sc on the chain, 8sc, dec (42)

Round 23 (Cotter) :

45sc (mark stitches 11-12 and 34-35) (45)

Round 24 (Cotter) :

(13sc, dec)*3 (42)

Round 25-26 :

42sc (2 rounds)

Round 27 :

6sc, dec, (12sc, dec)*2, 6sc (39)

Round 28 :

(11sc, dec)*2 (36)

Round 29 :

2sc, dec, (4sc, dec)*5, 2sc (30)

Round 30 :

(3sc, dec)*6 (24)

Round 31 :

(2sc, dec)*6 (18)

Round 32 :

(7sc, dec)*2 (16)

โ€” Tail :

Round 1 :

6sc in a MR (6)

Round 2 :

6inc (12)

Round 3 :

12sc (12)

Round 4 :

(1sc, dec)*4 (8)

โ€” Sweater :

Row 1 :

36sc (36), t-ch, turn

Row 2 :

4sc, inc, (8sc, inc)*3, 4sc (40), t-ch, turn

Row 3 :

BLO: (6sc, 3sc inc)*2, 6sc, inc, 5sc, (3sc inc, 6sc)*2 (49) t-ch, turn

Row 4 :

3sc, inc, 41sc, inc, 3sc (51), t-ch, turn

Row 5 :

BLO: (8sc, 3sc inc)*2, 15sc, (3sc inc, 8sc)*2 (59), t-ch, turn

Row 6 :

3sc, inc, 51sc, inc, 3sc (61)

Row 7 :

BLO: (10sc, 3sc inc)*2, 17sc, (3sc inc, 10sc)*2 (69), t-ch, turn

Row 8 :

11sc, ch6, skip 14sc, 9sc, inc, 9sc, ch6, skip 14sc, 11sc (54), t-ch, turn

Row 9 :

BLO: 11sc, (3sc, inc, 2sc) on the chain, 20sc, (2sc, inc, 3sc) on the chain, 11sc (56), t-ch, turn

Row 10 :

56sc (56)

Assembly Instructions

  • Attach eye spots to head with sewing pins and sew carefully in place
  • Embroider eyebrows and mouth using 2 strands of embroidering floss
  • Insert safety eyes between marked positions and secure threads at back of head
  • Attach ears to head in an arc shape using sewing pins for proper positioning
  • Install plastic joints or cotter pins in legs and body at marked locations
  • Sew head to body ensuring proper alignment and stuffing
  • Attach tail to back of panda and stuff lightly during assembly

Important Notes

  • ๐Ÿ’กUse stitch markers consistently to track rounds and prevent twisting
  • ๐Ÿ’กStuff pieces gradually as you work for better shape control
  • ๐Ÿ’กWhen using plastic joints, ensure proper disk size fits internal space
  • ๐Ÿ’กMark joint placement points with contrasting thread before assembly
  • ๐Ÿ’กMaintain even tension throughout color changes in striped sweater
  • ๐Ÿ’กTest fit sweater on panda during construction for proper sizing

This delightful panda amigurumi pattern brings together classic crochet techniques with modern jointed construction for a truly special creation. The combination of the panda's sweet expression, poseable limbs, and charming striped sweater creates a companion that's both adorable and functional. Perfect for intermediate crocheters ready to explore new techniques while creating something magical. Each stitch brings this loveable bear to life, ready to become someone's treasured friend. ๐Ÿงถ Happy crocheting! ๐Ÿผโœจ

You ask,

we answer.

FAQs

Can I use different yarn weights for this pattern?

While the pattern is designed for fine/4ply yarn, you can use different weights but will need to adjust hook size accordingly. Using thicker yarn will result in a larger finished panda.

Are plastic joints necessary or can I skip them?

Plastic joints make the limbs poseable, but you can skip them if you prefer. Without joints, simply stuff the limbs fully and sew them directly to the body for a traditional amigurumi construction.

How do I ensure the eye placement looks symmetrical?

Use sewing pins to mark eye placement before inserting safety eyes. Count stitches carefully and ensure both eyes are positioned at the same round level with equal spacing between them.

Can I make the sweater removable?

The sweater pattern is designed to fit snugly, but you could modify it by adding more ease and creating proper closures like buttons or velcro for removability.

What's the best way to stuff the panda evenly?

Stuff gradually as you work, using small amounts of fiberfill at a time. Focus on firm stuffing in the body and head, but keep limb stuffing lighter for better joint movement if using jointed construction.