๐Ÿงถ Beautiful โœจ Detailed ๐Ÿ’ Adorable

Adorable Puppy Dog Friend Amigurumi Pattern

Adorable Puppy Dog Friend Amigurumi Pattern
4.1โ˜… Rating
3-4 Hours Time Needed
2.2K Made This
โœ‚๏ธ

Beginner Friendly Level

Perfect for those just starting their sewing journey, with clear instructions and simple techniques

โฑ๏ธ

Weekend Treat

Takes 5-7 hours, making it an enjoyable project to finish over a couple of days.

๐Ÿงธ

Cute Companion

An adorable friend to cherish, handcrafted with love to bring comfort and joy for years to come.

About This Adorable Puppy Dog Friend Amigurumi Pattern

This delightful Puppy Dog Friend pattern is the fourth version in the popular Foxy Friend series, specifically designed to resemble a golden Labrador Retriever. The pattern features an innovative muzzle construction that's made separately and then attached, creating realistic facial proportions. The puppy is designed with arms outstretched for hugs, making it especially endearing for children and dog lovers alike.

Adorable Puppy Dog Friend Amigurumi Pattern crochet pattern - detailed view of completed project

Written in UK crochet terminology with US translations provided, this compact 9cm pattern works up quickly using standard double crochet techniques. The designer encourages customization and provides helpful suggestions for variations.

Why You'll Love This Adorable Puppy Dog Friend Amigurumi Pattern

I absolutely adore how this little puppy captures the essence of a golden retriever's friendly nature! The hugging pose is simply irresistible - those outstretched paws just beg for snuggles. I love that the muzzle is constructed separately, which gives such realistic dimension to the face. The size is perfect for little hands, and the fact that it's part of a series means you can create a whole menagerie of friends. The designer's personal touch and encouragement to customize really makes this feel like a labor of love rather than just instructions.

Adorable Puppy Dog Friend Amigurumi Pattern step 1 - construction progress Adorable Puppy Dog Friend Amigurumi Pattern step 2 - assembly progress Adorable Puppy Dog Friend Amigurumi Pattern step 3 - details and accessories Adorable Puppy Dog Friend Amigurumi Pattern step 4 - final assembly and finishing

Switch Things Up

I love how versatile this little puppy pattern can be with just a few simple modifications! Try creating different dog breeds by changing colors - make a brown chocolate lab, a black lab, or even a white fluffy maltese. The ears could be made smaller and more pointed for a terrier look, or larger and floppier for a basset hound vibe.

For seasonal variations, I've added tiny crocheted accessories like a red scarf for winter or a small flower crown for spring. You could even create a whole litter by making multiple puppies in different colors representing various breeds.

The designer mentions this could easily become a standing puppy by repositioning the back paws to the bottom and adding a pipe cleaner to the tail for balance. I've also seen crafters make the front paws longer and less stuffed so they hang naturally at the sides, creating a more relaxed pose instead of the signature hugging position.

Common Mistakes & How to Fix Them

โœ— Making the muzzle too loose, causing stuffing to show through the stitches and distorting the shape โœ— Placing safety eyes too close together or at wrong height, disrupting the puppy's sweet expression โœ— Overstuffing the body, making the puppy too round to sit properly without falling over constantly โœ— Not leaving long enough tails for sewing pieces together, making assembly difficult and connections weak

Adorable Puppy Dog Friend Amigurumi Pattern

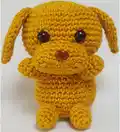
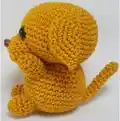
Create this charming golden retriever-inspired puppy that's reaching out for a hug! Part of the beloved Foxy Friend series, this pattern features a slightly more detailed muzzle shape while remaining beginner-friendly. At just 9cm tall, this cuddly companion is perfect for small hands and makes an ideal gift. The pattern includes clear instructions for creating realistic features including a shaped muzzle, floppy ears, and adorable paws positioned for maximum huggability.

Beginner Friendly 3-4 Hours

Materials Needed for Adorable Puppy Dog Friend Amigurumi Pattern

โ€” Main Fabric

  • 01
    1 ball of Catania yarn in gold (color 249 recommended) or chosen puppy color
  • 02
    Small amount of darker brown or pink yarn for embroidered nose (if not using safety nose)

โ€” Tools Required

  • 01
    2.5mm crochet hook
  • 02
    Large-eye needle for finishing ends and assembly
  • 03
    Stuffing
  • 04
    8mm or 9mm safety eyes (pair)
  • 05
    6mm or 7mm safety nose
  • 06
    Stitch markers (recommended for tracking rounds)
  • 07
    Scissors

Progress Tracker

0% Complete

โ€” Muzzle :

Info :

Make this first, you need it to help place the eyes when making the head.

Row 1 :

7ch, 2dc into 2nd ch from hook, dc in next 4 dc, 5 dc in last ch, working in the back loops of the chain, dc in each of the next 4 loops, 3dc in last loop. You now have 18 dc around an oval. Slip stitch into the first dc of the row to join the ring.

Row 2 :

2dc in the same place as the joining stitch, dc in each of next 6 dc, 2dc in next dc, dc in next dc, 2dc in next dc, dc in each of next 6 dc, 2dc in next dc, dc in next dc, join as before. (22 stitches)

Row 3 :

In the back loops of each stitch only, dc into each dc, join (22)

Row 4-5 :

dc into each dc (22)

Info :

Pull thread through, leaving a long end to sew the muzzle onto the head. Put the nose in the middle of one long side just above the edge formed by working into the back loops only. Stuff.

โ€” Head :

Row 1 :

6 dc into a magic ring.

Row 2 :

2dc into each dc (12 stitches)

Row 3 :

(1dc, 2dc in next dc) x 6 (18)

Row 4 :

(2 dc, 2dc in next dc) x 6 (24)

Row 5 :

(3 dc, 2dc in next dc) x 6 (30)

Row 6 :

(4 dc, 2dc in next dc) x 6 (36)

Row 7 :

(5 dc, 2dc in next dc) x 6 (42)

Row 8 :

(6 dc, 2dc in next dc) x 6 (48)

Rows 9-15 :

1dc in each dc to end (48) โ€“ that's 6 rows without shaping.

Row 16 :

(6 dc, dec) x 6 (42)

Row 17 :

(5 dc, dec) x 6 (36)

Row 18 :

(4 dc, dec) x 6 (30)

Row 19 :

(3 dc, dec) x 6 (24)

Row 20 :

(2 dc, dec) x 6 (18)

Info :

Place the muzzle so that it sits between row 12 and about row 18 and sew it in place. Put the safety eyes in just above and either side of it, between rows 11 and 12 about 5 stitches apart. Stuff the head.

Row 21 :

(1 dc, dec) x 6 (12)

Row 22 :

(dec) x 6 (6)

Info :

Cut yarn, leaving a long tail for sewing to the body.

โ€” Ears :

Info :

Make two.

Row 1 :

6 dc into a magic ring.

Row 2 :

2dc into each dc (12 stitches)

Row 3 :

(1dc, 2dc in next dc) x 6 (18)

Row 4 :

(2 dc, 2dc in next dc) x 6 (24)

Row 5 :

(3 dc, 2dc in next dc) x 6 (30)

Row 6 :

(4 dc, 2dc in next dc) x 3 โ€“ do not finish the row (33)

Info :

Leave a tail to sew on, make another one. Fold in half and stitch together so the ear is quite flat. Stitch to the head between about the 6th and 8th rows, just about half way back with the seam facing forwards.

โ€” Body :

Row 1 :

6 dc into a magic ring.

Row 2 :

2dc into each dc (12)

Row 3 :

(1dc, 2dc in next dc) x 6 (18)

Row 4 :

(2 dc, 2dc in next dc) x 6 (24)

Row 5 :

(3 dc, 2dc in next dc) x 6 (30)

Row 6 :

(4 dc, 2dc in next dc) x 6 (36)

Rows 7-12 :

dc into each dc (36) โ€“ that's 6 more rows straight.

Row 13 :

(4 dc, dec) x 6 (30)

Row 14 :

dc into each dc (30)

Row 15 :

(3 dc, dec) x 6 (24)

Row 16 :

dc into each dc (24)

Info :

Leave a long end, stuff and sew to the head around the 19th row. Don't overstuff, or the base will be too round for your puppy to sit neatly.

โ€” Tail :

Row 1 :

3 dc into a magic ring.

Rows 2 :

2dc in each dc (6 stitches).

Rows 3-11 :

dc into each dc (6 stitches) โ€“ that's 9 rows without shaping.

Info :

Leave an end for sewing. Flatten the very end where you finished, and stitch just that row to the back of the dog, around row 6 of the body.

โ€” Front Paws :

Row 1 :

6 dc into a magic ring.

Row 2 :

(1dc, 2dc in next dc) x 3 (9)

Rows 3-6 :

dc in each dc to end (9) โ€“ that's 4 rows.

Info :

Leave an end for sewing, make a second one, stitch to body either side of where the nose droops between about rows 12 and 15, 5 stitches visible between them.

โ€” Back Paws :

Row 1 :

6 dc into a magic ring.

Row 2 :

(1dc, 2dc in next dc) x 3 (9)

Rows 3-5 :

dc in each dc to end (9) โ€“ that's 3 rows.

Info :

Leave an end for sewing, make a second one, stitch them to the body between rows 4 and 7 right at the bottom of the front with only one stitch or so showing between them.

Assembly Instructions

  • Make and stuff the muzzle first, then attach safety nose to the middle of one long side
  • Create the head and place muzzle between rows 12-18, sewing securely in place
  • Install safety eyes just above and either side of muzzle, between rows 11-12, about 5 stitches apart
  • Stuff head firmly before closing, then attach to body around row 19
  • Create ears by folding in half and stitching flat, then attach between rows 6-8 with seam facing forward
  • Attach tail by flattening the end and sewing to back of body around row 6
  • Position front paws on either side of muzzle between rows 12-15 for hugging pose
  • Attach back paws at bottom front of body between rows 4-7, ensuring puppy can sit properly

Important Notes

  • ๐Ÿ’กThis pattern uses UK crochet terminology - US crocheters should use provided abbreviation translations
  • ๐Ÿ’กDon't overstuff the body or the puppy won't sit properly without falling over
  • ๐Ÿ’กWork in continuous spirals without joining, using stitch markers to track your position
  • ๐Ÿ’กThe muzzle construction is key to achieving realistic facial proportions
  • ๐Ÿ’กPattern encourages customization - adjust paw length, tail thickness, or positioning as desired

This adorable Puppy Dog Friend captures all the charm of a golden retriever in a perfectly huggable 9cm package! Part of the beloved Foxy Friend series, this pattern combines simple techniques with thoughtful construction details to create a companion that's reaching out for love. The separate muzzle construction and positioned paws give this little guy incredible personality and realistic proportions that will melt hearts instantly. Perfect for beginners ready to try slightly more detailed work! Happy crocheting!

You ask,

we answer.

FAQs

What's the difference between UK and US crochet terminology?

This pattern uses UK terms where 'dc' means double crochet, which is equivalent to 'sc' (single crochet) in US terminology. All UK terms are translated in the abbreviations section.

Can I make this puppy in different colors?

Absolutely! While designed for golden retriever coloring, you can use any color yarn to create different dog breeds or fantasy colors.

Why is the muzzle made separately?

Making the muzzle separately and attaching it creates much more realistic facial proportions and dimension than working it as part of the head.

How do I prevent my puppy from falling over?

Don't overstuff the body - it should be firm but not so round that it can't sit properly. The pattern also suggests positioning for balance.

Can I customize the paw positions?

Yes! The designer encourages experimentation. You can make paws longer, less stuffed for hanging at sides, or position them differently for standing instead of sitting.