๐Ÿงถ Beautiful โœจ Detailed ๐Ÿ’ Adorable

Adorable Stitch Amigurumi Pattern

Adorable Stitch Amigurumi Pattern
4.3โ˜… Rating
8-12 Hours Time Needed
2.3K Made This
โœ‚๏ธ

Intermediate Level

Ideal for those with basic knitting experience, featuring slightly more advanced stitches and techniques to expand your skills.

โฑ๏ธ

All-Day Adventure

Requires 8-10 hours, ideal for a full day of immersive knitting.

๐Ÿงธ

Cute Companion

An adorable friend to cherish, handcrafted with love to bring comfort and joy for years to come.

About This Adorable Stitch Amigurumi Pattern

This enchanting Stitch amigurumi pattern captures the beloved Disney character's mischievous charm and lovable personality. The design features intricate color work alternating between blue and powder blue yarns to create Stitch's distinctive appearance. Special attention is given to his iconic large ears with salmon pink inner details and his expressive eyes that bring the character to life. The pattern includes detailed assembly instructions to ensure your finished Stitch has the perfect proportions and authentic look that fans will instantly recognize.

Adorable Stitch Amigurumi Pattern crochet pattern - detailed view of completed project

Working with multiple yarn colors and creating the signature ear shape makes this an engaging intermediate project. The finished amigurumi stands as a perfect display piece or cuddly companion for Disney enthusiasts of all ages.

Why You'll Love This Adorable Stitch Amigurumi Pattern

I absolutely love how this pattern captures Stitch's playful spirit and brings such joy to anyone who sees the finished piece. The color-blocking technique creates that authentic Disney magic, and there's something so satisfying about watching those big ears take shape as you crochet. I find the assembly process particularly rewarding - seeing all the individual pieces come together to form that recognizable and beloved character never gets old. The pattern strikes the perfect balance between being challenging enough to keep you engaged while remaining achievable for intermediate crocheters.

Adorable Stitch Amigurumi Pattern step 1 - construction progress Adorable Stitch Amigurumi Pattern step 2 - assembly progress Adorable Stitch Amigurumi Pattern step 3 - details and accessories Adorable Stitch Amigurumi Pattern step 4 - final assembly and finishing

Switch Things Up

I love how versatile this Stitch pattern can be when you start experimenting with different approaches. Instead of the traditional blue color scheme, I've tried making him in sunset oranges and pinks for a tropical variant that still captures his Hawaiian spirit. You could easily adapt the ear size by adding or subtracting rounds to create a more compact version, or even make him extra large by doubling up on yarn weight. I find that changing the eye size dramatically affects his personality - smaller eyes make him look more mischievous while larger ones give him an innocent appearance.

The color-blocking technique in the body section opens up so many creative possibilities too. I've experimented with rainbow stripes, galaxy-themed colors with metallic accents, and even holiday versions using festive reds and greens. For those who want to skip the complex color changes, working the entire body in a single shade creates a cleaner, more minimalist look that's equally charming. You could also add texture by working some sections in different stitches like half double crochet or even incorporating bobble stitches for dimensional interest.

Common Mistakes & How to Fix Them

โœ— F โœ— o โœ— r โœ— g โœ— e โœ— t โœ— t โœ— i โœ— n โœ— g โœ— โœ— t โœ— o โœ— โœ— s โœ— t โœ— u โœ— f โœ— f โœ— โœ— b โœ— o โœ— d โœ— y โœ— โœ— p โœ— a โœ— r โœ— t โœ— s โœ— โœ— b โœ— e โœ— f โœ— o โœ— r โœ— e โœ— โœ— a โœ— s โœ— s โœ— e โœ— m โœ— b โœ— l โœ— y โœ— โœ— - โœ— โœ— a โœ— l โœ— w โœ— a โœ— y โœ— s โœ— โœ— s โœ— t โœ— u โœ— f โœ— f โœ— โœ— c โœ— o โœ— m โœ— p โœ— o โœ— n โœ— e โœ— n โœ— t โœ— s โœ— โœ— a โœ— s โœ— โœ— d โœ— i โœ— r โœ— e โœ— c โœ— t โœ— e โœ— d โœ— โœ— t โœ— o โœ— โœ— m โœ— a โœ— i โœ— n โœ— t โœ— a โœ— i โœ— n โœ— โœ— p โœ— r โœ— o โœ— p โœ— e โœ— r โœ— โœ— s โœ— h โœ— a โœ— p โœ— e โœ— โœ— a โœ— n โœ— d โœ— โœ— p โœ— r โœ— o โœ— p โœ— o โœ— r โœ— t โœ— i โœ— o โœ— n โœ— s โœ— โœ— t โœ— h โœ— r โœ— o โœ— u โœ— g โœ— h โœ— o โœ— u โœ— t โœ— โœ— c โœ— o โœ— n โœ— s โœ— t โœ— r โœ— u โœ— c โœ— t โœ— i โœ— o โœ— n โœ— . โœ— โœ— I โœ— n โœ— c โœ— o โœ— n โœ— s โœ— i โœ— s โœ— t โœ— e โœ— n โœ— t โœ— โœ— t โœ— e โœ— n โœ— s โœ— i โœ— o โœ— n โœ— โœ— w โœ— h โœ— e โœ— n โœ— โœ— w โœ— o โœ— r โœ— k โœ— i โœ— n โœ— g โœ— โœ— c โœ— o โœ— l โœ— o โœ— r โœ— โœ— c โœ— h โœ— a โœ— n โœ— g โœ— e โœ— s โœ— โœ— - โœ— โœ— m โœ— a โœ— i โœ— n โœ— t โœ— a โœ— i โœ— n โœ— โœ— e โœ— v โœ— e โœ— n โœ— โœ— t โœ— e โœ— n โœ— s โœ— i โœ— o โœ— n โœ— โœ— t โœ— o โœ— โœ— p โœ— r โœ— e โœ— v โœ— e โœ— n โœ— t โœ— โœ— p โœ— u โœ— c โœ— k โœ— e โœ— r โœ— i โœ— n โœ— g โœ— โœ— o โœ— r โœ— โœ— g โœ— a โœ— p โœ— s โœ— โœ— w โœ— h โœ— e โœ— r โœ— e โœ— โœ— b โœ— l โœ— u โœ— e โœ— โœ— a โœ— n โœ— d โœ— โœ— p โœ— o โœ— w โœ— d โœ— e โœ— r โœ— โœ— b โœ— l โœ— u โœ— e โœ— โœ— s โœ— e โœ— c โœ— t โœ— i โœ— o โœ— n โœ— s โœ— โœ— m โœ— e โœ— e โœ— t โœ— . โœ— โœ— I โœ— n โœ— c โœ— o โœ— r โœ— r โœ— e โœ— c โœ— t โœ— l โœ— y โœ— โœ— p โœ— o โœ— s โœ— i โœ— t โœ— i โœ— o โœ— n โœ— i โœ— n โœ— g โœ— โœ— t โœ— h โœ— e โœ— โœ— l โœ— a โœ— r โœ— g โœ— e โœ— โœ— e โœ— a โœ— r โœ— s โœ— โœ— - โœ— โœ— e โœ— n โœ— s โœ— u โœ— r โœ— e โœ— โœ— e โœ— a โœ— r โœ— s โœ— โœ— a โœ— r โœ— e โœ— โœ— s โœ— y โœ— m โœ— m โœ— e โœ— t โœ— r โœ— i โœ— c โœ— a โœ— l โœ— l โœ— y โœ— โœ— p โœ— l โœ— a โœ— c โœ— e โœ— d โœ— โœ— a โœ— n โœ— d โœ— โœ— a โœ— n โœ— g โœ— l โœ— e โœ— d โœ— โœ— c โœ— o โœ— r โœ— r โœ— e โœ— c โœ— t โœ— l โœ— y โœ— โœ— t โœ— o โœ— โœ— a โœ— c โœ— h โœ— i โœ— e โœ— v โœ— e โœ— โœ— S โœ— t โœ— i โœ— t โœ— c โœ— h โœ— ' โœ— s โœ— โœ— c โœ— h โœ— a โœ— r โœ— a โœ— c โœ— t โœ— e โœ— r โœ— i โœ— s โœ— t โœ— i โœ— c โœ— โœ— a โœ— p โœ— p โœ— e โœ— a โœ— r โœ— a โœ— n โœ— c โœ— e โœ— โœ— a โœ— n โœ— d โœ— โœ— e โœ— x โœ— p โœ— r โœ— e โœ— s โœ— s โœ— i โœ— o โœ— n โœ— . โœ— โœ— O โœ— v โœ— e โœ— r โœ— s โœ— t โœ— u โœ— f โœ— f โœ— i โœ— n โœ— g โœ— โœ— l โœ— i โœ— m โœ— b โœ— s โœ— โœ— a โœ— n โœ— d โœ— โœ— e โœ— x โœ— t โœ— r โœ— e โœ— m โœ— i โœ— t โœ— i โœ— e โœ— s โœ— โœ— - โœ— โœ— s โœ— t โœ— u โœ— f โœ— f โœ— โœ— a โœ— r โœ— m โœ— s โœ— , โœ— โœ— l โœ— e โœ— g โœ— s โœ— , โœ— โœ— a โœ— n โœ— d โœ— โœ— t โœ— a โœ— i โœ— l โœ— โœ— f โœ— i โœ— r โœ— m โœ— l โœ— y โœ— โœ— b โœ— u โœ— t โœ— โœ— n โœ— o โœ— t โœ— โœ— t โœ— o โœ— o โœ— โœ— t โœ— i โœ— g โœ— h โœ— t โœ— l โœ— y โœ— โœ— t โœ— o โœ— โœ— a โœ— l โœ— l โœ— o โœ— w โœ— โœ— f โœ— o โœ— r โœ— โœ— p โœ— r โœ— o โœ— p โœ— e โœ— r โœ— โœ— p โœ— o โœ— s โœ— i โœ— t โœ— i โœ— o โœ— n โœ— i โœ— n โœ— g โœ— โœ— d โœ— u โœ— r โœ— i โœ— n โœ— g โœ— โœ— f โœ— i โœ— n โœ— a โœ— l โœ— โœ— a โœ— s โœ— s โœ— e โœ— m โœ— b โœ— l โœ— y โœ— .

Adorable Stitch Amigurumi Pattern

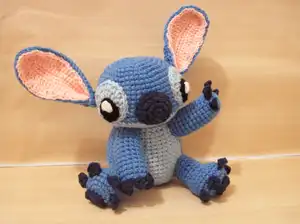
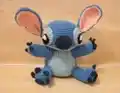
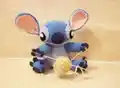
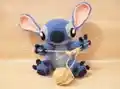
Create your own lovable blue alien companion with this detailed Stitch amigurumi pattern! This charming Disney-inspired character features his signature big ears, expressive eyes, and adorable personality captured in soft yarn. Perfect for Disney fans and crochet enthusiasts who want to bring the magic of Lilo & Stitch into their crafting world. The pattern includes step-by-step instructions for creating Stitch's distinctive features including his large ears, expressive face, and characteristic blue coloring with powder blue accents.

Intermediate 8-12 Hours

Materials Needed for Adorable Stitch Amigurumi Pattern

โ€” Main Fabric

  • 01
    4 ply Monaco Acrylic yarn in blue, powder blue, salmon pink, black colors
  • 02
    Lion Brand wool ease in navy blue
  • 03
    White yarn for eye highlights

โ€” Tools Required

  • 01
    Crochet hook size G
  • 02
    Tapestry needle
  • 03
    Fiberfill stuffing
  • 04
    Scissors
  • 05
    Stitch markers

Progress Tracker

0% Complete

โ€” Head :

Round 1 :

Ch2, 7 sc in 2nd chain from hook [7]

Round 2 :

2 sc in each st around [14]

Round 3 :

Sc in next st, 2 sc in st after, repeat til end [21]

Round 4 :

Sc in each of the next 2 sts, 2scs in st after, repeat til end [28]

Round 5 :

Sc in each of the next 3 sts, 2scs in st after, repeat til end [35]

Round 6 :

Sc in each of the next 4 sts, 2scs in st after, repeat til end [42]

Round 7 :

Sc in each of the next 5 sts, 2scs in st after, repeat til end [49]

Round 8-13 :

Sc all around [49]

Round 14 :

Sc in each of the next 6 sts, 2scs in st after, repeat til end [56]

Round 15 :

Sc in each of the next 13 sts, 2scs in st after, repeat til end [60]

Round 16 :

Sc all around [60]

Round 17 :

Using POWDER BLUE: Sc in each of the next 13 sts, sc2tog, repeat til end [56]

Round 18 :

Sc in each of the next 5 sts, sc2tog, repeat til end [48]

Round 19 :

Sc in each of the next 4 sts, sc2tog, repeat til end [40]

Round 20 :

Sc in each of the next 3 sts, sc2tog, repeat til end [32]

Round 21 :

Sc in each of the next 2 sts, sc2tog, repeat til end [24]

Round 22 :

Sc in each of the next 2 sts, sc2tog, repeat til end [18]

Info :

Fasten off. Do not weave in the ends

โ€” Eyes :

Powder Blue Part - Round 1 :

Ch 2, 8 sc in 2nd ch from hook [8]

Round 2 :

2sc in each of the next 2 sts, 2hdc in each of the next 4 sts, 2 sc in each of the remaining 2 sts [16]

Round 3 :

*Sc in next st, 2sc in st after* repeat 2x; *hdc in next st, 2hdc in st after* repeat 4x; *Sc in next st, 2sc in st after* repeat 2x [24]

Info :

Fasten off leaving a long tail for sewing

Black Part - Round 1 :

Ch 2, 5 sc in 2nd ch from hook [5]

Round 2 :

2sc in each of the next 2 sts, 2hdc in next st, 2sc in each of the remaining 2 sts [10]

Info :

Fasten off leaving a long tail for sewing

White Part - Round 1 :

Ch 2, 4 sc in 2nd ch from hook [4]

Info :

Fasten off leaving a long tail for sewing

โ€” Nose :

Round 1 :

Using NAVY BLUE: Ch2, 6 sc in 2nd chain from hook [6]

Round 2 :

2 sc in each st around [12]

Round 3 :

Sc in next st, 2 sc in st after, repeat til end [18]

Round 4 :

Sc all around [18]

Info :

Fasten off leaving a long tail for sewing

โ€” Ears :

Inner Ear (Salmon Pink) - Round 1 :

Ch 21, sc in 2nd ch from hook until the end [20sc], flip to face opposite side and sc all around [20 sc] [total: 40]

Round 2 :

Sc in each of the next 12 sts, hdc in each of the next 6 sts, 2hdc in each of the next 4 sts, hdc in each of the next 6 sts, sc in each of the last remaining 12 sts [44]

Round 3 :

Hdc in each of the next 10 sts, Dc in each of the next 10 sts, 2dc in each of the next 4 sts, dc in each of the next 10 sts, hdc in each of the remaining 10 sts [48]

Round 4-5 :

Sc all around [48]

Info :

Fasten off leaving a really long tail for sewing

Outer Ear (Blue) - Round 1 :

Ch 21, sc in 2nd ch from hook until the end [20sc], flip to face opposite side and sc all around [20 sc] [total: 40]

Round 2 :

Hdc in each of the next 12 sts, dc in each of the next 6 sts, 2dc in each of the next 4 sts, dc in each of the next 6 sts, hdc in each of the last remaining 12 sts [44]

Round 3 :

Hdc in each of the next 10 sts, Dc in each of the next 10 sts, 2dc in each of the next 4 sts, dc in each of the next 10 sts, hdc in each of the remaining 10 sts [48]

Info :

Fasten off hiding all ends

โ€” Body :

Round 1 :

Using BLUE: Ch2, 6 sc in 2nd chain from hook [6]

Round 2 :

Sc in next st, 2 sc in st after, repeat til end [9]

Round 3 :

2 sc in each st around [18]

Round 4 :

Sc in the next st, 2scs in st after, repeat til end [27]

Round 5 :

Sc in each of the next 2 sts, 2scs in st after, repeat til end [36]

Round 6 :

Sc in each of the next 3 sts, 2scs in st after, repeat til end [45]

Round 7 :

Sc in each of the next 4 sts, 2scs in st after, repeat til end [54]

Round 8-12 :

Using BLUE: Sc in each of the next 18 sts; Using POWDER BLUE: Sc in each of the next 18 sts; Using BLUE: Sc in each of the next 18 sts [54]

Info :

Note: Color blocking may need adjustment - alternate as needed moving 1sc to the right for each color section

โ€” Arms :

Round 1 :

Using BLUE: Ch2, 5 sc in 2nd chain from hook [5]

Round 2 :

2 sc in each st around [10]

Round 3 :

Sc in next st, 2 sc in st after, repeat til end [15]

Round 4-15 :

Sc all around [15]

Info :

Fasten off leaving a long tail for sewing

โ€” Fingers :

Make 4 :

Using NAVY BLUE: Ch 4, sc in 2nd ch from hook until end [3sc]

Info :

Fasten off leaving a tail for sewing

โ€” Legs :

Round 1 :

Using BLUE: Ch2, 6 sc in 2nd chain from hook [6]

Round 2 :

2 sc in each st around [12]

Round 3 :

Sc in next st, 2 sc in st after, repeat til end [18]

Round 4 :

Sc in each of the next 2 sts, 2scs in st after, repeat til end [24]

Round 5-6 :

Sc all around [24]

Round 10 :

Through front loops, sc in each of the next 6 sts; through back loops, sc in each of the next 3 sts; through front loops again, sc in each of the remaining 6 sts [15]

Round 11-15 :

Sc all around [15]

Info :

Fasten off leaving a long tail for sewing

โ€” Toes and Palm :

Toes (Make 4) :

Using NAVY BLUE: Ch2, 5 sc in 2nd chain from hook [5]

Palm - Round 1 :

Ch2, 5 sc in 2nd chain from hook [5]

Round 2 :

2 sc in each st around [10]

Info :

Fasten off leaving a long tail for sewing

โ€” Tail :

Round 1 :

Using BLUE: Ch2, 5 sc in 2nd chain from hook [5]

Round 2 :

2 sc in each st around [10]

Round 3 :

Sc in next st, 2 sc in st after, repeat til end [15]

Round 4 :

Sc in each of the next 2 sts, 2scs in st after, repeat til end [20]

Round 5 :

Sc all around [20]

Info :

Fasten off leaving a long tail for sewing

Assembly Instructions

  • Sew fingers to the tip of each arm, making sure you only sew the tip portion of the fingers for proper attachment.
  • Attach the palm pieces to the bottom of each leg using the yarn tail from the palm pieces.
  • Sew the tip of each toe (bottom of the circle) to the legs, ensuring proper proportion with the leg's palm.
  • Assemble the eyes by sewing white part to black, then black part to blue (position toward bottom, don't cover hdc area).
  • Sew inner ear to outer ear using the outer ear's tail, keeping excess tail for attaching to head.
  • Attach completed ears to head using the excess tail from the ear assembly process.
  • Stuff the head partially, then sew on the left eye first, ensuring proper proportion with ears and nose placement.

Important Notes

  • ๐Ÿ’กDo not weave in yarn ends until final assembly - many tails are needed for sewing components together
  • ๐Ÿ’กMaintain consistent tension during color changes to prevent gaps or puckering in the striped body sections
  • ๐Ÿ’กStuff all components firmly but not too tightly to allow for proper positioning during final assembly
  • ๐Ÿ’กPay special attention to ear positioning - they should be symmetrical and angled correctly for authentic appearance
  • ๐Ÿ’กWhen working the color-blocked body sections, adjust the pattern as needed to maintain clean color transitions

This adorable Stitch amigurumi pattern brings Disney's beloved blue alien to life in cuddly yarn form! The design captures all of Stitch's iconic features from his oversized ears to his mischievous expression. Perfect for Disney fans and anyone who loves creating character amigurumi, this pattern combines intermediate techniques with clear instructions to help you craft your own huggable Experiment 626. The finished piece makes a wonderful display item or cherished companion for Disney enthusiasts of all ages.

You ask,

we answer.

FAQs

What size will the finished Stitch amigurumi be?

The finished Stitch will be approximately 8-10 inches tall when worked with the specified yarn weight and hook size, making it the perfect cuddly size.

Can I use different colors than specified in the pattern?

Yes! While the pattern calls for blue and powder blue to match Stitch's authentic colors, you can experiment with other color combinations to create your own unique version.

How difficult is the color-changing technique in the body?

The color changes require some intermediate skill but the pattern provides detailed notes about adjusting the color blocking if it doesn't work out perfectly - don't worry about making it exactly perfect!

Do I need to stuff the amigurumi firmly?

Yes, but avoid overstuffing. The pattern specifically notes to stuff firmly but not too tightly, especially for the limbs, to maintain proper shape and allow for positioning.

What's the most challenging part of this pattern?

The large ears are probably the most complex component, requiring working around a foundation chain and shaping. Take your time with the assembly to ensure they're positioned symmetrically.