๐Ÿงถ Beautiful โœจ Detailed ๐Ÿ’ Adorable

Any-Size Square Container Crochet Pattern

Any-Size Square Container Crochet Pattern
4.3โ˜… Rating
2-4 Hours Time Needed
3.4K Made This
โœ‚๏ธ

Beginner Friendly Level

Perfect for those just starting their sewing journey, with clear instructions and simple techniques

โฑ๏ธ

Weekend Treat

Takes 5-7 hours, making it an enjoyable project to finish over a couple of days.

๐Ÿก

Cozy Accent

A warm touch for your space that transforms ordinary corners into inviting nooks filled with handmade charm.

About This Any-Size Square Container Crochet Pattern

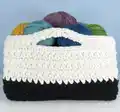
This ingenious square container pattern offers endless possibilities for customization. Starting with a simple magic loop base, you'll work in rounds to create a sturdy foundation that can be made in any size you need. The pattern includes optional handles and color-changing techniques to create stunning two-tone effects. What makes this pattern special is its adaptability - you can make tiny desk organizers or large storage baskets using the same basic technique.

Any-Size Square Container Crochet Pattern crochet pattern - detailed view of completed project

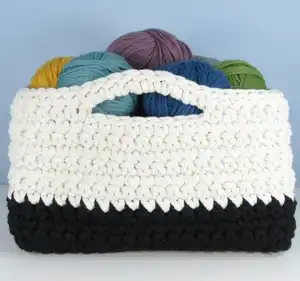
The dense stitch construction ensures your containers maintain their shape even when filled with heavy items. The optional handles make these containers both functional and portable, perfect for organizing any room in your home.

Why You'll Love This Any-Size Square Container Crochet Pattern

I absolutely love how this pattern grows with your skills and needs. Whether you're a complete beginner looking for a confidence-building project or an experienced crocheter wanting to use up yarn scraps, this pattern delivers every time. The satisfaction of creating custom storage solutions that perfectly fit your space is unmatched, and the ability to change colors creates endless design possibilities.

Any-Size Square Container Crochet Pattern step 1 - construction progress Any-Size Square Container Crochet Pattern step 2 - assembly progress Any-Size Square Container Crochet Pattern step 3 - details and accessories Any-Size Square Container Crochet Pattern step 4 - final assembly and finishing

Switch Things Up

I love experimenting with this pattern because it's such a perfect canvas for creativity. Try making a rainbow gradient by changing colors every few rounds, or create elegant monochrome versions using different textures of the same color yarn. For a modern touch, I often make the base in one color and the sides in another, creating a striking two-tone effect.

Consider making matching sets in different sizes - small ones for desk organization, medium for bathroom storage, and large ones for toy collection. You can even add a fabric liner for a more polished look, or work with metallic yarns for special occasion storage. The possibilities are truly endless with this adaptable design.

Common Mistakes & How to Fix Them

โœ— Using a hook that's too large will create loose stitches that won't hold the container's shape properly โœ— Forgetting to move stitch markers up each round can lead to confusion about corner placement โœ— Not maintaining consistent tension throughout the project will result in uneven sides and wobbly containers โœ— Skipping the gauge check can result in containers that are either too floppy or too stiff for practical use

Any-Size Square Container Crochet Pattern

Transform your yarn stash into beautiful, functional storage with this versatile square container pattern. Perfect for organizing your craft room, storing toys, or creating custom home decor pieces. This beginner-friendly design lets you customize the size, height, and colors to match your exact needs. The sturdy construction using dense stitches ensures your containers will hold their shape while adding a handmade touch to any space.

Beginner Friendly 2-4 Hours

Materials Needed for Any-Size Square Container Crochet Pattern

โ€” Main Fabric

  • 01
    Thick yarn (aran weight or thicker) in non-stretchy fibers such as cotton, raffia, or jute
  • 02
    Bobbiny 5mm recycled cotton cord in Black and Natural (as shown in pattern example)
  • 03
    Any sturdy yarn suitable for home decor projects

โ€” Tools Required

  • 01
    Crochet hook size 8mm (US L/11) or smallest comfortable size for chosen yarn
  • 02
    Stitch markers
  • 03
    Tapestry needle for yarn ends
  • 04
    Glue for thick cord ends
  • 05
    Fabric stiffener (optional)

Progress Tracker

0% Complete

โ€” Base :

Round 1 :

[sc, ch 2] 4 times into a magic loop. Join.

Round 2 :

ch 1 and turn, sc into every sc and CR into every ch-2 sp. Join.

Info :

Repeat round 2 until the base is the size you want (e.g. total of 9 rounds)

โ€” Sides :

Round A :

ch 1 and turn, sc in every sc and 2 sc in every ch-2 sp, placing a st marker between the 2 sc at each corner. Join.

Info :

Move the markers up on each round - they mark where each side starts/ends

Round B :

ch 1 and turn, sc in every sc. Join.

Info :

Repeat round B until the container is the height you want before the handles begin (e.g. repeat 9 times, changing colour after the 2nd repeat)

Info :

The last round will be on the outside of the container, so if it's currently on the inside turn the container inside out now

โ€” Handles :

Setup :

Count how many sts you have on each side. Each handle should be about half the width of one side, and you need to have the same number of sts to the left and right of it

Handle Creation :

Ch 1 and turn, sc in every sc until you reach the first marker. Handle side: sc the number of sts to the right of the handle, ch the number of sts for the handle and skip the same number of sc, then sc the number of sts to the left of the handle

Completion :

Sc in each sc along the next side. Repeat the handle side. Sc in every sc until the end of the round. Join.

Final Round :

Ch 1 and turn, sc in every sc and, in the space created by each handle, sc the same number of sts as there are ch in the handle. Join then fasten off.

Assembly Instructions

  • Weave in all yarn ends securely on the inside of the container using a tapestry needle
  • If using thick cord that cannot be sewn, use fabric glue to secure ends neatly on the inside
  • For extra stiffness, apply fabric stiffener to the inside and/or outside of the container
  • Allow fabric stiffener to dry completely before using the container
  • Turn the container right side out if needed after completing the final round

Important Notes

  • ๐Ÿ’กUse the smallest hook possible with your yarn for maximum density and structure
  • ๐Ÿ’กMaintain consistent tension throughout to ensure even sides and proper shape
  • ๐Ÿ’กMove stitch markers up each round to keep track of corner positions accurately
  • ๐Ÿ’กThe gauge is not critical, but stitches should be dense enough for a sturdy container
  • ๐Ÿ’กColor changes are optional and should be done at the slip stitch join at round end

This versatile square container pattern is your gateway to organized living with handmade style. Whether you're storing craft supplies, organizing toys, or creating beautiful home decor, this adaptable design grows with your needs. The simple construction makes it perfect for beginners, while the customization options keep experienced crocheters engaged. Transform any space with these functional, beautiful containers that showcase your personal style.

You ask,

we answer.

FAQs

Can I make this container without handles?

Yes! Simply continue with Round B pattern until you reach your desired height, then fasten off. The handles are completely optional.

What if I don't know how to make a magic loop?

No problem! Chain 4, join with a slip stitch into the first chain, chain 1, then work round 1 into this loop instead of a magic loop.

How do I make my container stiffer?

Use a smaller hook than recommended for your yarn, maintain tight tension, and consider applying fabric stiffener after completion.

Can I use different yarn weights?

Yes, but thicker yarns (aran weight or heavier) work best for structural integrity. Adjust your hook size accordingly.

How do I calculate the right handle size?

Make each handle about half the width of one side, ensuring equal stitches on both sides of the handle for symmetry.