🧢 Beautiful ✨ Detailed πŸ’ Adorable

Autumn Maple Leaf Crochet Table Runner Pattern

Autumn Maple Leaf Crochet Table Runner Pattern
4.3β˜… Rating
10-12 Hours Time Needed
2.9K Made This
βœ‚οΈ

Intermediate Level

Ideal for those with basic knitting experience, featuring slightly more advanced stitches and techniques to expand your skills.

⏱️

Slow & Steady

A 10-12 hour projectβ€”great for savoring the process over several sessions.

🍁

Autumn Vibes

Earthy tones with cozy textures inspired by falling leaves and the rich, warm colors of harvest season.

About This Autumn Maple Leaf Crochet Table Runner Pattern

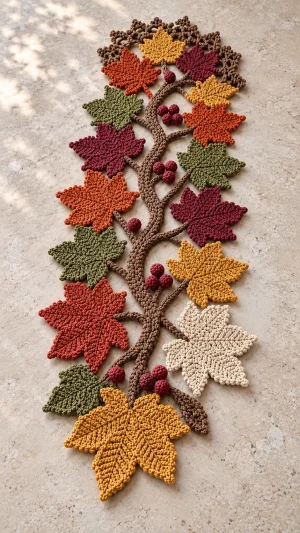
This autumn table runner combines sixteen separate maple-inspired leaves with a brown braided vine, short connecting branches, and eighteen small burgundy berries. Each leaf begins with a circular center, followed by five lobes worked back and forth; pointed edging and embroidered veins give the surface its woodland character. Smooth cotton helps the leaf outlines stay clear and makes the separate components easier to block before assembly, while the braided center supplies a substantial visual anchor. You will use basic stitches, decreases, small rounds, surface embroidery, and careful sewing, with most of the shaping concentrated in the leaf lobes.

Autumn Maple Leaf Crochet Table Runner Pattern crochet pattern - detailed view of completed project

The photograph shows an open arrangement with alternating leaves, visible tabletop between branches, and a cream leaf among the warmer colors. I have translated those features into an original modular construction, so you can adjust the spacing after measuring your own leaves rather than relying on a fixed finished length.

Why You'll Love This Autumn Maple Leaf Crochet Table Runner Pattern

I love how this project lets a handful of autumn colors do most of the decorative work: mustard, rust, olive, burgundy, and cream create interest before the first berry is attached. I also like the manageable rhythm of making one leaf at a time, because each completed motif gives you a useful stopping point without leaving a large piece on the hook. The assembly needs patience, especially where narrow branches meet the leaves, but laying everything out first makes those decisions easier to see. You can spread the motifs along a dining table, bring them closer together for a sideboard, or shorten the arrangement for a small seasonal display. For me, the raised veins and gently curving vine are the details that make the finished runner feel thoughtfully handmade.

Autumn Maple Leaf Crochet Table Runner Pattern step 1 - construction progress Autumn Maple Leaf Crochet Table Runner Pattern step 2 - assembly progress Autumn Maple Leaf Crochet Table Runner Pattern step 3 - details and accessories Autumn Maple Leaf Crochet Table Runner Pattern step 4 - final assembly and finishing

Switch Things Up

I would begin a color variation by keeping the brown vine and changing the leaf palette, because that familiar branch color helps even an unusual combination read as autumn foliage. For a quieter arrangement, I would use oatmeal, ochre, faded olive, and one deep burgundy accent, distributing the darkest leaves along the length instead of gathering them at one end. If I wanted a stronger harvest look, I would replace the cream leaf with copper and keep the four mustard leaves spaced apart so their brightness leads the eye through the runner. I would use yarns of the same weight and similar construction throughout, since a noticeably thicker replacement can change both the leaf size and the balance of the sewn joins.

For a shorter table, I would make ten or twelve leaves and shorten the three vine cords equally, arranging the finished motifs before deciding how much branch length to retain. For a longer display, I would add leaves in pairs and extend all three cords by the same number of foundation chains, preserving the five-lobe construction of every motif. I would also vary the angle of the leaves slightly, turning some toward the vine and others outward, while keeping their bases close enough to support secure branch attachments.

If I wanted a flatter centerpiece, I would omit the stuffing from the berries and flatten each closed berry before sewing it down with several stitches around its underside. For more visible veins, I would embroider with a neighboring shade rather than a sharply contrasting color, taking short stitches that follow the center of each lobe without pulling the fabric inward. I would finish any version by checking it on the intended table, adjusting the spaces around serving pieces, and blocking the leaves individually before committing to the final layout.

Common Mistakes & How to Fix Them

βœ— Lobes land in the wrong places when the center stitches are divided unevenly. Mark six groups of five stitches after Center Round 3, reserve the final group for the base, and check each lobe occupies exactly one marked group.βœ— A lobe becomes wider than its partner when turning chains are counted as stitches. Keep every turning chain outside the stitch count, mark the first actual stitch, and count across the row before starting the next decrease.βœ— Leaf tips look blunt when the final three-stitch decrease is replaced with an ordinary decrease. Work sc3tog through all three remaining stitches, then check that the lobe ends in one stitch before fastening off.βœ— The leaf cups when edging stitches are pulled too tightly or too many stitches enter a valley. Work loosely, use only the specified slip stitch at each junction, and lay the motif flat frequently to check its outline.βœ— Raised veins can gather the leaf when embroidery stitches are tightened aggressively. Leave each stitch resting on the surface, smooth the lobe after every few stitches, and loosen any vein that pulls its tip toward the center.βœ— The central vine twists when its three cords differ in length or the braid is excessively tight. Make matching cords, braid with relaxed tension, and check the completed vine lies flat before securing its ends.βœ— Branches detach or rotate when joined with a single stitch. Sew each end across several neighboring stitches, reinforce the underside, and gently move the attached leaf to check that its base remains stable.βœ— Berries distort the open spaces when they are overfilled or sewn onto unsupported chains. Add only a tiny amount of stuffing, attach berry stems to the braided vine, and check that each cluster rests comfortably on the table.

Autumn Maple Leaf Crochet Table Runner Pattern

Bring autumn color to your table with maple leaves, winding brown branches, and little burgundy berries. You will crochet the leaves separately, add raised veins, and arrange them around a braided vine before sewing everything together. This original Hook Vibes pattern takes inspiration from the photographed runner, giving you manageable pieces to make gradually and a flexible layout to suit your table.

Intermediate 10-12 Hours

Materials Needed for Autumn Maple Leaf Crochet Table Runner Pattern

β€” Main Fabric

  • 01
    Smooth DK-weight cotton yarn in brown for the braided vine, branches, and decorative top arch; allow approximately 100-150 g.
  • 02
    DK-weight cotton yarn in mustard for 4 leaves; allow approximately 75-100 g.
  • 03
    DK-weight cotton yarn in rust or burnt orange for 4 leaves; allow approximately 75-100 g.
  • 04
    DK-weight cotton yarn in olive green for 4 leaves; allow approximately 75-100 g.
  • 05
    DK-weight cotton yarn in burgundy for 3 leaves and 18 berries; allow approximately 75-100 g.
  • 06
    DK-weight cotton yarn in cream for 1 leaf; allow approximately 25 g.
  • 07
    Small quantity of polyester fiberfill for optional light berry stuffing.
  • 08
    Yarn quantities are planning allowances; actual use depends on yarn, tension, embroidery, and chosen spacing.

β€” Tools Required

  • 01
    3.5 mm crochet hook, or a size that produces firm but flexible fabric with your yarn.
  • 02
    Tapestry needle for embroidery, assembly, and weaving in ends.
  • 03
    Scissors.
  • 04
    Stitch markers for dividing leaf centers and marking berry rounds.
  • 05
    Measuring tape.
  • 06
    Blocking mat or a towel-covered flat surface.
  • 07
    Rustproof blocking pins.
  • 08
    Sewing clips or spare yarn ties for temporarily securing the layout.

Progress Tracker

0% Complete

β€” Before You Begin :

Design Note :

This is an original pattern inspired by the photographed autumn runner. It uses separate five-lobed leaves, embroidered veins, a braided vine, branches, berries, and a pointed top arch.

Leaf Quantity :

Make 16 leaves: 4 mustard, 4 rust, 4 olive, 3 burgundy, and 1 cream. Every leaf uses the same instructions.

Tension and Size :

Use a hook that makes firm, flexible fabric without large gaps. Make and block one complete leaf before continuing. Measure that leaf and use it to plan the runner width and spacing; a fixed finished measurement is not specified.

Turning Note :

For every lobe, ch 1 before turning to the next row. This chain does not count as a stitch. Do not turn after the final row of a lobe.

β€” Leaf Center: Repeat for Every Leaf :

Round 1 :

Work 10 sc in an MR. Tighten the ring and join with a sl st to the first sc. (10)

Round 2 :

Ch 1. Work 2 sc in each stitch around. Join with a sl st to the first sc. (20)

Round 3 :

Ch 1. Repeat (1 sc, inc) 10 times. Join with a sl st to the first sc. Fasten off. (30)

Mark the Sections :

With the RS facing, number the Round 3 stitches 1-30 in the direction of work. Mark six consecutive groups of 5 stitches: A = 1-5, B = 6-10, C = 11-15, D = 16-20, E = 21-25, and F = 26-30. Groups A and E form the small outer lobes, B and D form the side lobes, C forms the long central lobe, and F remains unworked as the leaf base.

β€” Small Outer Lobes: Work Once on Group A and Once on Group E :

Row 1 :

With the RS facing, join matching yarn with a sl st in the first stitch of the selected group. Ch 1, sc in the same stitch and in the next 4 stitches of that group. Ch 1 and turn. (5)

Row 2 :

Inc in the first stitch, sc in the next 3 stitches, inc in the last stitch. Ch 1 and turn. (7)

Row 3 :

Sc2tog, sc in the next 3 stitches, sc2tog. Ch 1 and turn. (5)

Row 4 :

Sc2tog, sc in the next stitch, sc2tog. Ch 1 and turn. (3)

Row 5 :

Sc3tog. Fasten off. (1)

β€” Side Lobes: Work Once on Group B and Once on Group D :

Row 1 :

With the RS facing, join matching yarn with a sl st in the first stitch of the selected group. Ch 1, sc in the same stitch and in the next 4 stitches of that group. Ch 1 and turn. (5)

Row 2 :

Inc in the first stitch, sc in the next 3 stitches, inc in the last stitch. Ch 1 and turn. (7)

Row 3 :

Sc in each stitch across. Ch 1 and turn. (7)

Row 4 :

Sc2tog, sc in the next 3 stitches, sc2tog. Ch 1 and turn. (5)

Row 5 :

Sc in each stitch across. Ch 1 and turn. (5)

Row 6 :

Sc2tog, sc in the next stitch, sc2tog. Ch 1 and turn. (3)

Row 7 :

Sc3tog. Fasten off. (1)

β€” Central Lobe: Work on Group C :

Row 1 :

With the RS facing, join matching yarn with a sl st in stitch 11 of the center. Ch 1, sc in the same stitch and in the next 4 stitches. Ch 1 and turn. (5)

Row 2 :

Inc in the first stitch, sc in the next 3 stitches, inc in the last stitch. Ch 1 and turn. (7)

Row 3 :

Sc in each stitch across. Ch 1 and turn. (7)

Row 4 :

Sc in each stitch across. Ch 1 and turn. (7)

Row 5 :

Sc2tog, sc in the next 3 stitches, sc2tog. Ch 1 and turn. (5)

Row 6 :

Sc in each stitch across. Ch 1 and turn. (5)

Row 7 :

Sc2tog, sc in the next stitch, sc2tog. Ch 1 and turn. (3)

Row 8 :

Sc in each stitch across. Ch 1 and turn. (3)

Row 9 :

Sc3tog. Fasten off. (1)

β€” Leaf Edging and Veins :

Edging Round 1 :

With the RS facing, join matching yarn in center stitch 26. Ch 1 and sc in stitches 26-30. Continue around the exposed leaf outline, working 1 sc in each lobe row end. At the single stitch forming each lobe tip, work (sc, picot, sc). Between neighboring lobes, work 1 sl st into the junction of their bases without adding another stitch there. On each lobe side, add a picot after every second row-end sc, counting afresh from each tip or valley; omit a side picot if it would touch a tip picot or valley. Join to the first sc and fasten off. Edging totals vary with the row-end placement; keep the outline flat and symmetrical.

Central Vein :

Thread matching yarn onto a tapestry needle. Work a line of short chain stitches on the RS from the middle of the five-stitch base, through the center disk, to just below the central tip. For each chain stitch, bring the needle up, insert it back beside the exit point, and bring it up a short distance ahead inside the yarn loop. Keep the loops relaxed and secure the final loop with a small anchoring stitch.

Side Veins :

Embroider four shorter chain-stitch veins from the center disk toward the other four lobe tips. End each vein below the edging. Add two short straight stitches on each side of each main vein, angling them outward toward the lobe edges.

Leaf Finishing :

Secure embroidery ends on the underside and weave in all leaf tails. Repeat the complete leaf instructions until all 16 leaves are finished.

Leaf Blocking :

Dampen the leaves according to the yarn care instructions. Pin each base and the five main tips, gently opening the valleys without stretching the center. Let every leaf dry completely before assembly.

β€” Braided Brown Vine :

Cord Foundation :

With brown yarn, ch 241, leaving a long starting tail.

Cord Row 1 :

Sl st in the second chain from the hook and in each remaining chain. Fasten off, leaving a long sewing tail. (240 sl sts)

Repeat the Cord :

Make 2 more identical cords for a total of 3. Keep the foundation chains and slip stitches loose enough that the cords remain flexible.

Optional Length Adjustment :

For a different runner length, change the foundation chain count equally on all three cords. Each cord will contain one fewer slip stitch than its foundation chain count. Compare the cords with your blocked leaves before braiding.

Braid the Vine :

Align the three starting ends and sew them together securely. Braid the cords loosely, keeping them flat rather than tightly twisted. Sew the opposite ends together, then place small securing stitches through all three cords at intervals along the underside so the braid retains its shape.

β€” Leaf Branches: Make 16 :

Branch Foundation :

With brown yarn, ch 13, leaving a long starting tail.

Branch Row 1 :

Sl st in the second chain from the hook and in each remaining chain. Fasten off with a long sewing tail. (12 sl sts)

Branch Length Note :

After arranging the leaves, remake an individual branch longer or shorter if needed. Work one slip stitch in every foundation chain after the first; do not pull a short branch tight to reach a leaf.

β€” Pointed Top Arch :

Foundation :

With brown yarn, ch 49, leaving a long starting tail.

Row 1 :

Sl st in the second chain from the hook and in each remaining chain. Ch 1 and turn. (48 sl sts)

Row 2 :

Repeat (sc in the next 6 stitches, picot) 8 times. Fasten off with a long sewing tail. (48 sc and 8 picots)

Arch Shaping :

Curve this piece into an open arch with the picots facing outward. Its ends will be sewn to opposite sides of the upper vine during assembly.

β€” Burgundy Berries: Make 18 :

Round Note :

Work berries in a continuous spiral without joining rounds. Mark the first stitch of every round.

Round 1 :

Work 6 sc in an MR and tighten the ring. (6)

Round 2 :

Inc in each stitch around. (12)

Round 3 :

Sc in each stitch around. (12)

Stuffing :

Add a tiny pinch of fiberfill if you want rounded berries. Leave them unstuffed if you prefer a flatter runner.

Round 4 :

Sc2tog 6 times. (6)

Berry Closure :

Fasten off with a sewing tail. Thread the tail through the front loops of the remaining 6 stitches, pull closed, and secure. Retain the tail for attachment.

β€” Berry Stems: Make 7 :

Stem Foundation :

With brown yarn, ch 9, leaving a sewing tail.

Stem Row 1 :

Sl st in the second chain from the hook and in each remaining chain. Fasten off with another sewing tail. (8 sl sts)

Cluster Arrangement :

Divide the 18 berries into seven groups containing 1, 4, 3, 1, 3, 1, and 5 berries. Sew each group around the outer end of one stem, placing neighboring berries against each other so they can also be joined with a small reinforcing stitch.

β€” Layout and Final Finishing :

Arrange the Vine :

Lay the braided vine on a flat surface in a shallow winding line. Allow it to rest naturally without stretching.

Arrange the Leaves :

Place one mustard leaf at the top with its central tip pointing upward. Below it, arrange seven staggered pairs from top to bottom: rust left and burgundy right; olive left and mustard right; burgundy left and rust right; rust left and olive right; olive left and burgundy right; rust left and mustard right; olive left and cream right. Place the final mustard leaf at the bottom with its central tip pointing downward. Keep the leaf bases directed toward the vine.

Fit the Branches :

Place one brown branch between each leaf base and the vine. Adjust the leaf positions or remake branches as necessary so every join rests flat. Hold the arrangement with clips or spare yarn ties.

Sew the Branches :

Using the branch tails, sew one end of each branch across the middle three stitches of its leaf base. Sew the other end through several strands of the braided vine. Reinforce each attachment on the underside.

Attach the Top Arch :

Place the pointed arch around the top mustard leaf and adjacent upper leaves. Sew its two ends to the upper vine or nearby branch junctions. Add small anchoring stitches to neighboring leaf edges where the arch naturally touches them, keeping the leaves flat.

Attach the Berry Clusters :

Distribute the seven clusters through the open spaces along the vine. Sew the free end of every stem to the braid. Where a cluster touches the vine, add a discreet stitch through a berry underside to stop the group from rotating.

Secure the Layout :

Check the runner from both ends. If two neighboring leaf edges touch naturally, join them with two or three small stitches on the underside for extra stability. Leave intentional gaps open and do not stretch motifs to create extra joins.

Final Finish :

Remove clips and temporary ties. Weave in every remaining tail through several stitches on the underside. Gently dampen and reshape any disturbed leaf edges, keeping the berries rounded. Dry the runner flat before placing it on the table.

Assembly Instructions

  • Lay the braided vine in a gentle curve and position the sixteen blocked leaves in the specified staggered color arrangement.
  • Place one brown branch between each leaf base and the vine, adjusting branch lengths wherever necessary.
  • Sew each branch across the middle three leaf-base stitches, then sew its opposite end securely through several strands of the braid.
  • Curve the pointed top arch around the upper leaves, attach both ends, and anchor natural contact points with small stitches.
  • Sew the eighteen berries into seven groups of 1, 4, 3, 1, 3, 1, and 5 around the ends of the seven berry stems.
  • Attach berry stems along the vine, secure rotating clusters underneath, and join neighboring leaf edges only where they touch naturally.
  • Remove temporary ties, weave in remaining tails, reshape any disturbed edges, and allow the completed runner to dry flat.

Important Notes

  • πŸ’‘The photographs provide visual inspiration without written stitch instructions; the crochet construction given here is an original interpretation.
  • πŸ’‘All stitch terminology is US crochet terminology.
  • πŸ’‘Turning chains and joining slip stitches never count as stitches.
  • πŸ’‘The five lobes occupy center stitches 1-25; stitches 26-30 remain the leaf base.
  • πŸ’‘Each leaf has two small outer lobes, two side lobes, and one longer central lobe.
  • πŸ’‘Leaf edging is worked into row ends, so follow the placement instructions rather than expecting a fixed edging stitch total.
  • πŸ’‘The suggested 10-12 hours is an estimate; embroidery and assembly speed can change the total considerably.
  • πŸ’‘Finished dimensions depend on yarn, tension, braid length, and motif spacing; measure your blocked sample leaf before planning the layout.
  • πŸ’‘Use similar yarn weights for all colors so the leaf sizes and branch attachments remain balanced.
  • πŸ’‘Follow the yarn label for washing and blocking, and dry the assembled runner flat.
  • πŸ’‘The raised berries create an uneven surface; place glasses, serving dishes, and candleholders on a separate stable surface.
  • πŸ’‘Keep the runner away from open flames and direct heat.

Build your autumn runner one leaf at a time, then let the final arrangement bring the colors together. Before sewing, take a moment to balance the mustard leaves, spread out the burgundy accents, and give the cream leaf a clear place to shine. Secure every branch with several small stitches and let the blocked pieces dry completely. Your finished maple leaf runner will be ready to bring handmade texture to a dining table, console, or seasonal display.
You ask,

we answer.

FAQs

How can I make the runner fit my table?

Finish and block one leaf first, then measure its width and length. Arrange paper shapes of that size along your table to estimate how many leaves you want. Shorten or lengthen all three vine cords equally, then adjust individual branch lengths during layout. Leave room around place settings and serving pieces before sewing the arrangement together.

Can I use acrylic instead of cotton?

Yes, a smooth acrylic yarn in a consistent weight can work, although the leaves may feel softer and behave differently during blocking. Make one complete sample before buying the full palette. Follow the yarn label carefully, especially around heat, and use relaxed embroidery stitches so the veins do not gather the softer fabric.

Why does my maple leaf look uneven before blocking?

Separate lobes can sit at slightly different angles until their edges and veins are finished. First check the row counts: the outer lobes have five rows, the side lobes seven, and the central lobe nine. Confirm each begins in its own five-stitch group. Then dampen the leaf and gently pin the five tips into a balanced shape.

Do I need to crochet separate left-facing and right-facing leaves?

No. Every leaf uses the same construction, with matching outer lobes and matching side lobes. Keep the embroidered side facing upward and rotate the completed motifs during layout. Direct each five-stitch base toward the vine, then vary the angle of the central tip to create a natural staggered arrangement on both sides.

How do I stop the branches and berries from turning over?

Attach branch ends across several stitches rather than at a single point, and sew through more than one cord of the braid. For berries, secure the cluster to its stem and add a discreet stitch underneath wherever it touches the vine. Lay the runner flat after each attachment to check that the join holds its intended position.

Can I make the berries without stuffing?

Yes. Work all four berry rounds as written, omit the fiberfill, and close the final six stitches securely. Gently flatten each berry before attaching it, then use several small underside stitches to hold that shape. This reduces the height of the decoration while keeping the burgundy accents and the same cluster arrangement.

What is the best way to wash and store the finished runner?

Follow the care instructions for your yarn and choose the gentlest method needed by any color used. Support the whole runner when lifting it wet, press out moisture in a towel, and dry it flat with the leaves reshaped. For storage, lay it flat or fold loosely with tissue between the berries and leaf tips.