🧢 Beautiful ✨ Detailed πŸ’ Adorable

Baby Blue Nutcracker Christmas Amigurumi Pattern

Baby Blue Nutcracker Christmas Amigurumi Pattern
4.6β˜… Rating
12-15 Hours Time Needed
1.1K Made This
βœ‚οΈ

Advanced Level

Designed for experienced knitters, these patterns involve intricate designs and complex techniques to challenge and inspire.

⏱️

Slow & Steady

A 10-12 hour projectβ€”great for savoring the process over several sessions.

πŸŽ„

Holiday Cheer

Festive fun for the season, bringing handmade magic to celebrations and creating new family traditions.

About This Baby Blue Nutcracker Christmas Amigurumi Pattern

This Baby Blue Nutcracker pattern combines traditional nutcracker charm with modern amigurumi techniques. The design features a detailed head-to-toe construction with color changes, intricate facial features, and special accessories like the cupcake hat and candy base. Each component is carefully crafted to create a cohesive and enchanting Christmas decoration.

Baby Blue Nutcracker Christmas Amigurumi Pattern crochet pattern - detailed view of completed project

The pattern includes multiple color changes and advanced techniques like back loop only stitching and popcorn stitches. Special attention is given to creating realistic facial features with embroidered details and felt accents.

Why You'll Love This Baby Blue Nutcracker Christmas Amigurumi Pattern

I absolutely love how this pattern captures the whimsical spirit of Christmas while challenging your crochet skills. The combination of traditional nutcracker elements with sweet candy-themed details creates something truly unique. I find the process of working through each detailed section incredibly satisfying, and the final result always brings such joy during the holiday season.

Baby Blue Nutcracker Christmas Amigurumi Pattern step 1 - construction progress Baby Blue Nutcracker Christmas Amigurumi Pattern step 2 - assembly progress Baby Blue Nutcracker Christmas Amigurumi Pattern step 3 - details and accessories Baby Blue Nutcracker Christmas Amigurumi Pattern step 4 - final assembly and finishing

Switch Things Up

I love experimenting with different color combinations for this nutcracker pattern - imagine how stunning it would look in traditional red and green, or even elegant silver and gold! The beauty of this design is that you can adapt the color scheme to match your personal holiday decor.

Sometimes I like to add extra embellishments like tiny pearls on the buttons or metallic thread accents on the hat stripes. You could also create a whole family of nutcrackers in different sizes by adjusting your hook size.

I've found that using a slightly heavier yarn creates a more substantial feel, while lighter cotton gives delicate detail work. Don't be afraid to make the facial features your own - each nutcracker develops its own personality through your personal touches!

Common Mistakes & How to Fix Them

βœ— Forgetting to stuff pieces before completing them, especially the head and body sections βœ— Not maintaining consistent tension during color changes, resulting in visible gaps or loose stitches βœ— Rushing through the facial features and embroidery details, which are crucial for the character's expression βœ— Skipping the pinning step before gluing accessories, leading to crooked or poorly positioned elements

Baby Blue Nutcracker Christmas Amigurumi Pattern

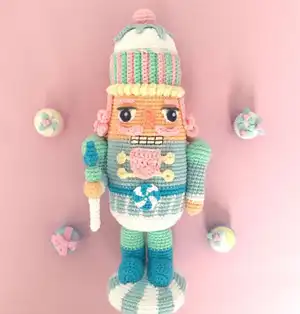
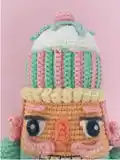
Create your own magical Baby Blue Nutcracker with this delightful Christmas amigurumi pattern! This charming holiday companion features intricate details including a cupcake hat, candy base, and adorable facial features. Perfect for festive decorating, gift-giving, or adding a touch of whimsical charm to your holiday collection. The pattern includes detailed instructions for creating the nutcracker's unique striped hat, decorative buttons, and special candy-themed accessories that make this project truly special.

Advanced 12-15 Hours

Materials Needed for Baby Blue Nutcracker Christmas Amigurumi Pattern

β€” Main Fabric

  • 01
    100% Cotton yarn in nude/flesh tone for head and hands
  • 02
    Baby blue cotton yarn for main body sections
  • 03
    White cotton yarn for uniform details and base
  • 04
    Turquoise cotton yarn for body accents
  • 05
    Green cotton yarn for legs and arm details
  • 06
    Pink cotton yarn for hat stripes and hair
  • 07
    Yellow cotton yarn for cupcake base and buttons

β€” Tools Required

  • 01
    Ergonomic crochet hook 2mm
  • 02
    Scissors for cutting yarn
  • 03
    Black embroidery thread for facial details
  • 04
    Embroidery needle for detailed work
  • 05
    Polyfill stuffing material
  • 06
    Fabric glue for attaching parts
  • 07
    Felt fabric for eye details
  • 08
    Mini white beads for eye highlights
  • 09
    Stitch markers for tracking rounds
  • 10
    Pins for positioning before gluing

Progress Tracker

0% Complete

β€” Body (starting from head with nude color) :

Round 1 :

6sc into magic ring (6)

Round 2 :

2 sc in each stitch (12)

Round 3 :

1 sc, 2 sc in next st (18)

Round 4 :

2 sc, 2 sc in next st (24)

Round 5 :

3 sc, 2 sc in next st (30)

Round 6 :

4 sc, 2 sc in next st (36)

Round 7 :

5 sc, 2 sc in next st (42)

Round 8 :

6 sc, 2 sc in next st (48)

Round 9 :

7 sc, 2 sc in next st (54)

Round 10 :

8 sc, 2 sc in next st (60)

Round 11 :

on back loops: 60 sc (60)

Round 12-21 :

60 sc (60)

Round 22 :

26 sc, change to white and 8 sc, change to nude and finish (60) change to baby blue

Round 23 :

26 sc, change to white and 8 sc, change again to baby blue and finish (60)

Round 24-34 :

60 sc in baby blue (60) change to turquoise

Round 35-36 :

60 sc in turquoise (60) change to baby blue

Round 37-41 :

60 sc working 3 sc baby blue, 1 sc white all row (60) change to white

Round 42-43 :

60 sc in White (60)

Round 44 :

on back loops 8 sc, 1 dec (54)

Round 45 :

7 sc, 1 dec (48)

Round 46 :

6 sc, 1 dec (42)

Round 47 :

5 sc, 1 dec (36) stuff

Round 48 :

4 sc, 1 dec (30)

Round 49 :

3 sc, 1 dec (24)

Round 50 :

2 sc, 1 dec (18)

Round 51 :

1 sc, 1 dec (12) leave a long piece of yarn and close

β€” Legs (Make 2, start with green) :

Round 1 :

6sc into magic ring (6)

Round 2 :

2sc in each stitch around (12)

Round 3 :

1 sc, 2 sc in next st (18)

Round 4 :

18 sc on back loops (18)

Round 5-9 :

18 sc (18) change to turquoise

Round 10-16 :

18 sc (18) leave a long piece of yarn to sew, do not forget stuffing

β€” Feet (Make 2) :

Round 1 :

6sc into magic ring (6)

Round 2 :

Instead of continuing the round, go up with one chain and 2sc in each stitch (12)

Round 3-7 :

Chain 1 to go up and 12 sc (12) See pictures. Stuff a little and sew the pieces to the legs to create boots

β€” Left Arm (start with green) :

Round 1 :

6sc into magic ring (6)

Round 2 :

2 sc in each stitch (12)

Round 3 :

1 sc, 2 sc in next st (18)

Round 4 :

2 sc, 2 sc in next st (24)

Round 5-6 :

24 sc (24)

Round 7 :

2 sc, 1 dec (18)

Round 8 :

1 sc, 1 dec (12) change to babyblue

Round 9-17 :

12 sc (12) change to white

Round 18-19 :

12 sc (12) change to nude

Round 18-20 :

12 sc (12) stuff

Round 21 :

dec all row (6) hide the yarn with needle and cut it

β€” Right Arm Part 1 (start with green) :

Round 1 :

6sc into magic ring (6)

Round 2 :

2 sc in each stitch (12)

Round 3 :

1 sc, 2 sc in next st (18)

Round 4 :

2 sc, 2 sc in next st (24)

Round 5-6 :

24 sc (24)

Round 7 :

2 sc, 1 dec (18)

Round 8 :

1 sc, 1 dec (12) change to babyblue

Round 9-17 :

12 sc (12) stuff now

Round 18 :

obl decrease x6, with a needle hide the yarn

β€” Right Arm Part 2 (start with nude) :

Round 1 :

6sc into magic ring (6)

Round 2 :

2 sc in each stitch (12)

Round 3-4 :

12 sc (12) change to white

Round 5-6 :

12 sc (12) change to babyblue

Round 7-13 :

12 (12) stuff leave a long piece of yarn to sew with part 1
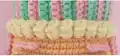
β€” Hat Base (start with pink) :

Info :

Chain 10, chain 1 more to go up and sc in all stitches

Info :

Chain 1, obl sc in all stitches. Change to green

Info :

Chain 1, obl sc in all stitches

Info :

Chain 1, obl sc in all stitches. Change to pink

Info :

Repeat this until you have 14 pink rows and 13 green rows

Info :

Once finished, sew the sides to create the hat. Sew this piece to the yellow base using yellow thread

β€” Top of the Cupcake (in white) :

Round 1 :

6sc into magic ring (6)

Round 2 :

2 sc in each stitch (12)

Round 3 :

1 sc, 2 sc in next st (18)

Round 4 :

2 sc, 2 sc in next st (24)

Round 5 :

3 sc, 2 sc in next st (30)

Round 6 :

4 sc, 2 sc in next st (36)

Round 7 :

5 sc, 2 sc in next st (42)

Round 8 :

6 sc, 2 sc in next st (48)

Round 9 :

7 sc, 2 sc in next st (54)

Round 10-14 :

54 sc (54)

Info :

Once finished, sew this piece to the hat base, do not forget stuffing

β€” Candy Base :

Round 1 :

7sc into magic ring (start with white)

Round 2 :

1 sc blue and 1sc white in same st, repeat all round (14)

Round 3 :

2 blue sc in red st, 1 white sc in white st (21) Use white in white stitches, blue in blue st

Round 4-23 :

Continue alternating pattern as described in detailed instructions

Assembly Instructions

  • Attach the completed legs to the bottom of the body, ensuring they are evenly positioned and securely sewn
  • Stuff and attach both arm parts, sewing the left arm as one piece and joining the two parts of the right arm first
  • Sew the cupcake hat assembly to the head, starting with the yellow base, then the striped hat, white top, and cherry
  • Attach the candy base to the bottom of the nutcracker, aligning the swirl pattern properly
  • Position and glue all facial features including eyes, nose, mustache, and beard using pins for accurate placement
  • Attach the hair wig using fabric glue, adjusting the number of strands as needed for your yarn weight
  • Sew on the decorative buttons and candy buckle details to complete the uniform appearance

Important Notes

  • πŸ’‘Use stitch markers consistently to track your progress, especially during the complex body color changes
  • πŸ’‘Maintain even tension throughout all color transitions to prevent gaps and ensure a professional appearance
  • πŸ’‘Test fit all pieces before final assembly and use pins to position everything correctly before gluing
  • πŸ’‘The facial features are crucial for character - take time with embroidery and felt placement for best results
  • πŸ’‘Keep stuffing firm but not overpacked to maintain the proper shape and proportions

This enchanting Baby Blue Nutcracker pattern brings the magic of Christmas to life with its intricate details and charming design. From the striped cupcake hat to the swirled candy base, every element tells a story of holiday wonder. The combination of traditional crochet techniques with creative color work makes this a truly special addition to your seasonal decorations. Perfect for gifting or creating new family traditions! 🧢 Happy crocheting! πŸŽ„βœ¨

You ask,

we answer.

FAQs

What skill level is required for this nutcracker pattern?

This is an advanced pattern that requires experience with color changes, back loop only stitching, and detailed assembly techniques.

Can I substitute different yarn colors?

Yes, you can customize the colors while maintaining the same yarn weight (100% cotton) for best results.

How do I achieve clean color changes?

Complete the last yarn over of the previous stitch with the new color, and maintain consistent tension throughout the change.

What's the best way to attach the facial features?

Use fabric glue for felt pieces and careful embroidery for details. Pin everything in place first to ensure proper positioning.

Can this pattern be made smaller or larger?

Yes, you can adjust the hook size and yarn weight, but you'll need to modify the stitch counts proportionally.