🧢 Beautiful ✨ Detailed πŸ’ Adorable

Baby Deer Amigurumi Pattern

Baby Deer Amigurumi Pattern
4.0β˜… Rating
5-7 Hours Time Needed
1.6K Made This
βœ‚οΈ

Intermediate Level

Ideal for those with basic knitting experience, featuring slightly more advanced stitches and techniques to expand your skills.

⏱️

Weekend Treat

Takes 5-7 hours, making it an enjoyable project to finish over a couple of days.

🐰

Whimsical Buddy

Playful characters full of personality, designed to spark imagination and become cherished playtime favorites.

About This Baby Deer Amigurumi Pattern

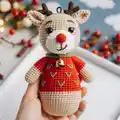
This sweet baby deer pattern combines classic amigurumi techniques with charming festive details. The deer is worked primarily in beige yarn with a distinctive red sweater section that features decorative green embroidery. The construction begins with the feet and continues seamlessly up through the body and head, with color changes creating natural definition between sections. Special attention to details like the white nose piece, brown antlers, and carefully placed safety eyes brings this woodland character to life.

Baby Deer Amigurumi Pattern crochet pattern - detailed view of completed project

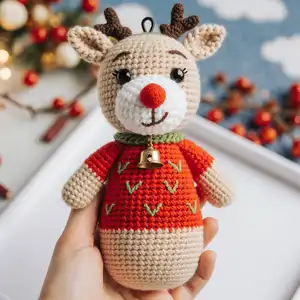
The pattern includes clear instructions for all body parts including arms, ears, nose, and horns, with specific placement guidelines for assembly. A small bell can be added inside for an extra special touch that makes this deer rattle gently when moved.

Why You'll Love This Baby Deer Amigurumi Pattern

I absolutely love how this baby deer pattern captures the gentle sweetness of woodland creatures while adding festive charm through the red sweater detail. The way the beige and red colors transition creates such a natural, eye-catching effect, and I find the process of adding those tiny green embroidered details on the sweater incredibly satisfying. What makes this pattern special for me is how it balances simplicity with characterβ€”the techniques aren't overly complicated, yet the finished piece has so much personality. I also appreciate how versatile this design is; you can customize the colors to create different seasonal versions or personalize it for gift-giving. The compact size makes it perfect for using up yarn scraps while still creating something truly special.

Baby Deer Amigurumi Pattern step 1 - construction progress Baby Deer Amigurumi Pattern step 2 - assembly progress Baby Deer Amigurumi Pattern step 3 - details and accessories Baby Deer Amigurumi Pattern step 4 - final assembly and finishing

Switch Things Up

I love experimenting with this baby deer pattern to create unique variations for different occasions and seasons. One of my favorite modifications is changing the sweater color from red to pastel pink or blue for a springtime version, perfect for baby showers or Easter baskets. You could also try making the deer in different sizes by adjusting your hook sizeβ€”a smaller hook creates an adorable miniature version perfect for keychains, while a larger hook with bulkier yarn makes a cuddly companion for children.

For a winter wonderland theme, I sometimes add tiny snowflake embroidery to the sweater instead of the green leaf pattern, and occasionally I'll use sparkly or metallic yarn for the nose tip to make it really shine. Another fun variation is creating a whole deer family by making multiple sizesβ€”perhaps a mama deer without the red sweater and baby deer twins in matching outfits. You can also experiment with the ear shape by making them slightly longer or rounder for different expressions, or even add a small crocheted scarf around the neck for extra winter warmth.

Don't be afraid to play with textures eitherβ€”using a fuzzy yarn for the body creates an incredibly soft, huggable texture that kids absolutely love. The possibilities are truly endless with this versatile pattern!

Common Mistakes & How to Fix Them

βœ— Forgetting to stuff the body parts as you go can make it difficult to achieve proper shaping later on and may result in lumpy or uneven stuffing distribution βœ— Placing the safety eyes incorrectly or too close together will affect the deer's expression, so always count stitches carefully and position them between rounds 43-44 with 9 stitches separation βœ— Skipping the back loops only instruction in round 5 of the body will eliminate the decorative ridge that defines where the feet meet the legs βœ— Not crocheting the two edges together properly when closing the arms and ears can leave gaps or create an uneven closure that affects the overall appearance

Baby Deer Amigurumi Pattern

Create an adorable baby deer amigurumi dressed in a festive red sweater adorned with delicate green embroidery details. This charming woodland friend features sweet safety eyes, a bright red nose, brown antlers, and beige ears that give it an endearing personality. Perfect for holiday gifts or seasonal decorations, this pattern creates a deer approximately 15 cm tall when worked with the recommended yarn. The combination of beige, white, brown, green, and red colors brings this precious forest creature to life with handcrafted warmth.

Intermediate 5-7 Hours

Materials Needed for Baby Deer Amigurumi Pattern

β€” Main Fabric

  • 01
    Beige, white, brown, green, and red yarn suitable for 1.80-2.00 mm hook
  • 02
    YarnArt Jeans brand yarn recommended

β€” Tools Required

  • 01
    Crochet hook size 1.80-2.00 mm
  • 02
    8 mm safety eyes
  • 03
    Yarn needle
  • 04
    Scissors
  • 05
    Fiberfill stuffing
  • 06
    Small bell (optional)
  • 07
    Stitch markers (recommended)

Progress Tracker

0% Complete

β€” Baby Deer Body :

Round 1 :

15 ch, starting from 2nd ch inc, 12 sc, 3 sc in 1 stitch (work on the other side of the chain) 13 sc (30)

Round 2 :

2 inc, 12 sc, 3 inc, 12 sc, inc (36)

Round 3 :

(sc, inc) 2 times, 13 sc, (inc, inc) 3 times, 12 sc, inc (42)

Round 4 :

(2 sc, inc) 2 times, 14 sc, (inc, 2 sc) 3 times, 12 sc, inc (48)

Round 5 :

BLO sc around (48)

Round 6 :

sc around (48)

Round 7 :

(7 sc, inc) 6 times (54)

Round 8-13 :

sc around (54)

Info :

Change color to red

Round 14 :

sc around (54)

Round 15 :

(7 sc, dec) 6 times (48)

Round 16-17 :

sc around (48)

Round 18 :

(6 sc, dec) 6 times (42)

Round 19-20 :

sc around (42)

Round 21 :

(5 sc, dec) 6 times (36)

Round 22-23 :

sc around (36)

Round 24 :

(4 sc, dec) 6 times (30)

Round 25-26 :

sc around (30)

Round 27 :

(3 sc, dec) 6 times (24)

Round 28-29 :

sc around (24)

Info :

Change color to beige

Round 30 :

(3 sc, inc) 6 times (30)

Round 31 :

(4 sc, inc) 6 times (36)

Round 32 :

(5 sc, inc) 6 times (42)

Round 33 :

(6 sc, inc) 6 times (48)

Round 34 :

(7 sc, inc) 6 times (54)

Round 35 :

(8 sc, inc) 6 times (60)

Round 36-48 :

sc around (60)

Info :

Attach the eyes to the 43rd and 44th rows, 9 stitches apart

Round 49 :

(8 sc, dec) 6 times (54)

Round 50 :

(7 sc, dec) 6 times (48)

Round 51 :

(6 sc, dec) 6 times (42)

Round 52 :

(5 sc, dec) 6 times (36)

Round 53 :

(4 sc, dec) 6 times (30)

Round 54 :

(3 sc, dec) 6 times (24)

Round 55 :

(2 sc, dec) 6 times (18)

Round 56 :

(sc, dec) 6 times (12)

Round 57 :

(dec) 6 times

β€” Arms :

Info :

Start with beige color

Round 1 :

6 sc into a magic ring (6)

Round 2 :

(inc) 6 times (12)

Round 3 :

(sc, inc) 6 times (18)

Round 4 :

BLO sc around (18)

Round 5-7 :

sc around (18)

Round 8 :

(4 sc, dec) 3 times (15)

Round 9-10 :

sc around (15)

Info :

Change color to red

Round 11 :

sc around (15)

Round 12 :

(3 sc, dec) (12)

Info :

Crochet the two edges together at the same time

β€” Ears :

Info :

Start with beige color

Round 1 :

6 sc into a magic ring (6)

Round 2 :

(sc, inc) 3 times (9)

Round 3 :

sc around (9)

Round 4 :

(2 sc, inc) 3 times (12)

Round 5 :

sc around (12)

Round 6 :

(3 sc, inc) 3 times (15)

Round 7-12 :

sc around (15)

Info :

Crochet the two edges together at the same time

β€” Nose :

Info :

Start with white color

Round 1 :

6 ch, starting from 2nd ch inc, 3 sc, 3 sc in 1 stitch (work on the other side of the chain) 4 sc (12)

Round 2 :

2 inc, 3 sc, 3 inc, 3 sc, inc (18)

Round 3 :

(sc, inc) 2 times, 4 sc, (inc) 3 times, 3 sc, inc (24)

Round 4 :

BLO sc (24)

Round 5-7 :

sc around (24)

β€” Red Nose Tip :

Round 1 :

6 sc into a magic ring (6)

Round 2 :

(inc) 6 times

β€” Horns :

Info :

Start with brown color

Round 1 :

6 sc into a magic ring (6)

Round 2 :

(sc, inc) 3 times (9)

Round 3-5 :

sc around (9)

Round 6-10 :

3 sc, inc, 4 sc, dec (9)

Assembly Instructions

  • Sew the white nose piece between rows 32 and 39 of the head, stuffing lightly before closing.
  • Attach the small red nose tip to the center of the white nose piece.
  • Sew the ears between rows 50 and 51 on either side of the head.
  • Plant the brown antlers between rows 53 and 55, positioning them above and slightly behind the ears.
  • Attach the arms between rows 25 and 26 of the body, ensuring they are evenly spaced on both sides.
  • Embroider green decorative stitches on the red sweater section to create a festive pattern.
  • Optional: Insert a small bell inside the body before final closure for a gentle rattling sound.

Important Notes

  • πŸ’‘Remember to stuff the body parts as you work through the rounds for easier shaping and better final structure
  • πŸ’‘Use stitch markers to track the beginning of each round, especially during color transitions between beige and red sections
  • πŸ’‘When changing colors, carry the yarn inside the work to avoid loose ends and maintain a neat appearance
  • πŸ’‘The finished size will be approximately 15 cm when using YarnArt Jeans yarn with a 1.80-2.00 mm hook
  • πŸ’‘Place safety eyes carefully between rounds 43-44 with exactly 9 stitches separation for the best facial expression
  • πŸ’‘Work back loops only instructions precisely as they create important decorative ridges that define the body sections

This precious baby deer pattern brings woodland magic to your crochet projects with its sweet expression and festive red sweater. The combination of simple techniques and charming details creates a character that's perfect for holiday decorating, gift-giving, or adding to your amigurumi collection. With clear instructions for each body part and helpful assembly guidance, you'll enjoy watching this adorable forest friend come to life stitch by stitch. Happy crocheting and may your deer bring joy to all who see it!

You ask,

we answer.

FAQs

What size will my finished baby deer be?

When using YarnArt Jeans yarn with a 1.80-2.00 mm crochet hook as recommended, your finished deer will be approximately 15 cm tall. The final size may vary depending on your tension and the specific yarn brand you choose.

Can I use different colors for this pattern?

Absolutely! While the pattern uses beige, white, brown, green, and red for a festive holiday look, you can customize the colors to create different seasonal versions or match your personal preferences. Just maintain the same color placement for best results.

Do I need to stuff the deer as I crochet?

Yes, it's highly recommended to stuff the body parts as you work through the decreasing rounds. This makes it much easier to achieve proper shaping and ensures even stuffing distribution throughout the piece.

Is the bell necessary for this pattern?

The bell is completely optional. It adds a charming rattling sound when the deer is moved, making it extra special for babies or young children, but the pattern works perfectly well without it.

How do I create the green embroidery details on the sweater?

After completing the red sweater section, use green yarn and a yarn needle to embroider small decorative stitches in a pattern of your choice. The pattern shows leaf-like or branch-like designs, but you can be creative with your own embroidery style.