๐Ÿงถ Beautiful โœจ Detailed ๐Ÿ’ Adorable

Birds Crochet Phone Case Pattern

Birds Crochet Phone Case Pattern
4.2โ˜… Rating
5-7 Hours Time Needed
4.0K Made This
โœ‚๏ธ

Intermediate Level

Ideal for those with basic knitting experience, featuring slightly more advanced stitches and techniques to expand your skills.

โฑ๏ธ

Weekend Treat

Takes 5-7 hours, making it an enjoyable project to finish over a couple of days.

โœจ

Stylish Touch

An elegant detail to elevate any look, combining traditional techniques with contemporary design sensibilities.

About This Birds Crochet Phone Case Pattern

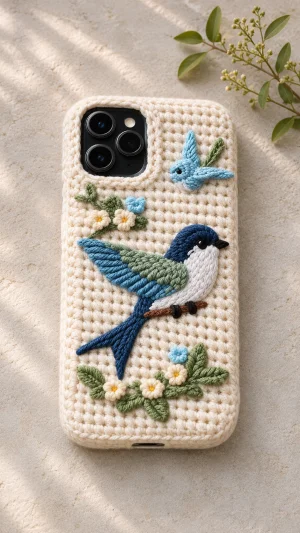
This original, photo-inspired pattern starts with a cream single-crochet panel shaped around a camera opening, then adds the birds and garden details with embroidery and small crocheted flowers. The larger bird has a navy head and tail, a white breast, and layered blue and green wings, while a smaller blue bird flies above it. Cotton yarn gives the background a defined texture and helps the decorative stitches stand out, although the finished dimensions will depend on your yarn and tension. You will use chains, single crochet, slip stitches, simple shaping, and basic embroidery, then secure the panel to a compatible phone case.

Birds Crochet Phone Case Pattern crochet pattern - detailed view of completed project

The sample stitch counts provide a starting point rather than a universal phone size, so measure your case and adjust the panel and camera opening before adding decoration. A sewable case or a separate fitted fabric backing gives you places to secure the crochet without covering buttons, ports, or lenses.

Why You'll Love This Birds Crochet Phone Case Pattern

I love how this design turns a practical phone accessory into a little garden scene, with a bold bird taking center stage and tiny flowers softening the edges. The cream background gives the colorful details room to stand out, and the project breaks naturally into manageable stages: first the panel, then the flowers, embroidery, and final attachment. You can check the fit before committing to the decorative work, which makes it easier to tailor the case to your own phone. I also appreciate that the birds are built with individual stitches, so their shapes can be adjusted as you work. Take a little extra time to secure the embroidery and yarn ends; a smooth back and firmly attached flowers will make the finished cover more comfortable to use or give.

Birds Crochet Phone Case Pattern step 1 - construction progress Birds Crochet Phone Case Pattern step 2 - assembly progress Birds Crochet Phone Case Pattern step 3 - details and accessories Birds Crochet Phone Case Pattern step 4 - final assembly and finishing

Switch Things Up

I would start by changing the background color to soft gray, pale blue, or warm beige, choosing a shade that still makes the birds and flowers easy to see. For a brighter garden, I would keep the same panel and flower instructions but replace the cream petals with pink or lavender and choose contrasting centers. The larger bird can take on a different character with teal wings or a russet breast; I would keep the head, breast, wing, and tail in separate color areas so its silhouette remains clear. If a quieter design suits your style, I would embroider the large bird and a single flowering branch, leaving the remaining background plain. The smaller bird could also be worked in a paler shade of the larger bird's wing color to give the two motifs a coordinated look.

I would change the placement of the branches to suit the available space, sketching them lightly on the panel and checking that they stay clear of the camera opening and outer edges. On a smaller case, I would make fewer flowers and shorten the embroidered leaves instead of crowding the birds into the camera area. On a larger case, I would add extra leaves or a second branch using the same embroidery techniques, keeping the attachment edge free. A matching yarn border can blend into the background, while a contrasting border can frame the scene; either way, I would keep the border loose enough for the panel to lie flat. Whatever colors and decorations I choose, I would preserve the fitted panel and correctly positioned camera opening, then check the case's buttons and ports before securing the finished cover.

Common Mistakes & How to Fix Them

โœ— A panel that is too narrow can pull away from the case edges. Add stitches to the foundation chain, work a few rows, and compare the width with your case before continuing.โœ— A camera opening in the wrong position can cover a lens or flash. Mark the opening on the case first, adjust the split rows, and check the panel against the case before embroidering.โœ— Tight border stitches can make the panel curl or distort the camera opening. Loosen your tension or use a larger hook for the border, then lay the panel flat to check it.โœ— Long embroidery stitches can snag on pockets or bags. Divide large color areas into shorter overlapping stitches and gently brush a finger over each motif to find loose loops.โœ— Flowers sewn on by their centers alone may catch and twist. Stitch through the backs of several petals as well, then gently tug each flower to check that it stays flat.โœ— Knots and bulky yarn tails on the back can prevent the panel from sitting smoothly. Weave ends through several stitches and trim them, then feel the reverse for lumps before attachment.โœ— Securing the panel over a button or charging port can make the case awkward to use. Mark those areas before attachment and check that each control and opening remains accessible.

Birds Crochet Phone Case Pattern

Create a garden-inspired phone case with a cream crochet background, two colorful birds, tiny flowers, and leafy branches. The back panel is worked in simple rows, with an opening shaped for the camera and embroidered details added afterward. Adapt the panel to your own phone case for a useful accessory with plenty of handmade personality.

Intermediate 5-7 Hours

Materials Needed for Birds Crochet Phone Case Pattern

โ€” Main Fabric

  • 01
    Lightweight cotton yarn in cream for the phone case panel and flower petals
  • 02
    Small amounts of cotton yarn or embroidery thread in navy, medium blue, pale blue, sage green, white, brown, black, and yellow for the birds, branches, leaves, and flower centers
  • 03
    A sewable phone case compatible with your phone, or a fitted fabric backing that can be securely attached to your existing case

โ€” Tools Required

  • 01
    Crochet hook suited to your chosen yarn, approximately 3 mm
  • 02
    Tapestry needle with an eye large enough for the yarn
  • 03
    Embroidery needle if using finer embroidery thread
  • 04
    Scissors
  • 05
    Measuring tape or ruler
  • 06
    Removable stitch markers or sewing pins
  • 07
    Washable fabric marker or tailor's chalk
  • 08
    Sewing needle and coordinating strong thread

Progress Tracker

0% Complete

โ€” Fit and preparation :

Info :

US crochet terms are used. The sample panel begins with 20 stitches; adjust its width and length to fit the back of your case. The turning chain does not count as a stitch.

Info :

Mark the camera opening on your case, including space around the lenses and flash. The sample opening is at the upper left when viewing the finished back; reverse the panel if needed for your phone.

Info :

For the sample opening, 7 stitches are omitted on one side for 8 rows, leaving a 13-stitch side strip. Adjust both numbers and the opening height to your case while keeping the omitted and remaining stitches equal to the full panel width.

โ€” Cream back panel :

Foundation :

With cream, ch 21.

Row 1 :

Sc in the second ch from the hook and in each remaining ch; turn. (20 sc)

Row 2 :

Ch 1, sc in each st; turn. (20 sc)

Row 3 :

Ch 1, sc in each st; turn. (20 sc)

Row 4 :

Ch 1, sc in each st; turn. (20 sc)

Row 5 :

Ch 1, sc in each st; turn. (20 sc)

Row 6 :

Ch 1, sc in each st; turn. (20 sc)

Row 7 :

Ch 1, sc in each st; turn. (20 sc)

Row 8 :

Ch 1, sc in each st; turn. (20 sc)

Row 9 :

Ch 1, sc in each st; turn. (20 sc)

Row 10 :

Ch 1, sc in each st; turn. (20 sc)

Row 11 :

Ch 1, sc in each st; turn. (20 sc)

Row 12 :

Ch 1, sc in each st; turn. (20 sc)

Row 13 :

Ch 1, sc in each st; turn. (20 sc)

Row 14 :

Ch 1, sc in each st; turn. (20 sc)

Row 15 :

Ch 1, sc in each st; turn. (20 sc)

Row 16 :

Ch 1, sc in each st; turn. (20 sc)

Row 17 :

Ch 1, sc in each st; turn. (20 sc)

Row 18 :

Ch 1, sc in each st; turn. (20 sc)

Row 19 :

Ch 1, sc in each st; turn. (20 sc)

Row 20 :

Ch 1, sc in each st; turn. (20 sc)

Row 21 :

Ch 1, sc in each st; turn. (20 sc)

Row 22 :

Ch 1, sc in each st; turn. (20 sc)

Row 23 :

Ch 1, sc in each st; turn. (20 sc)

Row 24 :

Ch 1, sc in each st; turn. (20 sc)

Row 25 :

Ch 1, sc in each st; turn. (20 sc)

Row 26 :

Ch 1, sc in each st; turn. (20 sc)

Row 27 :

Ch 1, sc in each st; turn. (20 sc)

Row 28 :

Ch 1, sc in each st; turn. (20 sc)

Row 29 :

Ch 1, sc in each st; turn. (20 sc)

Row 30 :

Ch 1, sc in each st; turn. (20 sc)

Info :

Check the panel against your case. Add or remove full-width rows before the opening as needed, ending with the working yarn at the edge opposite the intended camera opening.

Row 31 :

Ch 1, sc in the first 13 sts, leaving the last 7 sts unworked; turn. (13 sc)

Row 32 :

Ch 1, sc in each of the 13 sts; turn. (13 sc)

Row 33 :

Ch 1, sc in each of the 13 sts; turn. (13 sc)

Row 34 :

Ch 1, sc in each of the 13 sts; turn. (13 sc)

Row 35 :

Ch 1, sc in each of the 13 sts; turn. (13 sc)

Row 36 :

Ch 1, sc in each of the 13 sts; turn. (13 sc)

Row 37 :

Ch 1, sc in each of the 13 sts; turn. (13 sc)

Row 38 :

Ch 1, sc in each of the 13 sts; turn. (13 sc)

Info :

After Row 38, the yarn should be at the outer edge of the 13-stitch strip. If you change the number of opening rows, end at this outer edge before making the bridge.

Row 39 :

Ch 1, sc in each of the 13 sts, then ch 7 to bridge the top of the opening; turn. (13 sc and 7 ch)

Row 40 :

Ch 1, sc in each of the 7 chains and in each of the 13 sc; turn. (20 sc)

Row 41 :

Ch 1, sc in each st. (20 sc)

Info :

Add full-width rows if needed to reach the top of your case. Fasten off and weave in the ends.

โ€” Edging :

Outer edge :

Join cream at an outer corner. Work sc evenly around the outside of the panel, placing extra sc at corners as needed to keep the fabric flat; join with a sl st to the first sc. Fasten off and weave in the ends.

Camera edge :

Join cream at the camera opening and work sc evenly around its inner edge, keeping the stitches loose and the opening clear. Join with a sl st to the first sc, fasten off, and weave in the ends.

โ€” Small flowers :

Info :

Make five cream flowers and two pale blue flowers, or adjust the number to suit your panel. Leave a sewing tail on each flower.

Flower round :

Ch 4 and sl st in the first ch to form a ring. Work (ch 2, sc in ring, ch 2, sl st in ring) five times for five petals. Fasten off, leaving a tail.

Flower centers :

With yellow, make a small stitched center on each cream flower. Secure the yarn on the back.

โ€” Embroidered birds and foliage :

Layout :

Place the panel on the case and lightly mark the large bird below the camera, the small bird above it, and two curved flowering branches. Keep all motifs away from the camera opening and attachment edge.

Large bird body :

With navy, fill an oval head and the upper body using short, closely placed satin stitches. With white, fill a curved breast below the head, following the body outline.

Large bird wings :

Work a tapered wing extending left from the body with overlapping medium-blue stitches. Add a smaller layer of sage-green stitches over the upper part of the wing, leaving the blue tips visible.

Large bird tail :

With navy, embroider two narrow tapered tail feathers extending down and left from the body. Use several short overlapping stitches rather than one long loose stitch.

Large bird details :

Use black stitches for a small eye, pointed beak, and two feet. With brown, backstitch a short branch beneath the feet.

Small bird :

With pale blue, embroider a small oval body above the large bird. Add a raised wing and a tapered tail with short satin stitches, then add a white underside and a small black stitched eye and beak.

Branches :

With sage green, backstitch one short curved branch below the camera and another along the lower part of the panel.

Leaves :

Embroider small pointed leaves along the branches with short green satin stitches. Vary their direction while leaving room for the flowers.

Assembly Instructions

  • Arrange the cream and pale blue flowers on the branches, leaving the camera opening and panel edge clear.
  • Sew each flower to the panel through its center and the backs of several petals.
  • Weave all remaining decorative yarn ends through stitches on the reverse and trim them.
  • Place the finished panel on the compatible case or fitted backing, aligning the camera opening and checking all controls and ports.
  • Sew the panel securely around its outer edge and camera opening through the sewable case or backing, without piercing the phone or obstructing any opening.
  • Fit the case to the phone and check that the panel sits flat and that the camera, buttons, and charging port remain accessible.

Important Notes

  • ๐Ÿ’กThe photo is inspiration for this original pattern; the exact embroidery shapes and phone dimensions are adaptable.
  • ๐Ÿ’กMeasure your own phone case and check the camera opening throughout construction; the sample stitch counts may need adjustment.
  • ๐Ÿ’กKeep the phone out of the case while sewing the panel in place.
  • ๐Ÿ’กUse a sewable case or fitted backing; do not stitch through a rigid case unless it is designed for sewing.
  • ๐Ÿ’กCrochet adds decoration but does not guarantee impact protection.
  • ๐Ÿ’กAvoid loose beads for the eyes; stitched details sit flatter and are easier to secure.

This bird and flower phone case brings a small garden scene to an everyday accessory. Start by fitting the cream panel to your case, then add the birds and blossoms one detail at a time. Before attaching it, check that the camera opening is clear and every decorative stitch is secure. Enjoy choosing colors that make your finished cover feel like your own. ๐Ÿงถ

You ask,

we answer.

FAQs

How do I resize the panel for my phone?

Make a short single-crochet swatch with your chosen yarn and hook, then use its stitch and row spacing to estimate the panel size. Adjust the foundation chain and work enough full-width rows to reach the bottom of the camera opening. Divide the panel width between the opening and the side strip, and check the piece against your case as you work.

How can I move or resize the camera opening?

Mark the camera area on your case first, leaving clearance for every lens and the flash. Change the number of stitches left unworked and the number of short rows to match the marked opening, then chain the same number of stitches you left unworked to bridge its top. Keep checking the position before adding the edging and embroidery.

What kind of case should I attach the crochet to?

Choose a case made for your phone that has a sewable surface or a securely attached fabric backing. Position the crochet on the outside and stitch through the backing without covering the camera, buttons, speakers, or charging port. Check that the attachment is secure before using the case, and keep the phone out while sewing.

Can I use a different yarn for the birds and flowers?

Yes. Embroidery thread or a lighter cotton yarn can make the details finer, while the panel can remain in the yarn used for your fit swatch. If you change the panel yarn, check the measurements again because thicker or thinner yarn changes its size. Secure every end well and keep the embroidery flat enough for comfortable handling.

Should I block the panel before attaching it?

If the panel curls slightly, gently dampen it and lay it flat in its intended shape before adding the decorations. Allow it to dry fully, then compare it with the case again, particularly around the camera opening. Avoid stretching it aggressively, since a distorted panel can be difficult to attach neatly.

How should I clean the finished cover?

Remove the phone first and follow the care instructions for both the yarn and the case or backing. For a small mark, gently spot-clean with a damp cloth and mild soap if the materials allow it. Avoid soaking parts that cannot safely get wet, and let everything dry completely before putting the phone back.