🧢 Beautiful ✨ Detailed πŸ’ Adorable

Black and White Spiderweb Crochet Top Pattern

Black and White Spiderweb Crochet Top Pattern
4.6β˜… Rating
5-7 Hours Time Needed
4.0K Made This
βœ‚οΈ

Intermediate Level

Ideal for those with basic knitting experience, featuring slightly more advanced stitches and techniques to expand your skills.

⏱️

Weekend Treat

Takes 5-7 hours, making it an enjoyable project to finish over a couple of days.

πŸŽ€

Playful Twist

Fun patterns meet timeless design in pieces that express personality while remaining wonderfully wearable.

About This Black and White Spiderweb Crochet Top Pattern

This original crochet top takes its inspiration from the photograph’s contrasting black and white spiderwebs, long ties, and pointed outer edge. Two semicircular panels begin with a small center and grow through rows of increasingly long chain spaces, creating an airy web without complicated stitch combinations. The panels meet along their straight edges to form a circular overlay, while four ties let you position it against your body. Smooth cotton yarn helps the open loops show clearly, and comfortable chains make the fabric easier to shape.
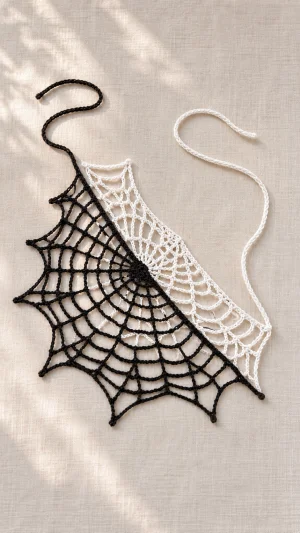
Black and White Spiderweb Crochet Top Pattern crochet pattern - detailed view of completed project

You will need to recognize single crochet stitches, count chains, work around a magic ring, and sew matching edges together. Because the open fabric stretches and provides little coverage, check the size against your body as you work and plan to wear it over another garment.

Why You'll Love This Black and White Spiderweb Crochet Top Pattern

I love how the black and white panels give this spiderweb top its character while using the same repeat on both sides. Each row has eight chain spaces, so you can pause between rows and check your progress without losing track of complicated shaping. The two panels are manageable to carry, and the seam becomes a strong visual line across the finished piece. I also appreciate that the ties can be made to suit the way you want to wear it, whether over a fitted tank, a swimsuit, or a costume. Leave time to arrange the loops during blocking and secure the yarn ends carefully: those finishing steps help the openwork look tidy and make the overlay more comfortable to wear.

Black and White Spiderweb Crochet Top Pattern step 1 - construction progress Black and White Spiderweb Crochet Top Pattern step 2 - assembly progress Black and White Spiderweb Crochet Top Pattern step 3 - details and accessories Black and White Spiderweb Crochet Top Pattern step 4 - final assembly and finishing

Switch Things Up

I would begin by choosing two yarn colors with a clear contrast, because the joined panels make the strongest visual statement when each web remains easy to distinguish. Black and ivory echo the photograph, while charcoal and silver or plum and cream can give the same construction a different mood. Use yarns of similar weight and fiber so both panels grow at a comparable rate, and keep the eight chain spaces in every web row. I would also consider making both panels in one color for a quieter layer, leaving the center seam visible as a subtle line. If you prefer a brighter accent, use a contrasting color for the four ties while retaining the same panel instructions.

For a larger overlay, I would work an additional row on each panel, adding two chains to each space as established in the pattern, then compare the panels before joining. For a smaller piece, stop both panels after the same earlier row and check that the resulting fabric covers the area you want to layer. These changes also affect yarn use and the distance between tie points, so measure against your body before cutting the yarn. I would adjust the tie lengths independently to suit a neck and waist arrangement, making each pair long enough to knot comfortably without pulling the web out of shape. Soft ribbons can replace crocheted ties if they are sewn securely through the panel edges and can support the fabric.

Finally, I would shape the points gently during blocking for a more pronounced web silhouette, or leave the loops relaxed for a softer edge. Keep the two straight edges matched at the center and row ends when assembling, so a change in color, size, or styling does not distort the seam.

Common Mistakes & How to Fix Them

βœ— If one panel grows larger than the other, your chain tension or yarn weight may differ. Use matching yarn weights and compare the panels after each row; adjust your tension or hook if their edges do not align.βœ— If a row has too many or too few web openings, an anchor stitch may have been missed or repeated. Undo that row and place one single crochet in each previous anchor; count eight chain spaces before turning.βœ— If the web puckers around its center, the magic ring may be pulled too tight or the early chains may be firm. Loosen the ring slightly and remake tight chains, then lay the beginning flat to check it.βœ— If the outer edge curls, tight chains or overstretched anchors may be responsible. Remake the affected row with relaxed chains, then lay the panel flat and check that its eight spaces open evenly.βœ— If the diagonal seam twists, the panel centers or row ends may not match. Unpick the seam, pin corresponding points together, and check that both panels lie flat before sewing again.βœ— If the ties distort the openwork, they may be attached through only one loose chain or pulled too tightly. Secure each tie through a sturdy anchor, then try the overlay on and check that its loops keep their shape.βœ— If yarn tails slip out of the open stitches, they may be too short or woven through only one direction. Leave longer tails, weave through several solid anchors in different directions, and gently tug to check they hold.

Black and White Spiderweb Crochet Top Pattern

Create a striking spiderweb crochet top with contrasting black and white openwork and a pointed, scalloped edge. You will work two panels from the center outward, join them along a diagonal, and add ties you can adjust for a comfortable fit. Layer your finished piece over a favorite garment for a festival outfit, a costume, or an eye-catching everyday look.

Intermediate 5-7 Hours

Materials Needed for Black and White Spiderweb Crochet Top Pattern

β€” Main Fabric

  • 01
    Smooth, similarly weighted cotton yarn in black and white; choose a light or DK weight and obtain enough for two matching panels and four ties.
  • 02
    Optional contrasting yarn for the ties.

β€” Tools Required

  • 01
    Crochet hook appropriate for the yarn label
  • 02
    Yarn needle
  • 03
    Scissors
  • 04
    Stitch markers or removable pins
  • 05
    Measuring tape
  • 06
    Blocking mat and rustproof pins

Progress Tracker

0% Complete

β€” Before You Begin :

Info :

This is an original pattern inspired by the pictured top. Use US crochet terms. Make one panel in black and one in white; both follow the same instructions. The turning ch 1 does not count as a stitch.

Fit :

Each panel is a semicircle. Its center-to-outer-edge distance becomes approximately half the width of the joined overlay. Hold a panel against your body as you work; the open fabric stretches, so choose your preferred coverage before joining.

β€” Spiderweb Panels :

Row 1 :

Make a magic ring, ch 1, and work 9 sc into the ring. Pull the ring closed, leaving the stitches in a flat arc; do not join. Ch 1, turn. (9 sc)

Row 2 :

Sc in the first sc, then (ch 3, sc in the next sc) 8 times. Ch 1, turn. (8 ch-3 spaces, 9 sc)

Row 3 :

Sc in the first sc, then (ch 5, sc in the next sc, passing in front of the intervening ch-sp) 8 times. Ch 1, turn. (8 ch-5 spaces, 9 sc)

Row 4 :

Sc in the first sc, then (ch 7, sc in the next sc, passing in front of the intervening ch-sp) 8 times. Ch 1, turn. (8 ch-7 spaces, 9 sc)

Row 5 :

Sc in the first sc, then (ch 9, sc in the next sc, passing in front of the intervening ch-sp) 8 times. Ch 1, turn. (8 ch-9 spaces, 9 sc)

Row 6 :

Sc in the first sc, then (ch 11, sc in the next sc, passing in front of the intervening ch-sp) 8 times. Ch 1, turn. (8 ch-11 spaces, 9 sc)

Row 7 :

Sc in the first sc, then (ch 13, sc in the next sc, passing in front of the intervening ch-sp) 8 times. Ch 1, turn. (8 ch-13 spaces, 9 sc)

Row 8 :

Sc in the first sc, then (ch 15, sc in the next sc, passing in front of the intervening ch-sp) 8 times. Ch 1, turn. (8 ch-15 spaces, 9 sc)

Row 9 :

Sc in the first sc, then (ch 17, sc in the next sc, passing in front of the intervening ch-sp) 8 times. Fasten off, leaving a long sewing tail on one panel. (8 ch-17 spaces, 9 sc)

Info :

Repeat Rows 1–9 in the second color. For a different size, stop both panels after the same row or add matching rows, increasing each chain space by 2 chains per added row.

β€” Ties :

Make 4 :

With your chosen color, make a chain long enough to tie comfortably at its intended position. Sl st in the second ch from the hook and in each remaining ch. Fasten off, leaving a sewing tail. Make two neck ties and two waist ties, checking their lengths against your body.

β€” Assembly and Finishing :

Join :

Place the two panels flat with their straight edges together, matching their centers and corresponding row ends. Sew along both straight edges, from one outer endpoint through the centers to the other outer endpoint.

Position :

Turn the joined circle so the seam runs diagonally across your front. Hold it over a garment and mark two comfortable upper attachment points for the neck ties and two side attachment points for the waist ties.

Attach :

Sew one tie securely through a sturdy single crochet anchor at each marked point. Try on the overlay and adjust placement before fastening the sewing tails.

Finish :

Weave in all ends through several sturdy anchors. Dampen and gently shape the overlay flat, pinning the outer anchor stitches into points without overstretching the chains; allow it to dry completely.

Assembly Instructions

  • Lay the black and white panels flat with their straight edges together, matching the centers and row ends.
  • Sew the straight edges together from one outer endpoint through the centers to the opposite endpoint.
  • Hold the joined overlay diagonally over a garment and mark two upper tie positions and two side tie positions.
  • Sew one tie through a sturdy single crochet anchor at each marked point, then check the fit.
  • Weave in the ends, gently shape the outer points on a blocking mat, and let the piece dry completely.

Important Notes

  • πŸ’‘The photographs are inspiration; the written instructions are an original interpretation of the pictured design.
  • πŸ’‘Each web row has nine single crochet anchors and eight chain spaces.
  • πŸ’‘Work each new anchor into the previous row’s single crochet, not into its chain space.
  • πŸ’‘Make both panels to the same row count and compare their size before joining.
  • πŸ’‘The fabric is very open; wear the overlay over a garment that provides your preferred coverage.
  • πŸ’‘Tie lengths and placement depend on your body and preferred fit.

Your spiderweb overlay comes together one airy row at a time, with contrasting panels and ties that make it easy to style. Before wearing it, check the knots, secure the ends, and arrange the scallops to show off the web. Pair it with a layer you love and adjust the ties until the fabric sits comfortably. Enjoy giving this striking crochet top your own finishing touch.

You ask,

we answer.

FAQs

How do I make the crochet top larger or smaller?

For a smaller overlay, stop both panels after the same earlier row. For a larger one, add the same number of rows to each panel, increasing every chain space by two chains on each new row while keeping nine anchors and eight spaces. Hold a panel against your body as you go, and allow extra yarn for a larger piece.

What should I wear underneath the spiderweb top?

The large chain spaces create an open overlay, so choose an underlayer that gives you the coverage and support you prefer. A fitted tank, crop top, swimsuit, or costume base can work well. Try the web over your intended layer before attaching the ties so you can place them where they feel comfortable.

Can I use a different yarn?

Yes. Choose a smooth yarn that shows the chain spaces clearly, and use similar weights for both colors so the panels match. Cotton can give the web a defined appearance, while other fibers may drape differently. Make the first few rows in each color and compare their size before committing to both panels.

How do I keep the two panels even?

Count eight chain spaces and nine single crochet anchors at the end of every row. Use the same hook and a similar chain tension for both colors, then lay one panel over the other before sewing. If the edges differ noticeably, adjust your tension or hook and remake the affected panel before joining.

Where should I attach the ties?

Hold the joined overlay diagonally against your front over the garment you intend to wear. Mark two upper points that reach comfortably toward your neck and two side points that can tie around your waist. Attach each tie to a sturdy single crochet anchor, and check the fit before weaving in its sewing tail.

How should I block and care for the finished top?

Follow the care instructions on your yarn label. For blocking, dampen the piece and lay it flat, arranging the web spaces evenly and pinning the outer anchors into gentle points without stretching the chains hard. Let it dry completely. Store it flat when possible, and avoid catching the open loops on jewelry or fasteners.