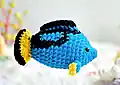
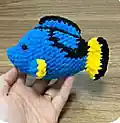
Dive into the underwater world with this adorable Blue Tang Fish amigurumi pattern! Inspired by everyone's favorite forgetful fish, this charming creation features vibrant blue coloring with striking black markings and bright yellow fins. Perfect for ocean lovers and Finding Nemo fans alike, this delightful fish works up quickly using super bulky yarn and simple stitches. The no-sew construction makes it beginner-friendly while still creating a stunning finished piece that's sure to make waves in any collection.
Progress Tracker
0% Complete
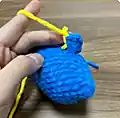
— Body (Crochet from body up to tail - no sew):
Info:
Begin with Blue yarn. When the text is bold and underlined, switch to BLACK yarn
Row 3:
INC, SC, 2INC, SC, INC (10)
Row 5:
4SC, (INC, SC) 4 times, INC, 4SC (22)
Row 6:
5SC, (INC, SC) 6 times, 5SC (28)
Row 7:
8SC, INC, 10SC, INC, 8SC (30)
Row 8:
14SC, 2SC, 14SC (30)
Row 9-10:
13SC, 4SC, 13SC (30)
Row 11:
10SC, 10SC, 10SC (30)
Row 12:
9SC, 2SC, 2SC, 4SC, 2SC, 2SC, 9SC (30)
Row 13:
9SC, SC, 3SC, 4SC, 3SC, SC, 9SC (30)
Row 14:
3SC, DEC, 3SC, DEC, 3SC, DEC, 2SC, SC, DEC, SC, 2SC, DEC, 3SC, DEC (24)
Row 15-16:
6SC, 2SC, 3SC, 3SC, 2SC, 2SC, 6SC (24)
Row 17:
2SC, DEC, 2SC, (DEC, 2SC) 3 times, DEC, 2SC, DEC (18)
Row 18:
5SC, 9SC, 4SC (18)
Row 19:
(SC, DEC) 2 times, (SC, DEC) 3 times, SC, DEC
Info:
Stuffing time! Cut the Black and Blue yarn
Info:
Change to Yellow yarn
Row 20:
Crochet 2 side together with 6SC
Row 21:
Turn, 2CH, DC-INC 6 times (12)
Info:
Change to Black yarn
Row 22:
Turn, CH, 12SC (12)
Info:
Weave in the yarn end and cut
— Dorsal Fins:
Part 1 (Make 2):
Begin with Blue yarn. Pick up the yarn from row 7, apart 8 stitch
Row 1:
(Chains 1, HDC, 3DC, HDC) in one stitch (5)
Info:
Change to Yellow yarn
Info:
Weave in the yarn end and cut
Part 2:
Begin with Blue yarn. Pick up the yarn from R8 to R16, in the vertical line from head to tail
Row 1:
(Chains 1, SC, 7DC, SC) in one stitch (9)
Info:
Change to Black yarn
Info:
Weave in the yarn end and cut
— Finishing:
Eyes:
Attach the eyes at R5-R6, apart 8 stitch
This delightful Blue Tang Fish pattern captures all the charm of everyone's favorite forgetful fish from Finding Nemo! The innovative no-sew construction makes it perfect for beginners while still creating a professional-looking result. With its vibrant blue body, distinctive black markings, and cheerful yellow fins, this little ocean friend is sure to bring smiles wherever it swims. The quick 2-3 hour completion time makes it perfect for a weekend project or a thoughtful handmade gift. 🐟 Happy crocheting! 🧶✨