๐Ÿงถ Beautiful โœจ Detailed ๐Ÿ’ Adorable

Bowling Llama Amigurumi Pattern

Bowling Llama Amigurumi Pattern
4.6โ˜… Rating
6-8 Hours Time Needed
4.1K Made This
โœ‚๏ธ

Intermediate Level

Ideal for those with basic knitting experience, featuring slightly more advanced stitches and techniques to expand your skills.

โฑ๏ธ

Weekend Treat

Takes 5-7 hours, making it an enjoyable project to finish over a couple of days.

๐Ÿงธ

Cute Companion

An adorable friend to cherish, handcrafted with love to bring comfort and joy for years to come.

About This Bowling Llama Amigurumi Pattern

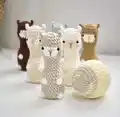
This bowling llama pattern introduces you to the wonderful world of no-sew amigurumi construction. The clever design integrates ears, snout, and legs directly into the body, eliminating the need for separate pieces and assembly. You'll learn valuable techniques including color changes, bobble stitches, and creating texture variations that make this llama truly special. The pattern comes complete with a matching bowling ball to create your own miniature bowling set.

Bowling Llama Amigurumi Pattern crochet pattern - detailed view of completed project

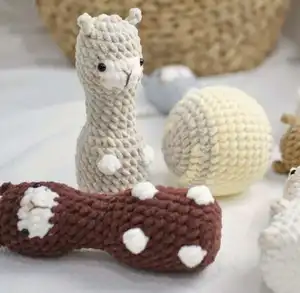
The finished llama measures approximately 15cm in height and uses chunky yarn for a soft, cuddly texture. Optional stability features allow your llama to stand upright independently, making it perfect for display or play.

Why You'll Love This Bowling Llama Amigurumi Pattern

I absolutely love how this pattern combines playful design with practical construction techniques. The no-sew approach means less finishing work and more time enjoying your creation. The bowling theme adds such a fun, unique twist that makes this llama stand out from typical amigurumi patterns. I find the bobble stitch details particularly satisfying to work, and the color change techniques you'll learn here will serve you well in future projects.

Bowling Llama Amigurumi Pattern step 1 - construction progress Bowling Llama Amigurumi Pattern step 2 - assembly progress Bowling Llama Amigurumi Pattern step 3 - details and accessories Bowling Llama Amigurumi Pattern step 4 - final assembly and finishing

Switch Things Up

I love experimenting with different color combinations for this bowling llama pattern. Try creating a rainbow llama using bright, bold colors for each section, or go for a more sophisticated look with gradient shades from light to dark. You could also modify the bowling ball to look like different sports balls - imagine a soccer ball version with black and white patches, or a basketball with orange yarn and black lines. For a seasonal twist, I've made holiday versions using red and green for Christmas, or pastels for spring. The bobble stitches can be emphasized with contrasting colors to make them pop even more. Some crafters have added a small bell inside the bowling ball for a fun rattle effect, though be mindful if the toy is for very small children.

Common Mistakes & How to Fix Them

โœ— Forgetting to stuff the head firmly before continuing to the body section โœ— Not placing safety eyes at the correct position between rounds 6 and 7 โœ— Missing color changes in the bowling ball pattern causing incorrect stripe placement โœ— Pulling closing stitches too tight and creating puckering at the bottom

Bowling Llama Amigurumi Pattern

Create your own adorable bowling llama with this charming amigurumi pattern! This unique design features an integrated no-sew construction where the ears, snout, and legs are cleverly built into the main body. Perfect for beginners looking to try color changes and bobble stitches, this pattern includes a cute llama pin and bowling ball. The finished llama stands approximately 15cm tall and makes a delightful gift or home decoration that will bring smiles to any space.

Intermediate 6-8 Hours

Materials Needed for Bowling Llama Amigurumi Pattern

โ€” Main Fabric

  • 01
    Chunky yarn size 4-5mm in cream/white and gray colors
  • 02
    Suggested brands: Himalaya Velvet or Himalaya Dolphin Baby yarn

โ€” Tools Required

  • 01
    4mm crochet hook
  • 02
    6mm toy safety eyes
  • 03
    Needle for sewing
  • 04
    Toy stuffing (fiberfill)
  • 05
    Stitch marker
  • 06
    Scissors
  • 07
    Brown embroidery thread
  • 08
    Powder blush for cheeks

Progress Tracker

0% Complete

โ€” Head & Body :

Round 1 :

8sc in MR [8]

Round 2 :

2inc, (ch 4, skip 2 ch from the hook, slst in next 2 ch), inc in next st of the base, 3inc, (ch 4, skip 2 ch from the hook, slst in next 2 ch), inc in next st of the base, inc [16]

Round 3 :

(3sc, inc) x 4 [20]

Round 4-5 :

20sc [20]

Round 6 :

8sc, 4inc, 8sc [24]

Round 7 :

8sc, 8sc, 8sc [24]

Round 8 :

8sc, 4dec, 8sc [20]

Round 9 :

20sc [20]

Round 10 :

sc, dec, (2sc, dec) x 4, sc [15]

Round 11-14 :

15sc [15]

Info :

Stuff the head firmly with fiberfill

Round 15 :

(2sc, inc) x 5 [20]

Round 16 :

(4sc, inc) x 4 [24]

Round 17 :

24sc [24]

Round 18 :

11sc, bo4, 4sc, bo4, 7sc [24]

Round 19-22 :

24sc [24]

Round 23 :

11sc, bo4, 5sc, bo4, 6sc [24]

Round 24 :

24sc [24]

Round 25 :

(sc, dec) x 8 [16]

Info :

Stuff the body firmly with fiberfill

Round 26 :

8dec [8]

Info :

Fasten off, weave yarn tail through front loops and close

โ€” Bowling Ball :

Round 1 :

8sc in MR [8]

Round 2 :

8inc [16]

Round 3 :

(sc, inc) x 2, (sc, inc) x 6 [24]

Round 4 :

(2sc, inc) x 3, (2sc, inc) x 3, (2sc, inc) x 2 [32]

Round 5 :

32sc [32]

Round 6 :

(3sc, inc) x 8 [40]

Round 7-12 :

40sc [40]

Round 13 :

(3sc, dec) x 8 [32]

Round 14 :

32sc [32]

Round 15 :

(2sc, dec) x 2 + (2sc, dec) x 3 + (2sc, dec) x 3 [24]

Round 16 :

(sc, dec) x 6 + (sc, dec) x 2 [16]

Info :

Stuff the ball firmly with fiberfill

Round 17 :

8dec [8]

Info :

Fasten off, weave yarn tail through front loops and close

Assembly Instructions

  • Insert 6mm safety eyes between rounds 6 and 7, positioned 8 stitches apart
  • Embroider the nose using brown embroidery thread in a Y-shape
  • Apply powder blush to the nose area and cheeks for a natural look
  • Optional: Insert a 2cm radius plastic pad in the bottom for stability

Important Notes

  • ๐Ÿ’กUse invisible decrease stitches for better shape and cleaner finish
  • ๐Ÿ’กKeep stitches close together to prevent stuffing from showing through
  • ๐Ÿ’กMaster color change, bobble stitch, and X stitch techniques before starting
  • ๐Ÿ’กStuff firmly but not too tightly to maintain proper shape
  • ๐Ÿ’กUse stitch markers to track rounds, especially during color changes

This delightful Bowling Llama pattern brings together the charm of amigurumi with a playful bowling theme that's sure to strike up conversations! The no-sew construction makes it perfect for those who want beautiful results with less finishing work. With its adorable bobble details and integrated features, this pattern teaches valuable techniques while creating a truly unique companion. Perfect for gift-giving or adding whimsy to your home decor. Happy crocheting!

You ask,

we answer.

FAQs

Can I use different yarn weights for this pattern?

The pattern is designed for chunky yarn (4-5mm). Using different weights will change the final size and may affect the structure.

What if I'm new to bobble stitches?

The pattern includes video tutorials for bobble stitches. Practice on a swatch first before starting the main project.

Is the bowling ball necessary?

The bowling ball completes the theme but the llama can stand alone. It's a fun addition that showcases color change techniques.

How do I make the llama stand up?

The pattern includes an optional plastic pad insert for the bottom, or stuff the base firmly for natural stability.