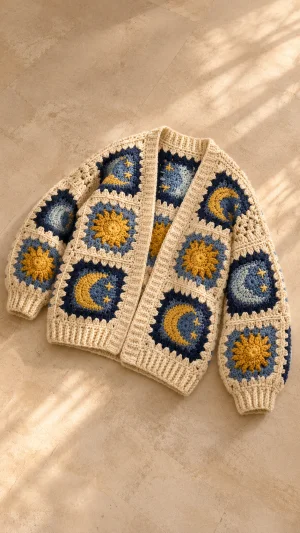
Wrap yourself in a cozy crochet cardigan filled with golden suns, crescent moons, and starry skies. You’ll make individual granny squares, join them into an open-front garment, and finish the edges with cream ribbing. This image-inspired pattern breaks the project into manageable pieces, with room to arrange the celestial motifs in your own favorite order.
Progress Tracker
0% Complete
— Planning and gauge :
Info :
Make 24 squares: 12 for the body and 12 for the sleeves. The target is an 8-inch square after blocking. At that gauge, the body measures approximately 32 inches around and 24 inches long before ribbing; each sleeve measures approximately 16 inches around and 24 inches long before the cuff. These are calculated dimensions, and seams and yarn behavior can affect the finished fit.
Info :
Make a sample square and adjust hook size to reach gauge. Check the body circumference, shoulder placement, sleeve circumference, and length against a comfortable garment before making all the squares. Beginning chains do not count as stitches. Join each round with a sl st to the first stitch, unless otherwise stated.
— Celestial square :
Info :
Make 24. Choose gold for some centers and medium or pale blue for others. Use navy or blue for the surrounding sky and cream for the final round. Change colors by fastening off and joining the new color in the first stitch of the next round.
Round 1 :
With the center color, make a magic ring. Ch 2, work 12 dc into the ring, pull the ring closed, and join. (12 dc)
Round 2 :
Ch 2, work 2 dc in each st around; join. (24 dc)
Round 3 :
Join the sky color if changing colors. Ch 2, work 2 dc in the first st, dc in the next st; repeat around and join. (36 dc)
Round 4 :
Ch 4. In the first st work 3 tr, ch 2, and 3 tr for a corner. Work dc in each of the next 2 sts, hdc in each of the next 2 sts, sc in each of the next 2 sts, hdc in the next st, and dc in the next st. Repeat this corner and following 8-st sequence three more times; join to the first tr. (56 stitches and 4 corner ch-2 spaces)
Round 5 :
Join cream in any corner ch-2 space. Ch 2, work 2 dc, ch 2, and 2 dc in that space. Dc in each of the next 14 sts; work 2 dc, ch 2, and 2 dc in the next corner space. Repeat around, ending with 14 dc after the fourth corner; join. Fasten off. (72 dc and 4 corner ch-2 spaces; 18 dc along each side)
— Celestial embroidery :
Sun :
On a gold-centered square, use gold yarn to embroider straight rays radiating from the center toward the sky round. Space them around the circle and keep the stitches clear of the cream border.
Moon :
On a blue-centered square, use gold or pale blue yarn to outline a crescent with two curved lines. Fill the shape with closely spaced embroidery stitches, keeping the fabric flat.
Stars :
Use short crossing stitches in gold to add one or two stars beside each moon. Secure and weave in the embroidery ends on the wrong side.
— Ribbed edges :
Hem setup :
After the body panels are joined, attach cream yarn at one lower front corner. Work sc evenly across the lower edge to the opposite front corner, placing approximately one sc in each square-edge stitch and adjusting at seams so the edge lies flat. Turn.
Hem row 1 :
Ch 7, sc in the second ch from the hook and in each remaining ch; sl st in the next 2 available hem-edge sc to attach the ribbing. Turn. (6 ribbing sc)
Hem row 2 :
Skip the 2 joining sl sts, sc BLO in each of the 6 ribbing sts. Ch 1 and turn. (6 sc)
Hem row 3 :
Sc BLO in each of the 6 ribbing sts, sl st in the next 2 available hem-edge sc, and turn. (6 sc)
Hem continuation :
Repeat rows 2 and 3 across the hem. If one edge sc remains, attach the final ribbing row with one sl st. Fasten off.
Cuff setup :
With each sleeve attached and its seam closed, join cream at the underarm seam on the lower sleeve edge. Work sc evenly around the opening, adjusting the spacing for a comfortable wrist opening; join to the first sc. Use an even number of sc. Turn.
Cuff row 1 :
Ch 7, sc in the second ch from the hook and in each remaining ch; sl st in the next 2 available cuff-edge sc. Turn. (6 ribbing sc)
Cuff row 2 :
Skip the 2 joining sl sts, sc BLO in each of the 6 ribbing sts. Ch 1 and turn. (6 sc)
Cuff row 3 :
Sc BLO in each of the 6 ribbing sts, sl st in the next 2 available cuff-edge sc, and turn. (6 sc)
Cuff continuation :
Repeat rows 2 and 3 around the opening. Fasten off, leaving a tail, and sew the first and last ribbing rows together. Repeat the cuff on the other sleeve.
Front band row 1 :
With the right side facing, join cream at the lower corner of one front, including the end of the hem ribbing. Work sc evenly up that front edge, around the back neck, and down the other front edge to the lower corner. Place stitches closely enough to cover the edge without making it wave. Ch 1 and turn.
Front band row 2 :
Sc in each sc across. Ch 1 and turn.
Front band row 3 :
Sc in each sc across. Fasten off.
Your celestial cardigan comes together one square at a time, from sunny gold centers to embroidered moons and stars. Once the panels are joined, try it on before adding the bands so you can check the sleeve length and shoulder placement. Take your time weaving in the color-change ends and gently shaping the ribbing. Then enjoy a cozy, handmade layer that brings a little night-sky magic to everyday outfits.