🧶 Beautiful ✨ Detailed 💝 Adorable

Cherry Blossom Drawstring Pouch Crochet Pattern

Cherry Blossom Drawstring Pouch Crochet Pattern
4.8★ Rating
5-7 Hours Time Needed
1.4K Made This
✂️

Beginner Friendly Level

Perfect for those just starting their sewing journey, with clear instructions and simple techniques

⏱️

Weekend Treat

Takes 5-7 hours, making it an enjoyable project to finish over a couple of days.

✨

Stylish Touch

An elegant detail to elevate any look, combining traditional techniques with contemporary design sensibilities.

About This Cherry Blossom Drawstring Pouch Crochet Pattern

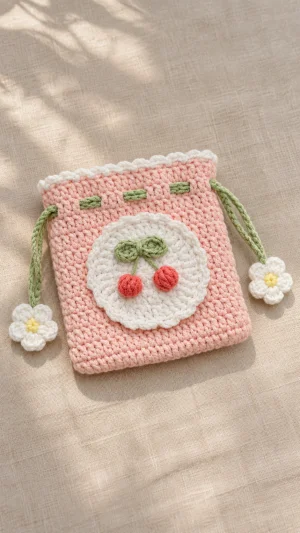
This original pouch pattern takes its inspiration from the photographed pink drawstring bag, with a cream circular patch, red cherries, green leaves, and little white flowers. Two rectangular double crochet panels form the body, and an eyelet row near the top gives the green cords a place to weave through. The circular appliqué is worked in increasing rounds, while the cherries, leaves, and flowers are made separately and sewn on. Cotton yarn helps the details hold their shape and gives the pouch a pleasant, sturdy texture; beginners will practice chains, double crochet, simple increases, and basic seaming.

Cherry Blossom Drawstring Pouch Crochet Pattern crochet pattern - detailed view of completed project

The pattern uses US crochet terms and leaves the top unlined, so the stitch openings remain visible inside. Finished size depends on your yarn and tension; compare the two panels as you work so their edges match neatly before you join them.

Why You'll Love This Cherry Blossom Drawstring Pouch Crochet Pattern

I love how this little pouch turns familiar stitches into something both useful and full of personality. The rectangular panels let you settle into a rhythm before you try the circular patch, and each cherry or flower is small enough to finish in a short sitting. I also like that you can arrange the appliqués before sewing: a few pins make it easy to adjust the leaves and cherries until the front feels balanced. Allow time for weaving in the many small ends, because a tidy reverse side makes the pouch more pleasant to use. Once finished, it is a cheerful place to keep earbuds, a lip balm, stitch markers, or other small treasures together in a larger bag.

Cherry Blossom Drawstring Pouch Crochet Pattern step 1 - construction progress Cherry Blossom Drawstring Pouch Crochet Pattern step 2 - assembly progress Cherry Blossom Drawstring Pouch Crochet Pattern step 3 - details and accessories Cherry Blossom Drawstring Pouch Crochet Pattern step 4 - final assembly and finishing

Switch Things Up

I would start with color if I wanted a different mood: a soft blue or lavender body would keep the cream patch and red cherries easy to see. For a more understated pouch, I could use two shades of the same color for the body and patch, choosing enough contrast that the scalloped edge still stands out. I would keep all yarns in a similar weight so the pieces remain proportionate and the flowers do not overwhelm the cords. If I had small leftover balls, I could use them for the cherries and leaves while keeping the larger panels in one color, checking first that I have enough yarn to complete both sides. Changing colors does not require changing the stitch counts, so the eyelets and seams can stay aligned as written.

I would also experiment with the placement of the decoration by pinning the circle slightly higher or lower before sewing, while leaving the drawstring openings clear. For a simpler finish, I could omit the leaves and cherries and let the cream circle stand alone; I would still sew its edge securely to the front panel. The flower ends can be made in a single color, or I could choose a contrasting center and petals to echo another shade in the appliqué. If I preferred a longer drawstring, I would add the same number of chains to both cords and check that each one still travels all the way around the pouch with enough length to knot. I would preserve the two matching panels and the same eyelet spacing, because those features let the cords cinch evenly from opposite sides. To make the pouch feel more substantial without changing its crochet, I could sew in a separate fabric lining below the eyelet row, leaving the drawstring path open.

Common Mistakes & How to Fix Them

✗ If one panel is wider than the other, a stitch may have been added or missed at a row end. Count 24 stitches after each row and compare the panels before seaming.✗ If the drawstrings catch or the openings do not line up, the eyelet row may have been worked unevenly. Check for six chain-two spaces on each panel and align them before sewing.✗ If the cream circle curls into a cup, increases may have been missed or the stitches may be too tight. Recount each round and gently flatten the completed circle to check its shape.✗ If the circle ripples, the yarn or tension may be too loose for the chosen hook. Try a smaller hook for the appliqué and check that it lies flat before attaching it.✗ If the pouch will not open fully, a seam or appliqué stitch may have caught an eyelet or cord. Remove the obstructing stitches, resew below the eyelets, and slide both cords through.✗ If a flower feels loose, its cord may be attached through too few stitches. Sew through the flower center and cord end several times, then gently tug to check the connection.✗ If the top edge puckers, the edging may have been worked too tightly. Redo it with a relaxed tension and check that the opening lies flat before threading the cords.

Cherry Blossom Drawstring Pouch Crochet Pattern

Make a sweet pink crochet pouch with a cherry appliqué, a scalloped cream edging, and daisy-tipped green drawstrings. You will crochet two simple panels, join them into a little bag, and add the decorative details one step at a time. This approachable project is a lovely way to practice basic stitches while making a useful pouch for small essentials.

Beginner Friendly 5-7 Hours

Materials Needed for Cherry Blossom Drawstring Pouch Crochet Pattern

— Main Fabric

  • 01
    Worsted-weight cotton yarn in pink for the pouch body
  • 02
    Worsted-weight cotton yarn in cream or white for the circular patch, edging, and flower petals
  • 03
    Worsted-weight cotton yarn in green for the drawstrings, leaves, and embroidered stems
  • 04
    Small amounts of worsted-weight cotton yarn in red for the cherries and yellow for the flower centers

— Tools Required

  • 01
    4 mm crochet hook, or a size suitable for the chosen yarn
  • 02
    Yarn needle
  • 03
    Scissors
  • 04
    Stitch markers
  • 05
    Pins for positioning appliqués

Progress Tracker

0% Complete

— Pouch Panels :

Info :

Make 2 identical panels in pink. The turning chain does not count as a stitch. Work rows back and forth.

Row 1 :

Ch 26. Dc in the third ch from the hook and in each remaining ch. Turn. (24 dc)

Row 2 :

Ch 2, dc in each st across. Turn. (24 dc)

Row 3 :

Ch 2, dc in each st across. Turn. (24 dc)

Row 4 :

Ch 2, dc in each st across. Turn. (24 dc)

Row 5 :

Ch 2, dc in each st across. Turn. (24 dc)

Row 6 :

Ch 2, dc in each st across. Turn. (24 dc)

Row 7 :

Ch 2, dc in each st across. Turn. (24 dc)

Row 8 :

Ch 2, dc in each st across. Turn. (24 dc)

Row 9 :

Ch 2, dc in each st across. Turn. (24 dc)

Row 10 :

Ch 2, dc in each st across. Turn. (24 dc)

Row 11 :

Ch 2, dc in each st across. Turn. (24 dc)

Row 12 :

Ch 2, (dc in each of the next 2 sts, ch 2, skip 2 sts) 6 times. Turn. (12 dc and 6 ch-2 spaces)

Row 13 :

Ch 2, (dc in each of the next 2 dc, 2 dc in the next ch-2 space) 6 times. Turn. (24 dc)

Row 14 :

Ch 2, dc in each st across. (24 dc)

Finishing :

Fasten off each panel, leaving a long pink tail on one panel for seaming.

— Cream Circle :

Info :

Make 1 in cream. Join each round with a sl st to the first dc; beginning ch 2 does not count as a stitch.

Round 1 :

Make an MR, ch 2, work 12 dc into the ring, and join. Pull the ring closed. (12 dc)

Round 2 :

Ch 2, work 2 dc in each st around; join. (24 dc)

Round 3 :

Ch 2, (dc in the next st, 2 dc in the next st) 12 times; join. (36 dc)

Round 4 :

Ch 2, (dc in each of the next 2 sts, 2 dc in the next st) 12 times; join. (48 dc)

Round 5 :

Ch 1, (sl st in the next st, 3 hdc in the next st, sl st in the next st) 16 times. Join to the first sl st. (16 scallops)

Finishing :

Fasten off, leaving a long tail for sewing.

— Cherries :

Info :

Make 2 in red. Join each round with a sl st to the first sc.

Round 1 :

Work 6 sc into an MR; join and pull the ring closed. (6 sc)

Round 2 :

Ch 1, work 2 sc in each st around; join. (12 sc)

Finishing :

Fasten off each cherry, leaving a tail for sewing.

— Leaves :

Info :

Make 2 in green.

Leaf :

Ch 6. Starting in the second ch from the hook, work sl st, sc, hdc, sc, and 3 sl sts in the last ch. Working along the opposite side of the foundation chain, work sc, hdc, sc, and sl st in the next 4 chains. (11 stitches)

Finishing :

Fasten off each leaf, leaving a tail for sewing.

— Drawstrings :

Cord 1 :

With green, ch 100. Fasten off, leaving a tail for attaching a flower.

Cord 2 :

With green, ch 100. Fasten off, leaving a tail for attaching a flower.

— Daisy Cord Ends :

Info :

Make 2 flowers. Each flower joins the two ends of one drawstring.

Round 1 :

With yellow, work 5 sc into an MR; join with a sl st to the first sc and pull the ring closed. Fasten off yellow. (5 sc)

Round 2 :

Join cream in any sc. In each of the 5 sts, work (sl st, ch 2, 2 dc, ch 2, sl st). (5 petals)

Finishing :

Fasten off each flower, leaving a tail for sewing.

— Top Edging :

Info :

Work the edging after joining the panels along the sides and bottom. Leave the top open.

Edging Round :

Join cream to any top-edge stitch. Working around both panels, (sl st in the next st, 3 hdc in the next st, sl st in the next st) 16 times; join to the first sl st. (16 scallops over 48 top-edge stitches)

Finishing :

Fasten off and weave in the cream ends.

Assembly Instructions

  • Pin the cream circle to the center of the front panel, below the eyelet row, and sew it in place around its outer edge.
  • Arrange the two red cherries on the lower half of the circle and sew each one securely in place.
  • Position the green leaves above the cherries and sew them down; embroider two green stems from the leaves to the cherries.
  • Place the panels together with the decorated side facing inward and the eyelet rows aligned. Sew the two side edges and bottom edge together, leaving the top open; turn the pouch right side out.
  • Work the cream top edging as described in the pattern, keeping the eyelets open.
  • Thread one green cord through all eyelets around the pouch, beginning and ending at one side. Thread the second cord through all eyelets in the opposite direction, beginning and ending at the other side.
  • Knot the two ends of each cord together and sew a daisy securely over each knot. Weave in all remaining ends, then pull the cords to check that the pouch closes and opens smoothly.

Important Notes

  • 💡This is an original pattern inspired by the pictured pouch; the reference image does not provide written stitch instructions.
  • 💡The time is an estimate and will vary with experience, tension, and the time spent sewing the details.
  • 💡Match the yarn weights and check the panel sizes before joining; finished dimensions will vary.
  • 💡Keep all sewing below the eyelet row so the cords can move freely.
  • 💡The drawstrings and small sewn details require care around young children; choose an appropriate recipient and secure all parts firmly.
  • 💡Hand wash gently in cool water and dry flat, following the yarn label.

This cherry blossom pouch brings together a practical drawstring shape and a handful of playful crochet details. Before sewing, arrange the cream circle, cherries, and leaves on the front until you like their spacing. Take a little time to secure the flowers and weave in every end, then thread the cords and try the closure. Your finished pouch is ready to keep a few favorite small things close at hand. Happy crocheting!
You ask,

we answer.

FAQs

Can a beginner make this drawstring pouch?

Yes. The body consists of two matching rectangles, so you can practice double crochet before trying the smaller decorative pieces. If you are new to magic rings or working around a foundation chain, practice those techniques with spare yarn first. Count the stitches in each panel row and take your time sewing the appliqués.

How do I make sure the drawstrings close evenly?

Make both cords the same length and align the panels' eyelet rows when you sew the sides. Thread the first cord around the entire opening with both ends at one side, then thread the second around the entire opening with both ends at the opposite side. Pull both flower ends outward to gather the pouch.

Can I use a different yarn weight?

You can, but the finished size and texture will change. Choose a hook suited to the yarn and make both body panels with the same yarn and tension. For balanced decorations, use a similar weight for the circle, cherries, leaves, and flowers, and check that your cords pass easily through the eyelets.

Should I block the pieces before assembly?

Blocking is optional, but it can help the panels match and the cream circle lie flat. Gently dampen the pieces according to the yarn label, shape them without stretching the eyelets, and let them dry completely. Compare the panels again before sewing and pin the appliqués in place to check their arrangement.

Can I add a lining to the pouch?

Yes. Sew a small fabric lining to fit inside the assembled pouch, with its upper edge below the eyelet row. Stitch it to the inside by hand without catching the drawstrings or closing the openings. A lining can help contain very small items that might otherwise slip through the crochet fabric.

How should I wash the finished pouch?

Follow the care instructions on your yarn label. For cotton, a gentle hand wash in cool water is a useful starting point; avoid rubbing the flowers and appliqués vigorously. Press out excess water in a towel, reshape the pouch and its decorations, and let everything dry flat before using it again.