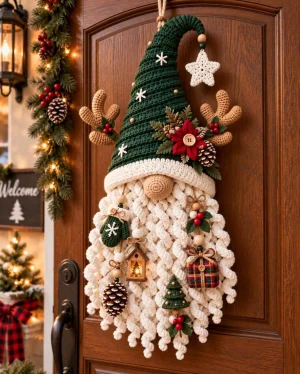
Create a festive crochet gnome with a forest green hat, branching antlers, and a generous beard of cream spirals, inspired by the holiday door decoration pictured. You will work the hat and backing flat, crochet the smaller details separately, and arrange everything into a lightweight hanging with a rounded nose and dangling star. This original Hook Vibes pattern breaks the project into manageable pieces, with optional holly and a red flower for your finishing touch.
Progress Tracker
0% Complete
— Before You Begin :
Pattern Notes :
This is an original pattern inspired by the supplied photograph, using a flat construction with separately attached details. The photograph does not contain written instructions. Small gift, lantern, pinecone, and wooden bead decorations are not required for this version.
Gauge and Size :
Gauge is flexible for this decoration. Use a hook that gives firm fabric without visible stuffing gaps. Make a small sc swatch and an hdc swatch if you need to plan the size: the backing is 29 sc wide, the hat base is 33 hdc wide, and the longest curls begin with 44 worked chains. Finished dimensions depend on your yarn, tension, and curl arrangement.
Flat Work :
Turning ch 1 never counts as a stitch. Work into the first stitch after turning. The hat and backing have no added crochet border; keep their edge stitches even.
Round Work :
Work the nose and antler pieces in continuous rounds without joining. Mark the first stitch and move the marker after every round. The star, flower, and berries have their own joining instructions.
Special Decreases :
For hdc2tog: yarn over, insert into the next stitch and pull up a loop; yarn over, insert into the following stitch and pull up a loop; yarn over and pull through all 5 loops. For hdc3tog: yarn over, insert into the next stitch and pull up a loop, repeat this action in each of the following 2 stitches, then yarn over and pull through all 7 loops.
— Cream Backing :
Foundation :
With cream, ch 30. Leave a starting tail for weaving in.
Row 1 :
Sc in the second ch from the hook and each remaining ch. Turn. (29)
Row 2 :
Ch 1, sc in each st. Turn. Mark this row for the short curls. (29)
Row 3 :
Ch 1, sc in each st. Turn. (29)
Row 4 :
Ch 1, sc in each st. Turn. (29)
Row 5 :
Ch 1, sc in each st. Turn. Mark this row for the medium curls. (29)
Row 6 :
Ch 1, sc in each st. Turn. (29)
Row 7 :
Ch 1, sc in each st. Turn. (29)
Row 8 :
Ch 1, sc in each st. (29)
Backing Finish :
Fasten off and weave in both ends. Lay the backing with Row 1 at the top and Row 8 at the bottom. Choose one face as the front and mark its upper-left corner; count all attachment positions from the left when viewing this face.
— Forest Green Hat :
Foundation :
With forest green, ch 34. This hat is a flat tapered panel worked from its wide base toward the tip.
Row 1 :
Hdc in the second ch from the hook and each remaining ch. Turn. (33)
Row 2 :
Ch 1, hdc2tog, hdc in the next 29 sts, hdc2tog. Turn. (31)
Row 3 :
Ch 1, hdc2tog, hdc in the next 27 sts, hdc2tog. Turn. (29)
Row 4 :
Ch 1, hdc2tog, hdc in the next 25 sts, hdc2tog. Turn. (27)
Row 5 :
Ch 1, hdc2tog, hdc in the next 23 sts, hdc2tog. Turn. (25)
Row 6 :
Ch 1, hdc2tog, hdc in the next 21 sts, hdc2tog. Turn. (23)
Row 7 :
Ch 1, hdc2tog, hdc in the next 19 sts, hdc2tog. Turn. (21)
Row 8 :
Ch 1, hdc2tog, hdc in the next 17 sts, hdc2tog. Turn. (19)
Row 9 :
Ch 1, hdc2tog, hdc in the next 15 sts, hdc2tog. Turn. (17)
Row 10 :
Ch 1, hdc2tog, hdc in the next 13 sts, hdc2tog. Turn. (15)
Row 11 :
Ch 1, hdc2tog, hdc in the next 11 sts, hdc2tog. Turn. (13)
Row 12 :
Ch 1, hdc2tog, hdc in the next 9 sts, hdc2tog. Turn. (11)
Row 13 :
Ch 1, hdc2tog, hdc in the next 7 sts, hdc2tog. Turn. (9)
Row 14 :
Ch 1, hdc2tog, hdc in the next 5 sts, hdc2tog. Turn. (7)
Row 15 :
Ch 1, hdc2tog, hdc in the next 3 sts, hdc2tog. Turn. (5)
Row 16 :
Ch 1, hdc2tog, hdc in the next st, hdc2tog. Turn. (3)
Row 17 :
Ch 1, hdc3tog. (1)
Hat Finish :
Fasten off, leaving a sewing tail at the tip. Weave in the foundation tail. Smooth the panel flat; block lightly according to the yarn label if the edges curl. Let it dry completely before assembly.
— Curled Hat Tip :
Foundation :
With forest green, ch 17, leaving a long starting tail.
Row 1 :
Work 2 sc in the second ch from the hook and in every remaining ch. (32)
Tip Finish :
Fasten off, leaving a second sewing tail. Guide the strip into a loose hook shape. Sew its foundation end to the hat's final stitch and upper side edge; use the second tail to tack the inner curve so the free end points downward. Weave in both ends after securing.
— Cream Hat Brim :
Foundation :
With cream, ch 36.
Row 1 :
Sc in the second ch from the hook and each remaining ch. Turn. (35)
Row 2 :
Ch 1, sc BLO in each st. Turn. (35)
Row 3 :
Ch 1, sc BLO in each st. Turn. (35)
Row 4 :
Ch 1, sc BLO in each st. (35)
Brim Finish :
Fasten off, leaving a long sewing tail. Keep the brim flat with its ridges facing forward. Do not join its short ends.
— Long Beard Curls :
Quantity :
Make 9 in cream. Leave a long starting tail on each curl for attachment.
Row 1 :
Work 3 sc in the second ch from the hook and in every remaining ch. There are 44 worked chains. (132)
Long Curl Finish :
Fasten off. Weave the finishing tail into nearby stitches without tightening the end. Wind the strand gently into a corkscrew and retain the starting tail at its top.
— Medium Beard Curls :
Quantity :
Make 8 in cream. Leave a long starting tail on each curl for attachment.
Row 1 :
Work 3 sc in the second ch from the hook and in every remaining ch. There are 36 worked chains. (108)
Medium Curl Finish :
Fasten off, weave in the finishing tail, and guide the strand into a corkscrew. Retain the starting tail.
— Short Beard Curls :
Quantity :
Make 7 in cream. Leave a long starting tail on each curl for attachment.
Row 1 :
Work 3 sc in the second ch from the hook and in every remaining ch. There are 28 worked chains. (84)
Short Curl Finish :
Fasten off, weave in the finishing tail, and guide the strand into a corkscrew. Retain the starting tail.
— Tan Nose :
Round 1 :
With tan, work 6 sc in an MR. Pull the ring closed. (6)
Round 2 :
Inc in each st. (12)
Round 3 :
(Sc in the next st, inc) 6 times. (18)
Round 4 :
(Sc in the next 2 sts, inc) 6 times. (24)
Round 5 :
Sc in each st. (24)
Round 6 :
Sc in each st. (24)
Round 7 :
(Sc in the next 2 sts, dec) 6 times. (18)
Stuffing :
Add small tufts of fiberfill. Keep the front rounded and press the back slightly flatter so it sits against the backing.
Round 8 :
(Sc in the next st, dec) 6 times. (12)
Round 9 :
Dec 6 times. (6)
Nose Finish :
Fasten off, leaving a long tail. Thread the tail through the front loops of the remaining 6 sts and draw closed. Pass the tail through the back of the nose and retain it for attachment.
— Antler Main Stems :
Quantity :
Make 2 in tan, working from each rounded upper tip toward its lower attachment edge.
Round 1 :
Work 6 sc in an MR. Pull closed. (6)
Round 2 :
(Sc in the next st, inc) 3 times. (9)
Round 3 :
Sc in each st. (9)
Round 4 :
Sc in each st. (9)
Round 5 :
Sc in each st. (9)
Round 6 :
Sc in each st. (9)
Round 7 :
Sc in each st. (9)
Round 8 :
Sc in each st. (9)
Round 9 :
Sc in each st. (9)
Round 10 :
Sc in each st. (9)
Main Stem Finish :
Fasten off, leaving a long sewing tail. Stuff lightly, keeping the lower 2 rounds flexible for flattening against the back of the hat. Leave the lower opening unclosed until attachment.
— Antler Branches :
Quantity :
Make 4 in tan, using 2 branches for each main stem.
Round 1 :
Work 6 sc in an MR. Pull closed. (6)
Round 2 :
Sc in each st. (6)
Round 3 :
Sc in each st. (6)
Round 4 :
Sc in each st. (6)
Branch Finish :
Fasten off, leaving a long tail. Add a tiny amount of stuffing and leave the opening unclosed.
Upper Branch Attachment :
Sew one branch opening around the outside of each main stem across Rounds 4-5. Angle the branch upward and outward. Sew around the opening twice and secure the tail inside the stem.
Lower Branch Attachment :
Sew the second branch to the same outward-facing side of each stem across Rounds 7-8. Angle it outward. Mirror the second antler so both sets of branches point away from the hat center.
— Cream Hanging Star :
Quantity :
Make 2 identical star layers in cream. These are joined without stuffing.
Round 1 :
Work 5 sc in an MR. Pull closed. (5)
Round 2 :
Inc in each st. Sl st to the first sc to join; the joining sl st does not count. (10)
Round 3 :
For each point: sc in the next unworked base st, ch 4, sc in the second ch from the hook, hdc in the next ch, dc in the last ch, then sl st in the next unworked base st. Repeat this sequence 5 times around, using all 10 base sts. (5 points)
Star Layer Finish :
Fasten off and weave in ends on the first layer. On the second layer, leave a long tail for joining. Flatten both layers gently with your fingers.
Star Joining :
Place the layers with their wrong sides together and align all 5 points. Whipstitch around the complete outline, catching corresponding edge loops and adding an extra stitch at each point tip. Secure and weave in the tail.
Star Cord :
Cut approximately 15 cm of cotton cord. Pass it through one star point and the free end of the curled hat tip. Adjust the drop so the star clears the hat edge, tie a secure double knot at the back, and trim only after checking the knot.
— Optional Red Flower :
Round 1 :
With red, work 6 sc in an MR. Pull closed. (6)
Round 2 :
For each petal: sl st in the next unworked base st, ch 5, sc in the second ch from the hook, hdc in the next ch, dc in the next ch, hdc in the last ch, then sl st back into the same base st used to begin this petal. Repeat in each of the 6 base sts. (6 petals)
Flower Finish :
Fasten off, leaving a sewing tail. Spread the petals evenly. With cream, make 3 short straight stitches crossing at the center, then secure the cream ends on the back.
— Optional Holly Leaves :
Quantity :
Make 2 in dark green. These are simple pointed leaves rather than scalloped holly shapes.
Row 1 :
Sc in the second ch from the hook, hdc in the next ch, dc in each of the next 2 ch, hdc in the next ch, sc in the last ch. (6)
Leaf Finish :
Fasten off, leaving a sewing tail. Weave in the starting tail. Shape the narrow ends with your fingers.
— Optional Red Berries :
Quantity :
Make 3 in red. Do not stuff.
Round 1 :
Work 6 sc in an MR. Pull closed. (6)
Round 2 :
Dec 3 times. (3)
Berry Finish :
Fasten off, leaving a sewing tail. Thread through the front loops of the remaining 3 sts and draw closed. Retain the tail for attachment.
— Construction and Finishing :
Long Curl Placement :
Lay the backing front upward with Row 1 at the top. Sew the 9 long curl tops to Row 8 at stitch positions 3, 6, 9, 12, 15, 18, 21, 24, and 27. Catch several backing loops at each attachment and secure the tails on the back.
Medium Curl Placement :
Sew the 8 medium curl tops to Row 5 at stitch positions 4, 7, 10, 13, 16, 19, 22, and 25. Let these curls fall over the long-curl attachment line. Secure and weave in each tail on the back.
Short Curl Placement :
Sew the 7 short curl tops to Row 2 at stitch positions 5, 8, 11, 14, 17, 20, and 23. Let them overlap the medium layer. Secure and weave in each tail.
Hat Embroidery :
Before attaching the hat, embroider 3 cream snowflakes on its front: one near the center of Row 5, one near the center of Row 9, and one near the center of Row 13. For each snowflake, make one vertical, one horizontal, and two diagonal straight stitches crossing at the same center. Keep the stitches relaxed and secure the ends on the back.
Antler Mounting :
Place the main stem openings behind the hat's lower side edges, with each opening near Rows 4-5 and the tips extending upward. Flatten the unstuffed lower rounds and sew through both walls of each opening to close and attach it. Add a second attachment across the flattened base so each antler stays upright.
Rear Hat Support :
Cut a narrow felt strip to follow the center of the hat from just above its base to just below its tip. Round its corners and keep every edge inside the crochet outline. Hand-sew the felt to the hat back with matching thread, catching rear stitch loops so the thread does not show on the front.
Main Hanging Loop :
Use the remaining approximately 45 cm of cotton cord. Pass both ends through the reinforced upper hat area just below the tip, taking each end through crochet and felt. Form a loop of your preferred length and tie the ends together securely at the back. Stitch the knot against the felt with several passes of sewing thread.
Hat-to-Backing Join :
Center the hat over the backing, with the hat foundation edge overlapping the upper backing by approximately one backing row. Pin it level, then sew the hat base to the backing across its width. Leave the beard curls free below the join.
Nose Attachment :
Center the nose over backing stitch 15, just below the hat base. Move the central curls aside while sewing. Stitch the flattened back of the nose to the backing around its rear perimeter, keeping the rounded front visible and the curl tops behind it.
Brim Attachment :
Center the cream brim across the hat base, covering the hat-to-backing seam and the upper edge of the nose. Ease its length evenly, allowing its ends to extend slightly beyond the green panel. Sew the upper long edge to the hat, tack both short ends securely, and tack the lower edge at each side of the nose without flattening the beard.
Optional Leaf Attachment :
Arrange the 2 leaves on one side of the brim. Sew their narrow bases and one additional point on each leaf to the brim or hat, keeping their outer ends visible.
Optional Flower Attachment :
Sew the flower center over the leaf bases. Add discreet stitches beneath 2 opposite petals to prevent the flower from twisting, leaving the remaining petal tips free.
Optional Berry Attachment :
Sew the 3 berries together as a small cluster beside the flower center. Pass each berry tail through the brim or hat several times, then secure and weave in the ends on the back.
Final Tail Check :
Inspect the back and weave in every remaining yarn end. Check the nose, antlers, star cord, brim, and hanging loop with a gentle tug. Reinforce any join that shifts.
Final Hanging Check :
Hang the gnome, separate any interlocked curls with your fingers, and adjust their spiral direction. If the hanging tilts, reposition the main cord slightly within the reinforced area and secure it again. Display indoors in a dry place.
Your gnome is ready for its final arrangement once the beard curls hang freely and the hat sits evenly over the nose. Take a moment to check the antler seams, straighten the star, and secure any loose embroidery ends on the back. I like to leave the hanging suspended overnight before choosing its permanent spot, giving the curls time to settle. Finish with the optional holly cluster or keep the green hat simple for a woodland Christmas accent.