🧢 Beautiful ✨ Detailed πŸ’ Adorable

Cow Squishmallow Plushie Amigurumi Pattern

Cow Squishmallow Plushie Amigurumi Pattern
4.8β˜… Rating
6-8 Hours Time Needed
2.9K Made This
βœ‚οΈ

Intermediate Level

Ideal for those with basic knitting experience, featuring slightly more advanced stitches and techniques to expand your skills.

⏱️

Weekend Treat

Takes 5-7 hours, making it an enjoyable project to finish over a couple of days.

🧸

Cute Companion

An adorable friend to cherish, handcrafted with love to bring comfort and joy for years to come.

About This Cow Squishmallow Plushie Amigurumi Pattern

This cow squishmallow plushie pattern brings together the best of both worldsβ€”the charm of amigurumi and the huggable softness of a squishmallow. With its distinctive pink and white coloring, sweet facial features, and adorable strawberry horns, this plushie is designed to capture hearts. The pattern uses soft chenille yarn to create that signature squishy texture, making it perfect for cuddling. Each piece is worked in rounds with clear color changes, creating a dimensional look that adds personality and charm to your finished creation.

Cow Squishmallow Plushie Amigurumi Pattern crochet pattern - detailed view of completed project

The strawberry horn details and carefully shaped nose give this cow plushie its unique character, while the simple construction makes it accessible for intermediate crocheters. This project is perfect for those looking to expand their amigurumi skills with fun color work and creative assembly techniques.

Why You'll Love This Cow Squishmallow Plushie Amigurumi Pattern

I absolutely love this pattern because it creates such a unique and charming character that stands out from typical amigurumi projects. The combination of the squishy chenille yarn and the playful strawberry horn details makes this cow incredibly special and fun to work on. I find the color changes engaging without being overwhelming, and the satisfaction of watching this adorable face come together is truly rewarding. The finished plushie has such personality and charm that it makes a perfect gift or personal keepsake. Plus, working with the soft chenille yarn is a delightful tactile experience that makes every stitch enjoyable.

Cow Squishmallow Plushie Amigurumi Pattern step 1 - construction progress Cow Squishmallow Plushie Amigurumi Pattern step 2 - assembly progress Cow Squishmallow Plushie Amigurumi Pattern step 3 - details and accessories Cow Squishmallow Plushie Amigurumi Pattern step 4 - final assembly and finishing

Switch Things Up

I absolutely love experimenting with color variations on this adorable cow pattern to create completely unique personalities for each plushie I make. Instead of the classic pink and white combination, I've tried mint green and cream for a soft pastel aesthetic, or even bold combinations like purple and yellow for a more whimsical fantasy look.

The strawberry horns are another area where I get really creativeβ€”I've swapped them out for tiny flowers, hearts, or even miniature ice cream cones to match different themes or seasons. For a more traditional cow look, I've added black spots using surface crochet or felt appliques throughout the white sections of the body.

I also enjoy varying the facial expressions by adjusting the eye placement and adding embroidered details like blushing cheeks, eyebrows, or even a little smile beneath the nose. Sometimes I'll make the ears larger for a more floppy, puppy-like appearance, or keep them smaller for a sleeker silhouette.

The size is another fun element to play withβ€”I've scaled up the pattern using bulky yarn and a larger hook to create giant huggable versions, or worked it in thread weight with a tiny hook for adorable keychain-sized charms. Adding accessories like tiny scarves, bows, or even crocheted collars with bells gives each cow its own special character and makes them perfect for gift-giving.

Common Mistakes & How to Fix Them

βœ— Not using stitch markers during color changes can lead to losing your place and creating uneven sections throughout the head and body construction βœ— Stuffing too loosely will result in a floppy plushie that lacks the characteristic squishmallow shape and won't hold its adorable form properly βœ— Rushing through the facial feature placement without pinning first often leads to asymmetrical eyes or an off-center nose that affects the overall cuteness βœ— Failing to secure color changes properly at the beginning of rounds creates gaps and loose stitches that detract from the clean, professional appearance

Cow Squishmallow Plushie Amigurumi Pattern

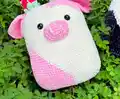
Create your very own adorable cow squishmallow plushie with this charming crochet pattern! This delightful design features a soft, cuddly body with a sweet pink nose, cute ears, and playful strawberry horns that add a whimsical touch. Perfect for gifting or keeping as a comforting companion, this plushie combines simple techniques with creative details to bring a lovable character to life. Whether you're crafting for yourself or a loved one, this pattern will guide you through every step to create a huggable friend that's sure to bring smiles and joy.

Intermediate 6-8 Hours

Materials Needed for Cow Squishmallow Plushie Amigurumi Pattern

β€” Main Fabric

  • 01
    100g Soft Chenille Yarn in white color
  • 02
    100g Soft Chenille Yarn in pink color
  • 03
    100g Soft Chenille Yarn in red color
  • 04
    100g Soft Chenille Yarn in mint green color

β€” Tools Required

  • 01
    Crochet hook size 3.5mm
  • 02
    Stitch markers
  • 03
    Sewing needle
  • 04
    Scissors
  • 05
    Cotton filling
  • 06
    Hot glue gun
  • 07
    Plastic safety eyes

Progress Tracker

0% Complete

β€” Head :

Row 1 :

10 Ch, 14 Ch hook on the 2nd stitch 13 SC, 9 SC, 3 SC in one st, 9 SC, 12 SC, INC (48)

Row 2 :

2 INC, 11 SC, 8 SC, 5 INC, 8 SC, 11 SC, 3 INC (58)

Row 3 :

(SC, INC) 2 times, 11 SC, 8 SC, (SC, INC) 5 times, 8 SC, 11 SC, (SC, INC) 3 times (68)

Row 4 :

17 SC, 31 SC, 20 SC (68)

Row 5 :

(2SC, INC) 2 times, 11 SC, 8 SC, (2SC, INC) 5 times, 8 SC, 11 SC, (2SC, INC) 3 times (78)

Row 6-7 :

19 SC, 36 SC, 23 SC (78)

Row 8 :

18 SC, 38 SC, 22 SC (78)

Row 9 :

17 SC, 40 SC, 21 SC (78)

Row 10 :

16 SC, 42 SC, 20 SC (78)

Row 11 :

15 SC, 44 SC, 19 SC (78)

Row 12 :

14 SC, 46 SC, 18 SC (78)

Row 13 :

13 SC, 48 SC, 17 SC (78)

Row 14 :

12 SC, 50 SC, 16 SC (78)

Row 15 :

11 SC, 52 SC, 15 SC (78)

Row 16 :

10 SC, 54 SC, 14 SC (78)

Row 17 :

9 SC, 56 SC, 13 SC (78)

Row 18 :

8 SC, 58 SC, 12 SC (78)

Row 19 :

7 SC, 60 SC, 11 SC (78)

Row 20 :

6 SC, 62 SC, 10 SC (78)

Row 21 :

5 SC, 64 SC, 9 SC (78)

Row 22 :

4 SC, 66 SC, 8 SC (78)

Row 23 :

3 SC, 75 SC (78)

Row 24-29 :

78 SC (78)

Info :

Cut the yarn, leaving a long tail for sewing

Row 30 :

30 SC, 13 SC, 35 SC (78)

Row 31 :

29 SC, 16 SC, 33 SC (78)

Row 32 :

27 SC, 19 SC, 31 SC (78)

Row 33 :

(11SC, DEC) 2 times, 11SC, DEC, 10 SC, SC, DEC, (11SC, DEC) 2 times (72)

Row 34 :

20 SC, 32 SC, 20 SC (72)

Row 35 :

(3SC, DEC) 3 times, 4 SC, 4 SC, (3SC, DEC) 6 times, SC, 3 SC, (3SC, DEC) 3 times (60)

Row 36 :

16 SC, 29 SC, 15 SC (60)

Row 37 :

2 SC, DEC, 12 SC, 10 SC, (2SC, DEC) 2 times, 11 SC, 13 SC, DEC (56)

Row 38 :

15 SC, 27 SC, 14 SC (56)

Row 39 :

(5SC, DEC) 2 times, SC, 4 SC, DEC, (5SC, DEC) 3 times, (5SC, DEC) 2 times (48)

Info :

Stuffing

Row 40 :

(2 SC, DEC) 3 times, SC, SC, DEC, (2SC, DEC) 5 times, (2 SC, DEC) 3 times (36)

Row 41 :

(SC, DEC) 3 times, SC, DEC, (SC, DEC) 5 times, (SC, DEC) 3 times (24)

Info :

Cut the yarn, leaving a long tail for sewing

β€” Nose :

Row 1 :

6 Ch hook on the 2nd stitch 4 SC, W, 3 SC, INC (12)

Row 2 :

INC, 3 SC, 3 INC, 3 SC, 2 INC (18)

Row 3 :

SC, INC, 3 SC, (SC, INC) 3 times, 3 SC, (SC, INC) 2 times (24)

Row 4 :

2 SC, INC, 3 SC, (2 SC, INC) 3 times, 3 SC, (2 SC, INC) 2 times (30)

Info :

Cut the yarn, leaving a long tail for sewing

β€” Ear : (Make 2)

Row 1 :

6 SC in a MR (6)

Row 2 :

INC 6 times (12)

Row 3 :

(SC, inc) 6 times (18)

Row 4 :

(2 SC, inc) 6 times (24)

Row 5 :

(3 SC, inc) 6 times (30)

Row 6 :

(4 SC, inc) 6 times (36)

Row 7 :

(5 SC, inc) 6 times (42)

β€” Strawberry : (Make 2)

Row 1 (Red) :

6 SC in a MR (6)

Row 2 :

(SC, inc) 3 times (9)

Row 3 :

(2 SC, inc) 3 times (12)

Row 4 :

(3 SC, inc) 3 times (15)

Row 5 :

(4 SC, inc) 3 times (18)

Row 6-7 :

18 SC (18)

Row 8 :

(SC, inc) 6 times (12)

Row 9 :

6 DEC (6)

Row 10 (Mint) :

slst, 4 Ch hook on the 2nd stitch: slst, 2 SC (repeat 5 times)

β€” Horn : (Make 2)

Row 1 :

6 Sc in a Mr (6)

Row 2 :

(Sc, Inc) 3 times (9)

Row 3 :

9 Sc (9)

Row 4 :

(2Sc, Inc) 3 times (12)

Row 5 :

12 Sc (12)

Row 6 :

(3Sc, Inc) 3 times (15)

Row 7 :

15 Sc (15)

Info :

Stuffing

Assembly Instructions

  • Sew the pink nose onto the center of the face, positioning it between the marked eye placements, then use black thread to create the nostril details
  • Attach the plastic safety eyes to the head, making sure they are centered and evenly spaced for a balanced, adorable expression
  • Sew the two strawberry pieces together to form the decorative horn, then attach them securely to the top of the head
  • Position and sew the two pink ears near the strawberry horns, ensuring they are symmetrical and properly aligned with the facial features
  • Firmly stuff the head with cotton filling before closing completely to achieve the characteristic squishmallow shape and softness

Important Notes

  • πŸ’‘Use stitch markers to keep track of your rounds, especially during the extensive color changes throughout the head construction
  • πŸ’‘The pink text in the pattern indicates where to switch to pink yarn for creating the distinctive squishmallow coloring pattern
  • πŸ’‘Stuff the plushie firmly but gradually to maintain the soft, squishy texture while ensuring it holds its adorable rounded shape
  • πŸ’‘Pin all facial features and accessories in place before sewing to ensure proper positioning and symmetry for the cutest results
  • πŸ’‘When working with chenille yarn, be gentle as it can split easily; maintain consistent tension for even stitches throughout

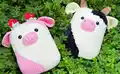
This adorable Cow Squishmallow Plushie pattern was designed to bring the irresistibly cute squishmallow aesthetic to your crochet projects! The pattern combines the soft, huggable texture of chenille yarn with playful design elements like strawberry horns and sweet facial features to create a character bursting with personality. Perfect for gifting or adding to your own plushie collection, this project offers a satisfying blend of color work and creative assembly. The finished plushie is sure to become a cherished companion for anyone lucky enough to receive it. Happy crocheting and enjoy creating your own squishy friend!

You ask,

we answer.

FAQs

Can I use regular yarn instead of chenille yarn for this pattern?

Yes, you can use regular yarn, but the finished plushie won't have the same soft, squishy texture that makes it feel like a squishmallow. If you substitute regular yarn, consider using a worsted weight yarn and adjust your hook size accordingly to maintain the correct gauge and stuffing density.

How do I keep track of the color changes in the head section?

The pattern indicates color changes with pink text showing where to use pink yarn. Use stitch markers at the beginning of each round and consider using different colored markers for different yarn colors. Taking photos of your progress can also help you track the color placement pattern.

What size will the finished plushie be?

When made with the recommended chenille yarn and 3.5mm hook, the finished cow squishmallow plushie will be approximately 6-8 inches tall, making it the perfect huggable size for both children and adults to enjoy.

Can I make the horns with different decorations instead of strawberries?

Absolutely! The strawberry horns are a creative design choice, but you can customize them with flowers, stars, or any other small decorative elements you prefer. Just make sure whatever you choose is securely attached and safe for the intended recipient.

How do I create the nostril details on the nose?

After sewing the pink nose onto the face, use black embroidery thread or yarn to create small vertical stitches or French knots for the nostrils. The pattern images show their placement, and pinning them first helps ensure they're positioned symmetrically before you stitch them permanently.