๐Ÿงถ Beautiful โœจ Detailed ๐Ÿ’ Adorable

Crochet Pride Frog Amigurumi Pattern

Crochet Pride Frog Amigurumi Pattern
4.0โ˜… Rating
4-5 Hours Time Needed
3.8K Made This
โœ‚๏ธ

Intermediate Level

Ideal for those with basic knitting experience, featuring slightly more advanced stitches and techniques to expand your skills.

โฑ๏ธ

Weekend Treat

Takes 5-7 hours, making it an enjoyable project to finish over a couple of days.

๐Ÿงธ

Cute Companion

An adorable friend to cherish, handcrafted with love to bring comfort and joy for years to come.

About This Crochet Pride Frog Amigurumi Pattern

This heartwarming Pride Frog pattern combines the joy of amigurumi with meaningful representation and inclusivity. The frog features a classic amigurumi construction with separately crocheted arms, legs, and protruding eyes that give it an authentic frog appearance. The special feature is the interchangeable pride flag patches that can be sewn onto the frog's belly, allowing you to create multiple versions or switch between different flags.

Crochet Pride Frog Amigurumi Pattern crochet pattern - detailed view of completed project

The pattern includes instructions for three different pride flag patches: Rainbow Flag, Trans Flag, and Non-Binary Flag. Each patch uses a unique color progression and increases to create the distinctive flag stripes in a semi-circular rainbow shape.

Why You'll Love This Crochet Pride Frog Amigurumi Pattern

I love how this pattern combines the therapeutic joy of amigurumi with such an important message of love and acceptance. Creating something that can bring comfort and show support for the LGBTQ+ community feels incredibly meaningful. The satisfaction of watching each pride flag patch take shape with its beautiful color transitions is absolutely magical, and knowing that this little frog can be a symbol of pride and belonging makes every stitch worthwhile.

Crochet Pride Frog Amigurumi Pattern step 1 - construction progress Crochet Pride Frog Amigurumi Pattern step 2 - assembly progress Crochet Pride Frog Amigurumi Pattern step 3 - details and accessories Crochet Pride Frog Amigurumi Pattern step 4 - final assembly and finishing

Switch Things Up

I love how versatile this pattern can be beyond just the pride flags! Try creating seasonal versions with autumn colors, or make a whole family of frogs in different shades of green. You could even experiment with sparkly yarns for special occasion frogs.

Consider making tiny keychain versions using smaller hooks and thinner yarn, or go giant with chunky yarn for a huggable friend. The patch technique could be adapted for other designs too - think flowers, hearts, or even favorite sports team colors. The possibilities are endless when you let your creativity hop along!

Common Mistakes & How to Fix Them

โœ— Forgetting to mark the last stitch of each round when working in spiral can cause the piece to become lopsided โœ— Not stuffing the body firmly enough before closing will result in a floppy frog that won't hold its shape properly โœ— Placing safety eyes incorrectly on the eye pieces before securing with washers makes repositioning difficult or impossible โœ— Not maintaining consistent tension when changing colors on the pride patches can create uneven stripes and gaps

Crochet Pride Frog Amigurumi Pattern

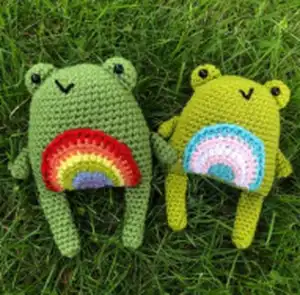
Create this adorable and meaningful Pride Frog amigurumi that celebrates love and inclusivity. This charming 7-inch frog features interchangeable pride flag patches including Rainbow, Trans, and Non-Binary designs. Perfect for showing support, giving as a thoughtful gift, or simply enjoying a fun crochet project that spreads positivity and acceptance.

Intermediate 4-5 Hours

Materials Needed for Crochet Pride Frog Amigurumi Pattern

โ€” Main Fabric

  • 01
    Worsted weight yarn in green for the frog body
  • 02
    Rainbow Flag colors: Red, Orange, Yellow, Green, Blue, and Purple yarns
  • 03
    Trans Flag colors: Light Blue, Pink, and White yarns
  • 04
    Non-Binary Flag colors: Yellow, White, Purple, and Black yarns

โ€” Tools Required

  • 01
    Size G (4.0mm) crochet hook
  • 02
    9.00mm black safety eyes with washers (1 pair)
  • 03
    Poly-fill stuffing
  • 04
    Yarn needle
  • 05
    Stitch markers
  • 06
    Scissors
  • 07
    Scrap of black yarn or thread for nose embroidery

Progress Tracker

0% Complete

โ€” Frog Body :

Round 1 :

Make a ring, sc 6 times into ring (6)

Round 2 :

2scinc in each stitch around (12)

Round 3 :

*2scinc, sc the next stitch * repeat around (18)

Round 4 :

*2scinc, sc in each of the next 2 stitches * repeat around (24)

Round 5 :

*2scinc, sc in each of the next 3 stitches * repeat around (30)

Round 6 :

*2scinc, sc in each of the next 4 stitches * repeat around (36)

Round 7 :

*2scinc, sc in each of the next 5 stitches * repeat around (42)

Rounds 8-23 :

Sc around (42)

Round 24 :

*2sctog, sc in each of the next 5 stitches * repeat around (36)

Info :

Cut yarn leaving 16 inch tail, stuff body firmly, then sew closed

โ€” Arms (Make 2) :

Round 1 :

Make a ring, sc 8 times into ring (8)

Rounds 2-6 :

Sc around (8)

Info :

Slip stitch to next stitch, cut yarn leaving 10 inch tail

โ€” Legs (Make 2) :

Round 1 :

Make a ring, sc 8 times into ring (8)

Rounds 2-12 :

Sc around (8)

Info :

Slip stitch to next stitch, cut yarn leaving 10 inch tail

โ€” Eyes (Make 2) :

Round 1 :

Make a ring, sc 6 times into ring (6)

Round 2 :

2scinc in each stitch around (12)

Rounds 3-4 :

Sc around (12)

Info :

Secure safety eyes with washers, stuff lightly, sew to top of body

โ€” Rainbow Patch :

Row 1 :

With Purple, ch 2. In 2nd ch from hook make 4 sc (4)

Row 2 :

Ch 1, turn: 2scinc in first stitch, 2hdcinc in next 2 stitches, 2scinc in last stitch (8). Change to Blue

Row 3 :

Ch 1, turn: 2scinc in first stitch, sc next stitch, *2hdcinc, hdc next stitch * twice, 2scinc in next stitch, sc last stitch (12). Change to Green

Row 4 :

Ch 1, turn: 2scinc in first stitch, sc in next 2 stitches, *2hdcinc, hdc in next 2 stitches * twice, 2scinc in next stitch, sc in last 2 stitches (16). Change to Yellow

Row 5 :

Ch 1, turn: 2scinc in first stitch, sc in next 3 stitches, *2hdcinc, hdc in next 3 stitches * twice, 2scinc in next stitch, sc in last 3 stitches (20). Change to Orange

Row 6 :

Ch 1, turn: 2scinc in first stitch, sc in next 4 stitches, *2hdcinc, hdc in next 4 stitches * twice, 2scinc in next stitch, sc in last 4 stitches (24). Change to Red

Row 7 :

Ch 1, turn: 2scinc in first stitch, sc in next 5 stitches, *2hdcinc, hdc in next 5 stitches * twice, 2scinc in next stitch, sc in last 5 stitches (28)

โ€” Trans Patch :

Row 1 :

With Light Blue, ch 2. In 2nd ch from hook make 4 sc (4)

Row 2 :

Ch 1, turn: 2scinc in first stitch, 2hdcinc in next 2 stitches, 2scinc in last stitch (8). Change to Pink

Row 3 :

Ch 1, turn: 2scinc in first stitch, sc next stitch, *2hdcinc, hdc next stitch * twice, 2scinc in next stitch, sc last stitch (12). Change to White

Row 4 :

Ch 1, turn: 2scinc in first stitch, sc in next 2 stitches, *2hdcinc, hdc in next 2 stitches * twice, 2scinc in next stitch, sc in last 2 stitches (16). Change to Pink

Row 5 :

Ch 1, turn: 2scinc in first stitch, sc in next 3 stitches, *2hdcinc, hdc in next 3 stitches * twice, 2scinc in next stitch, sc in last 3 stitches (20). Change to Light Blue

โ€” Non-Binary Patch :

Row 1 :

With Black, ch 2. In 2nd ch from hook make 4 sc (4)

Row 2 :

Ch 1, turn: 2scinc in first stitch, 2hdcinc in next 2 stitches, 2scinc in last stitch (8). Change to Purple

Row 3 :

Ch 1, turn: 2scinc in first stitch, sc next stitch, *2hdcinc, hdc next stitch * twice, 2scinc in next stitch, sc last stitch (12)

Row 4 :

Ch 1, turn: 2scinc in first stitch, sc in next 2 stitches, *2hdcinc, hdc in next 2 stitches * twice, 2scinc in next stitch, sc in last 2 stitches (16). Change to White

Row 5 :

Ch 1, turn: 2scinc in first stitch, sc in next 3 stitches, *2hdcinc, hdc in next 3 stitches * twice, 2scinc in next stitch, sc in last 3 stitches (20)

Row 6 :

Ch 1, turn: 2scinc in first stitch, sc in next 4 stitches, *2hdcinc, hdc in next 4 stitches * twice, 2scinc in next stitch, sc in last 4 stitches (24). Change to Yellow

Row 7 :

Ch 1, turn: 2scinc in first stitch, sc in next 5 stitches, *2hdcinc, hdc in next 5 stitches * twice, 2scinc in next stitch, sc in last 5 stitches (28)

Row 8 :

Ch 1, turn: 2scinc in first stitch, sc in next 6 stitches, *2hdcinc, hdc in next 6 stitches * twice, 2scinc in next stitch, sc in last 6 stitches (32)

Assembly Instructions

  • Sew arms to either side of the frog body using the 10-inch yarn tails
  • Attach legs to the bottom of the frog body, positioning them evenly
  • Secure safety eyes to the inside of eye pieces with washers, stuff lightly, then sew to top of body
  • Embroider a simple 'V' shape with black yarn below the eyes for the mouth
  • Choose your desired pride flag patch and align the flat edge with the sewn edge of the body
  • Sew the pride patch securely to the frog's belly using the long yarn tail

Important Notes

  • ๐Ÿ’กWork in a spiral and mark the last stitch of each round to keep track of your place
  • ๐Ÿ’กUse any preferred ring method: slip knot, magic ring, adjustable loop, or chain 2
  • ๐Ÿ’กStuff the body firmly but not overly tight for the best shape
  • ๐Ÿ’กInstall safety eyes before stuffing the eye pieces for easier positioning
  • ๐Ÿ’กYou can make multiple pride patches to interchange on the same frog

This meaningful Pride Frog pattern celebrates love, acceptance, and inclusivity through beautiful handcraft. Each little frog becomes a symbol of support and pride, perfect for gifting to loved ones or displaying in your home. The interchangeable pride flag patches make this pattern versatile and personal, allowing you to create representations that matter most to you and your community.

You ask,

we answer.

FAQs

Can I make all three pride patches for one frog?

Absolutely! You can make multiple patches and either switch them out on the same frog or make separate frogs for each flag design.

What if I don't have all the colors for a specific pride flag?

You can substitute similar colors or even create your own color variation. The pattern technique works with any color combination you choose.

Are the safety eyes necessary or can I embroider the eyes instead?

Safety eyes give a professional look, but you can absolutely embroider the eyes with black yarn if you prefer or if making for a small child.

How do I keep track of rounds when working in spiral?

Place a stitch marker or safety pin in the last stitch of each round. Move it up as you complete each round to maintain your place.