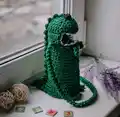
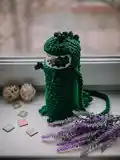
Create an adorable dinosaur water bottle holder that's perfect for staying hydrated in style! This fun and functional crochet pattern transforms your everyday water bottle into a cute prehistoric companion. With its textured green body, spiky fins, sharp white teeth, and charming black eyes, this holder is both practical and playful. Perfect for kids and adults who love unique accessories that make a statement.
Progress Tracker
0% Complete
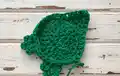
— Crochet the bottom :
Setup :
Take the cord of the primary color and 4mm hook. Crochet 2 CH.
Row 1 :
6 SC in the 2nd loop from the hook. SlSt, CH.
Row 2 :
(1 Inc)*6 = 12, SlSt, CH. This and all subsequent rows, crochet with the 2nd SC. Skip CH and crochet SlSt in the 1st SC.
Row 3 :
(SC, 1 Inc)*6 = 18, SlSt, CH.
Row 4 :
(2 SC, 1 Inc)*6 = 24, SlSt, CH.
Row 5 :
(3 SC, 1 Inc)*6 = 30, SlSt, CH. Don't cut the thread.
Tail Instructions :
5 SC, CH, turn; Dec, 1 SC, Dec, CH, turn; 3 SC together, CH. Cut the end, pull out in the loop. Pull out through all loops. Hide the end. Process with fire. Process with fire the end, with which you began crocheting.
— Crochet the hind paws(*2) :
Setup :
Take the cord of the primary color. Crochet 4 CH.
Row 1 :
3 SC from the 2nd loop, CH. Turn.
Row 2 :
2 CH, SlSt in the 1st SC of the previous row, 4 CH, SlSt in the 2nd SC of previous row, 3 CH, SlSt in the 3rd SC of the previous row. Cut the end, pull out in the loop. Process with fire.
— Crochet the base :
Setup :
Place the marker in 8th SC from the tail. We will crochet in the paws between the markers. Count 5 loops to the left of the tail. Insert the hook on the back loop and the jumper only. Crochet CH. Crochet in the end of the thread.
Row 1 :
3 SC, take the paw, crochet 3 SC on both parts, 3 SC. Take the 2nd paw, crochet 3 SC on both parts, 8 SC, 4 SC on the right side of the tail, 3 SC in 1, 4 SC on the left side of the tail, 4 SC (35), SlSt, CH. Crochet this row on the back loop and the jumper only. Cut the end, with which began crocheting. Process with fire.
Row 2 :
22 SC, 3 SC together, insert the hook in the last SC, 3 SC together, 8 SC (32), SlSt, CH. This and all the subsequent rows, crochet with the 2nd SC. Skip the CH and crochet SlSt in the 1st SC. In the each row, the seam will move to the left.
Row 3 :
20 SC, 3 SC together, insert the hook in the last SC, 3 SC together, 7 SC (29), SlSt, CH.
Row 4 :
19 SC, 3 SC together, 7 SC (27) SlSt, CH.
Rows 6-15 :
27 SC, SlSt, CH.
Row 16 :
21 SC, 1st paw: 5 CH, SlSt in the 4th loop from the hook, 3 CH, SlSt in this loop, SC in the 1st CH, 6 SC, 2nd paw: 5 CH, SlSt in the 4th loop from the hook, 3 CH, SlSt in this loop, SC in the 1st CH, SlSt, CH.
Row 18 :
27 SC, SlSt. Shift the beginning of the row by one loop. SlSt in the 2nd loop of previous row, CH.
Rows 22-23 :
15 SC, CH, turn.
Row 24 :
15 SC, 15 CH, SlSt in the 1st loop of this row.
Row 25 :
14 SC, place the marker in the 1st SC, 15 SC in the each CH. Next, crochet a spiral.
Row 26 :
(3 SC, Dec)*6. The last decrease grabs the first loop of the row. The each row is shifted by one SC. Rearrange the marker in the 1st loop of the each row.
Row 29 :
6 Dec. Tighten the hole with the last decrease. Don't cut the thread.
— Crochet the fin :
Setup :
Fold the cover in half.
Fin Creation :
Crochet 3 CH, SC in the 2nd loop from the hook, SlSt in the middle of the fold over the one row. Again crochet 3 CH, SC in the 2nd loop from the hook, SlSt over the one row. Repeat to the end of the tail. Crochet the last fin on the end of the tail. There are 16 fins now. Cut the end and pull out in the loop. Tighten and hide the end. Process with fire.
— Crochet the teeth :
Setup :
Take the white cord and 3mm hook. Insert the hook on the back loop only in the right side of the mouth.
Teeth Creation :
Crochet 3 CH, SC in the 2nd loop from the hook, SlSt over the one loop. 3 CH, SC in the 2nd loop from the hook, SlSt over the one loop. Repeat around the perimeter of the mouth. SlSt of the last teeth crochet in the beginning of the row. Cut the end, tie the knot. Hide both ends on the wrong side, process with fire.
— Crochet the eyes :
Setup :
Take the black cord and 3mm hook. Crochet 2 CH.
Row 1 :
6 SC in the 2nd loop from the hook. Crochet a spiral.
Row 2 :
6 SC. Leave the ends of 4 inches (10 cm). Pull out both ends on the wrong side. Crochet the 2nd eye.
Eye Attachment :
Attach the eyes at the beginning of the fin. Pull out both ends on the wrong side, tie the knot. Hide and process with fire. If necessary, strengthen the eyes with the glue gun.
— Crochet i-cord :
Setup :
Count 2 SC from the mouth and insert the hook between 17th and 18th rows.
I-cord Creation :
Crochet CH, SC. Turn clockwise. Insert the hook under two loops of the CH. Crochet SC. Turn clockwise. Insert the hook under two loops, SC. Repeat the steps. Crochet to the required length of the handle, which is about 25½ inches (65 cm). Cut the end, pull out in the loop. Attach the I-cord to the holder with the end of the thread. Hide both ends on the wrong side. Process with fire.
This charming dinosaur water bottle holder brings prehistoric fun to your daily hydration routine! Perfect for kids and adults who love unique, handmade accessories that combine functionality with personality. The detailed fins, cute teeth, and playful eyes make this holder a conversation starter wherever you go. It's not just a practical item – it's a delightful companion that makes staying hydrated fun and stylish! 🦕 Happy crocheting! 🧶✨