๐Ÿงถ Beautiful โœจ Detailed ๐Ÿ’ Adorable

Elephant Elf Amigurumi Pattern

Elephant Elf Amigurumi Pattern
4.2โ˜… Rating
8-10 Hours Time Needed
1.4K Made This
โœ‚๏ธ

Intermediate Level

Ideal for those with basic knitting experience, featuring slightly more advanced stitches and techniques to expand your skills.

โฑ๏ธ

All-Day Adventure

Requires 8-10 hours, ideal for a full day of immersive knitting.

๐Ÿงธ

Cute Companion

An adorable friend to cherish, handcrafted with love to bring comfort and joy for years to come.

About This Elephant Elf Amigurumi Pattern

Meet Elf, the sweetest elephant who believes in love and carries hope in the form of a heart balloon. This enchanting pattern captures the essence of friendship and dreams, featuring detailed construction with optional wire reinforcement for a movable trunk. The finished elephant stands approximately 11cm tall and includes charming details like embroidered facial features, pink cheeks, and decorative ear picots.

Elephant Elf Amigurumi Pattern crochet pattern - detailed view of completed project

This pattern includes comprehensive photo tutorials and video links to guide you through complex techniques like joining multiple pieces and creating the signature balloon rope. Each step is carefully explained with helpful tips for achieving professional-looking results.

Why You'll Love This Elephant Elf Amigurumi Pattern

I absolutely love how this pattern tells a story - Elf isn't just a toy, he's a character with personality and dreams! The attention to detail, from the delicate cheek embroidery to the wire-reinforced movable trunk, makes this project truly special. The optional balloon rope technique creates such a realistic effect, and the heart-shaped balloon adds the perfect touch of whimsy that makes this elephant irresistible.

Elephant Elf Amigurumi Pattern step 1 - construction progress Elephant Elf Amigurumi Pattern step 2 - assembly progress Elephant Elf Amigurumi Pattern step 3 - details and accessories Elephant Elf Amigurumi Pattern step 4 - final assembly and finishing

Switch Things Up

I love experimenting with different color combinations for this sweet elephant! Try creating Elf in soft pastels like lavender and cream for a dreamy version, or go bold with bright rainbow colors for a more playful look. The heart balloon is perfect for customization too - imagine it in metallic gold thread for special occasions or in seasonal colors like red and green for Christmas.

For advanced crocheters, I enjoy adding extra details like tiny embroidered flowers on the ears or a small bow tie around the neck. You could even create a whole family of elephants in different sizes by adjusting your hook size. The wire trunk technique opens up endless posing possibilities - have Elf holding flowers, reaching for stars, or even hugging another amigurumi friend!

Common Mistakes & How to Fix Them

โœ— Forgetting to mark round beginnings with stitch markers leading to uneven shaping and counting errors โœ— Stuffing too loosely or too firmly resulting in poor shape definition and visible stuffing through stitches โœ— Incorrect wire placement in trunk causing difficulty in shaping and potential safety issues for children โœ— Rushing the facial embroidery details leading to asymmetrical features and unprofessional appearance

Elephant Elf Amigurumi Pattern

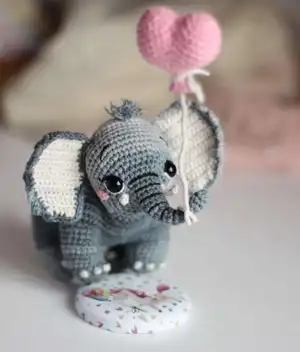
Create your own charming Elephant Elf named Elf who dreams of finding his soulmate! This delightful amigurumi pattern features an adorable elephant holding a heart-shaped balloon, complete with detailed facial features, movable trunk (optional wire reinforcement), and sweet cheeks. Perfect for gifting or adding whimsy to your home, this pattern combines simple crochet techniques with enchanting details to bring this loveable character to life.

Intermediate 8-10 Hours

Materials Needed for Elephant Elf Amigurumi Pattern

โ€” Main Fabric

  • 01
    Alize Cotton Gold Batik 330m/100gr in gray (Yarn A)
  • 02
    Yarnart Jeans 160m/50gr in white/cream (Yarn B)
  • 03
    Yarnart Jeans 160m/50gr in pink (Yarn C)

โ€” Tools Required

  • 01
    Crochet hook 2.0mm (for elephant)
  • 02
    Crochet hook 1.5mm (for cheeks)
  • 03
    10mm safety eyes
  • 04
    Black, white and pink embroidery threads (mouline)
  • 05
    5 stitch markers or pins
  • 06
    Needles for cutting with bead ends
  • 07
    Synthepus stuffing
  • 08
    Yarn needle (thick with blunt end)
  • 09
    Scissors
  • 10
    Sewing needle
  • 11
    Round-nose pliers
  • 12
    Floral wire 1.2mm diameter and electrical tape (optional)
  • 13
    Small piece of white felt
  • 14
    Glossy glaze Sculpey or transparent varnish
  • 15
    Round synthetic paint brush
  • 16
    Super Glue Moment
  • 17
    Weighting agent 2-3cm diameter (round stone or metal)

Progress Tracker

0% Complete

โ€” Trunk & Face (Yarn A) :

Round 1 :

2 loops, 6sc in 2nd loop from hook (amigurumi ring) (6l)

Round 2-6 :

6sc (6l)

Round 7 :

[2sc, inc]x2 (8l)

Round 8-10 :

8sc (8l)

Round 11 :

[3sc, inc]x2 (10l)

Round 12 :

10sc (10l)

Round 13 :

[4sc, inc]x2 (12l)

Round 14 :

12sc (12l)

Round 15 :

[5sc, inc]x2 (14l)

Round 16 :

[6sc, inc]x2 (16l)

Round 17 :

[7sc, inc]x2 (18l)

Round 18 :

3sc, [sc, inc]x6, 3sc (24l)

Round 19 :

3sc, [2sc, inc]x6, 3sc (30l)

Round 20 :

3sc, [3sc, inc]x6, 3sc (36l)

Round 21 :

[5sc, inc]x6 (42l)

Info :

Fill trunk with synthepus. Cut and fix thread.

โ€” Legs (Make 4, Yarn A) :

Round 1 :

2 loops, 8sc in 2nd loop from hook (amigurumi ring) (8l)

Round 2 :

[sc, 3sc in next loop]x4 (16l)

Round 3 :

2sc, inc, [3sc, inc]x3, sc (20l)

Round 4 :

20sc only through back loops (20l)

Round 5 :

[dec]x2, 4sc, [inc]x4, 4sc, [dec]x2 (20l)

Round 6-9 :

20sc (20l)

โ€” Belly (Yarn B) :

Round 1 :

4 loops, turning, 3sc starting from 2nd loop from hook (3l)

Round 2-3 :

1 loop, turning, 3sc (3l)

Round 4 :

3sc in corner, 1sc down side, 3sc in corner, 3sc across, 3sc in corner, 1sc up side, 3sc in corner, 3sc across (20l)

Round 5 :

Connect legs: 1sc, join 1st leg with sc, 19sc around leg, 3sc down, join 2nd leg with sc, 19sc around leg, 5sc across, join 3rd leg with sc, 19sc around leg, 3sc up, join 4th leg with sc, 19sc around leg, 4sc across (96l)

โ€” Body & Head (Yarn A) :

Round 1-7 :

96sc (96l)

Round 8 :

45sc along body, crochet 6sc of face together with 6sc of body, then 45sc along body

Round 9 :

[13sc, dec]x3, [5sc, inc]x6, [13sc, dec]x3 (126l)

Round 10 :

[12sc, dec]x3, [2sc, dec]x3, [2sc, inc]x6, [2sc, dec]x3, [12sc, dec]x3 (120l)

Round 11 :

[11sc, dec]x3, 42sc, [11sc, dec]x3 (114l)

Round 12 :

86sc, 6 loops, sc in marked loop (new round beginning)

Round 13 :

60sc (60l)

Round 14 :

[sc, dec]x2, 42sc, [sc, dec]x4 (54l)

Round 15 :

[dec]x2, 42sc, [dec]x4 (48l)

Round 16-17 :

48sc (48l)

Round 18 :

[6sc, dec]x6 (42l)

Round 19 :

[5sc, dec]x6 (36l)

Info :

Insert safety eyes between rounds 20-21, 14 stitches apart. Embroider eye details with mouline threads.

Round 20 :

[4sc, dec]x6 (30l)

Round 21 :

[3sc, dec]x6 (24l)

Round 22 :

[2sc, dec]x6 (18l)

Round 23 :

[sc, dec]x6 (12l)

Round 24 :

[dec]x6 (6l)

โ€” Cheeks (Make 2, Pink mouline) :

Round 1 :

2 loops, 6sc in 2nd loop from hook, sl st in 1st sc (6l)

โ€” Tusks (Make 2, Yarn B) :

Technique :

Crochet cord of two threads. Make 6 loops total using cord technique.

โ€” Forelock (Yarn A) :

Technique :

Create 5 loose stitches 1cm long on top of head. Cut loops in half and trim to triangular shape.

โ€” Back (Yarn A) :

Round 1 :

[9sc, dec]x6 (60l)

Round 2 :

[8sc, dec]x6 (54l)

Round 3 :

54sc (54l)

Round 4 :

[7sc, dec]x6 (48l)

Round 5 :

[6sc, dec]x6 (42l)

Round 6 :

[5sc, dec]x6 (36l)

Round 7 :

[4sc, dec]x6 (30l)

Round 8 :

[3sc, dec]x6 (24l)

Round 9 :

[2sc, dec]x6 (18l)

Round 10 :

[sc, dec]x6 (12l)

Round 11 :

[dec]x6 (6l)

โ€” Toes (3 per leg, Yarn B) :

Technique :

Embroider 3 toes on each leg with French knot using double strand.

โ€” Tail (Yarn A) :

Technique :

Crochet 10 loops. Create brush at end with 5 loops, cut and trim.

โ€” Ears (Make 2) :

Round 1 :

9 loops, turning, 8sc from 2nd loop (8l)

Round 2 :

inc, 6sc, inc (10l)

Round 3-5 :

10sc (10l)

Round 6 :

inc, 8sc, inc (12l)

Round 7-9 :

12sc (12l)

Round 10 :

dec, 8sc, dec (10l)

Round 11 :

10sc (10l)

Round 12 :

8sc, dec (9l)

Round 13 :

dec, 7sc (8l)

Round 14 :

6sc, dec (7l)

Round 15 :

dec, 5sc (6l)

Round 16 :

2dc, 2sc, dec (5l)

Round 17 :

Crochet around perimeter joining inner and outer ear pieces

Round 18 :

Add picot edging: small and big picots

โ€” Heart Balloon (Yarn C) :

Top Pieces (Make 2) :

Round 1: 6sc in magic ring (6l)

Round 2 :

[inc]x6 (12l)

Round 3 :

[sc, inc]x6 (18l)

Round 4 :

18sc (18l)

Round 5 :

[2sc, inc]x6 (24l)

Round 6 :

24sc (24l)

Round 7 :

Join pieces: 6sc together, 18sc on second piece

Round 8 :

18sc first part, 18sc second part (36l)

Round 9 :

[4sc, dec]x6 (30l)

Round 10 :

[3sc, dec]x6 (24l)

Round 11 :

[2sc, dec]x6 (18l)

Round 12 :

[sc, dec]x6 (12l)

Round 13 :

12sc (12l)

Round 14 :

[dec]x6 (6l)

Round 15 :

6sc (6l)

Round 16 :

[inc]x6, sl st (12l)

โ€” Balloon Rope (Yarn B) :

Technique :

Wrap 20cm wire with thread, coat with glaze, attach to heart and elephant.

Assembly Instructions

  • Attach the completed head to the body by connecting at the neck junction, ensuring proper alignment
  • Sew the ears to the head symmetrically, pinning first to achieve perfect placement
  • Attach the tail to the back of the body and reinforce head-to-body connection with additional stitches
  • Sew cheeks and tusks to the face, then embroider facial details including eye accents and eyebrows
  • Fill all body parts with synthepus stuffing, adding counterweight to back for stability
  • Create and attach the heart balloon with rope to the trunk or leg as desired
  • Embroider three toes on each leg using French knot technique with double yarn strand

Important Notes

  • ๐Ÿ’กUse stitch markers consistently to track round beginnings and maintain accurate stitch counts
  • ๐Ÿ’กThe wire reinforcement in trunk is optional but not recommended for young children due to safety concerns
  • ๐Ÿ’กStuff firmly but not overly tight to maintain proper shape and prevent stuffing visibility through stitches
  • ๐Ÿ’กPin all pieces in place before final sewing to ensure symmetrical and professional appearance
  • ๐Ÿ’กTake time with facial embroidery as these details bring the character to life
  • ๐Ÿ’กUse counterweight in back cavity to prevent the elephant from tipping forward due to trunk weight

This enchanting Elephant Elf pattern brings the sweetest story to life through your crochet hook! Elf carries his heart balloon with hope and dreams, waiting to find his special someone. The detailed construction includes movable trunk options, delicate facial embroidery, and that magical heart balloon that makes this project truly special. Every stitch tells part of Elf's story, creating not just a toy but a cherished companion full of personality and charm. ๐Ÿงถ Happy crocheting! ๐Ÿ˜๐Ÿ’•

You ask,

we answer.

FAQs

Is this pattern suitable for beginners?

This is an intermediate level pattern that requires knowledge of basic crochet stitches, joining pieces, and embroidery techniques. Beginners should have completed a few simpler amigurumi projects first.

Is the wire in the trunk necessary?

No, the wire is completely optional. It allows the trunk to be poseable but is not recommended for toys intended for young children. The elephant works perfectly well without wire reinforcement.

What size will my finished elephant be?

The finished elephant measures approximately 11cm (4.3 inches) tall without the balloon, though size may vary slightly depending on your tension and yarn choice.

Can I use different yarn than specified?

Yes, you can substitute yarns but choose a hook size appropriate for your yarn weight. Make sure your crochet is tight enough that stuffing doesn't show through the stitches.

How do I make the balloon rope look realistic?

The pattern includes detailed instructions for wrapping wire with thread and coating with glaze for a realistic balloon string effect. This technique is optional and you can use regular yarn if preferred.