🧶 Beautiful ✨ Detailed 💝 Adorable

Elvina Delicate Butterfly Amigurumi Pattern

Elvina Delicate Butterfly Amigurumi Pattern
4.7★ Rating
4-5 Hours Time Needed
2.6K Made This
✂️

Intermediate Level

Ideal for those with basic knitting experience, featuring slightly more advanced stitches and techniques to expand your skills.

⏱️

Weekend Treat

Takes 5-7 hours, making it an enjoyable project to finish over a couple of days.

🧸

Cute Companion

An adorable friend to cherish, handcrafted with love to bring comfort and joy for years to come.

About This Elvina Delicate Butterfly Amigurumi Pattern

Elvina the Delicate Butterfly is a charming amigurumi pattern that brings together elegant puff stitches and delicate details to create a truly magical companion. Standing at 11cm tall (13cm with antennas), this sweet butterfly features intricate wings made with beautiful puff stitches, embroidered facial details, and a lovely daisy accessory. The pattern combines traditional amigurumi techniques with special decorative elements like French knots and detailed wing construction.

Elvina Delicate Butterfly Amigurumi Pattern crochet pattern - detailed view of completed project

This intermediate-level pattern is perfect for crocheters looking to expand their skills with new techniques like puff stitches and decorative embroidery. Elvina makes a wonderful gift for butterfly lovers or anyone who appreciates handmade treasures.

Why You'll Love This Elvina Delicate Butterfly Amigurumi Pattern

I absolutely adore this pattern because Elvina captures the delicate beauty of butterflies in such a sweet, huggable form. The puff stitch wings create amazing texture and dimension that makes her feel so realistic, while the gentle color palette gives her an ethereal, dreamy quality. What I love most is how the French knot details and embroidered features bring her personality to life - those sleepy eyes and tiny smile just melt my heart every time!

Elvina Delicate Butterfly Amigurumi Pattern step 1 - construction progress Elvina Delicate Butterfly Amigurumi Pattern step 2 - assembly progress Elvina Delicate Butterfly Amigurumi Pattern step 3 - details and accessories Elvina Delicate Butterfly Amigurumi Pattern step 4 - final assembly and finishing

Switch Things Up

I love how versatile this Elvina pattern can be with just a few creative tweaks! Try using variegated yarn for the wings to create a magical ombre effect, or add tiny seed beads to the wing tips for extra sparkle. You could even crochet multiple Elvinas in different sizes using various hook sizes - imagine a whole family of butterflies! For a seasonal twist, I sometimes substitute the pastel colors for autumn oranges and golds, or winter whites and silvers.

The daisy accessory opens up so many possibilities too - swap it for a tiny rose, sunflower, or even a small heart for different occasions. For advanced crocheters, try adding wire to the wings and antennas to make them poseable, or create a small loop on the back to turn Elvina into a hanging ornament. The French knot spots can become anything from stars to tiny flowers with different embroidery stitches.

Common Mistakes & How to Fix Them

✗ Forgetting to mark the beginning of rounds when working in spiral, leading to misaligned stitches and uneven shaping ✗ Making puff stitches too tight or too loose, resulting in inconsistent wing texture and poor drape ✗ Skipping the invisible decrease technique, creating visible holes and bumpy decreases in the head and body ✗ Not stuffing firmly enough before closing sections, causing the butterfly to lose its proper shape over time

Elvina Delicate Butterfly Amigurumi Pattern

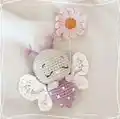
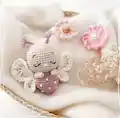
Create your own enchanting Elvina, a delicate butterfly amigurumi that captures hearts with her sweet expression and beautiful puff stitch wings. This charming pattern features detailed instructions for crafting a 11cm tall butterfly with intricate wing details, adorable antennas, and a lovely daisy accessory. Perfect for gifting or adding a touch of whimsy to any space, Elvina combines classic amigurumi techniques with elegant finishing touches that make her truly special.

Intermediate 4-5 Hours

Materials Needed for Elvina Delicate Butterfly Amigurumi Pattern

— Main Fabric

  • 01
    Cotton yarn (50g, 115m) in cream, pastel pink, violet, caramel, and ivory colors
  • 02
    Ricorumi yarn recommended: Cream n°02, Pastel pink n°07, Violet n°18, Caramel n°53, Ivory n°61
  • 03
    Black embroidery yarn for facial features

— Tools Required

  • 01
    Crochet hook 2.5mm
  • 02
    Yarn needle
  • 03
    Scissors
  • 04
    Stitch markers
  • 05
    Pins
  • 06
    Fiberfill stuffing

Progress Tracker

0% Complete

— Head and Body :

Rd 1 :

6 sc in mr (6)

Rd 2 :

6 inc (12)

Rd 3 :

(1 sc, 1 inc) x6 (18)

Rd 4 :

(1 sc, 1 inc, 1 sc) x6 (24)

Rd 5 :

(3 sc, 1 inc) x6 (30)

Rd 6 :

(2 sc, 1 inc, 2 sc) x6 (36)

Rd 7 :

(5 sc, 1 inc) x6 (42)

Rd 8-16 :

42 sc (9 rds) (42)

Rd 17 :

(5 sc, 1 dec) x6 (36)

Rd 18 :

(1 sc, 1 dec, 1 sc) x9 (27)

Rd 19 :

(1 sc, 1 dec) x9 (18)

Info :

Stuff the head and continue with the body in violet

Rd 20 :

(flo) (1 sc, 1 inc, 1 sc) x6 (24)

Rd 21 :

(3 sc, 1 inc) x6 (30)

Rd 22 :

(2 sc, 1 inc, 2 sc) x6 (36)

Rd 23-26 :

36 sc (4 rds) (36)

Rd 27 :

(2 sc, 1 dec, 2 sc) x6 (30)

Rd 28 :

(3 sc, 1 dec) x6 (24)

Info :

Start stuffing and continue as you crochet

Rd 29 :

(2 sc, 1 dec, 2 sc) x4 (20)

Rd 30 :

(3 sc, 1 dec) x4 (16)

Rd 31 :

(1 sc, 1 dec, 1 sc) x4 (12)

Rd 32 :

(1 sc, 1 dec) x4 (8)

Rd 33 :

(2 sc, 1 dec) x2 (6)

— Antenna (x2) :

Base :

Make 6 ch. Starting in the 3rd ch from the hook, make 4 sl st

Tassels :

Cut 3 strands of violet yarn (about 7 cm each) and fold them in 2. Insert hook under the 2 ch stitches skipped and pull strands through to create tassels
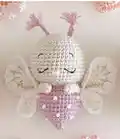
— Arm (x2) :

Rd 1 :

6 sc in mr (6)

Rd 2-6 :

6 sc (5 rds) (6)

Info :

Fold the arm and close it by sewing the two edges together

— Large Half-Wing (x2) :

Row 1 :

Start with cream. Make chain of 8 ch. Starting in 2nd ch from hook: 2 sc, 2 hdc, 2 dc, then in last ch: [(1 dc, 1 ch) x5, 1 dc], on other side: 2 dc, 2 hdc, 2 sc

Row 2 :

In ivory: Join yarn by 1 sc in 1st stitch. Continue with: 6 sc, then in each of 5 ch-spaces: (2 ch, 1 sc). Then: 7 sc

Row 3 :

In cream: Join yarn by 1 sc in 1st stitch. Continue with: 1 sc, 3 hdc, 1 Puff, 1 ch, 1 Puff, 2 ch, then in each of next 5 ch-spaces: [(1 Puff, 2 ch) x2]. Skip next stitch and make: 1 Puff, 1 ch, 1 Puff, 3 hdc, 2 sc

— Small Half-Wing (x2) :

Row 1 :

Make chain of 6 ch. Starting in 2nd ch from hook: 4 sc, in last ch: (2 ch, 1 sc, 2 ch, 1 sc, 2 ch), on other side: 4 sc

Row 2 :

Join yarn by 1 sc in 1st stitch. Continue with: 1 sc, 1 hdc, 1 dc, then in each of next 2 ch-spaces: [(1 Puff, 2 ch) x2], in 3rd ch-space: (1 Puff, 2 ch, 1 Puff, 1 ch). Continue with: 1 dc, 1 hdc, 2 sc
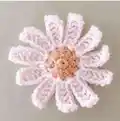
— Daisy :

Rd 1 :

Start in caramel: 5 sc in mr. Close rd with 1 sl st and 2 ch (5)

Rd 2 :

2 dc in each stitch of rd 1. Close rd with 1 sl st in pastel pink (10)

Rd 3 :

Make 8 ch. Starting in 3rd ch from hook: 4 dc, 1 hdc, 1 sc. Starting in 1st stitch of rd 2: (1 sl st, 8 ch, starting in 3rd ch from hook: 4 dc, 1 hdc, 1 sc) x10

Assembly Instructions

  • Stuff the head firmly and continue with the violet body section as indicated in the pattern
  • Sew the antennas on round 4 on each side of the head, ensuring they're positioned symmetrically
  • Attach the arms on each side between the head and body by tilting them slightly forward
  • Sew the large and small half-wings together following the specific technique, ensuring the second wing is sewn inversely for symmetry
  • Attach the completed wings behind the arms on each side of the butterfly's body
  • Embroider the nose with cream thread between rounds 14-15, and add eyes and eyebrows with black embroidery yarn
  • Add decorative French knots on the body with cream thread for a spotted pattern effect

Important Notes

  • 💡Use the invisible decrease technique throughout to maintain smooth shaping and avoid holes
  • 💡Work puff stitches consistently with the same tension to ensure even wing texture
  • 💡Mark the beginning of each round when working in spiral to keep track of your progress
  • 💡Stuff sections firmly but not overly tight to maintain the proper butterfly shape
  • 💡Pay attention to wing assembly direction to create symmetrical wings for the second side
  • 💡Use stitch markers and pins during assembly to ensure proper positioning before final sewing

This enchanting Elvina butterfly pattern brings together the delicate beauty of nature with the cozy comfort of amigurumi. With her puff stitch wings, sweet embroidered features, and charming daisy accessory, she's designed to capture hearts and spread joy wherever she goes. The combination of soft pastels and intricate details makes her perfect for display or cuddling. 🧶 Happy crocheting! 🦋✨

You ask,

we answer.

FAQs

What makes the puff stitch wings special in this pattern?

The puff stitches create beautiful texture and dimension that mimics real butterfly wing scales. Each puff stitch is made of 3 incomplete double crochets joined together, creating a raised, fluffy effect that gives the wings realistic movement and visual interest.

Can I use different colors for Elvina?

Absolutely! While the pattern uses soft pastels, you can customize Elvina with any color combination you prefer. Consider using gradient yarns or metallic threads for a more dramatic effect, or stick to monochromatic schemes for an elegant look.

How do I ensure my wings are symmetrical?

The key is in the assembly - when making the second wing, sew the large and small half-wings together in the inverse order compared to the first wing. Pin everything in place before sewing to check symmetry.

What's the best way to achieve clean invisible decreases?

Insert your hook through the front loops only of both stitches before completing the decrease. This technique creates a smooth, nearly invisible seam that maintains the amigurumi's professional appearance.

How can I make the French knot decorations even?

Practice the tension on a sample piece first. Wind the yarn exactly twice around the needle each time, and keep consistent spacing by counting stitches between each dot. The pattern provides detailed photo instructions for the technique.