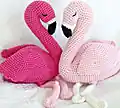
Create your own adorable Florence the Flamingo with this charming amigurumi pattern! This delightful pink flamingo sits elegantly at 21cm tall with her graceful curved neck and beautiful decorative wings. Perfect for both beginners looking to expand their skills and experienced crocheters who want a rewarding weekend project.
Progress Tracker
0% Complete
— Body :
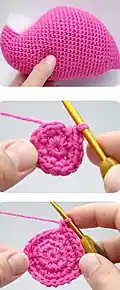
Round 1 :
sc 8 into a mr [8]
Round 3 :
(sc 3, inc) x 4 [20]
Round 4 :
(sc 4, inc) x 4 [24]
Round 5 :
(sc 5, inc) x 4 [28]
Round 6 :
(sc 6, inc) x 4 [32]
Round 7 :
(sc 7, inc) x 4 [36]
Round 8 :
chain 3, skip 12 stitches then sc 24 stitches to form the body. (The body stitch count is now 27 which includes the 24 stitches plus the chain 3) [27]
Round 9 :
inc, inc, inc (these are worked into the BLO chain stitches from the previous round). Then sc 24 [30]
Round 11 :
(sc 4, inc) x 6 [36]
Round 12 :
(sc 5, inc) x 6 [42]
Round 14 :
(sc 2, inc) x 3 then sc 33 [45]
Round 15 :
(sc 3, inc) x 3 then sc 33 [48]
Round 17 :
(sc 4, inc) x 3 then sc 33 [51]
Round 19 :
(sc 5, inc) x 3 then sc 33 [54]
Round 22 :
(sc 5, dec) x 3 then sc 33 [51]
Round 25 :
(sc 4, dec) x 3 then sc 33 [48]
Round 27 :
(sc 3, dec) x 3 then sc 33 [45]
Round 30 :
(sc 2, dec) x 3 then sc 33 [42]
Round 32 :
(sc 5, dec) x 6 [36]
Round 33 :
(sc 4, dec) x 6 [30]
Round 34 :
(sc 1, dec) x 3 then sc 21 [27]
Info :
Stuff the body of the Flamingo
Round 36 :
(dec x 4) then sc 19 [23]
Round 38 :
(dec x 3) then sc 17 [20]
Round 39 :
(dec x 2) then sc 16 [18]
Info :
Tie off and leave a long tail of yarn for sewing closed. Finish stuffing the body. Fold the edges towards each other in half and line up the stitches. Take a tapestry needle and work a mattress stitch to close the tail.
— Neck :
Round 1 :
sc 8 into a mr [8]
Round 3 :
(sc 3, inc) x 4 [20]
Round 4 :
(sc 4, inc) x 4 [24]
Round 5 :
(sc 5, inc) x 4 [28]
Round 6 :
(sc 6, inc) x 4 [32]
Round 8 :
(sc 7, inc) x 4 [36]
Round 9 :
Chain 2, skip 18 stitches and then sc 18 to form the neck. [20]
Round 10 :
sc 2 into BLO (these are worked into the chain stitches from the previous round). Then sc 18 [20]
Round 11 :
(sc 8, dec) x 2 [18]
Round 12 :
(sc 4, dec) x 3 [15]
Info :
Tie off and leave a long tail for sewing.
— Head and Beak :
Round 1 :
make a slip knot and perform a standing sc in the stitch immediately after the chain 2 join. Now Sc 19. (The last two sc are worked into the FLO of the chain stitches) [20]
Round 3 :
inc, sc 16, then (inc x 3) [24]
Round 6 :
(sc 2, dec) x 6 [18]
Round 7 :
(dec, sc 4) x 3 [15]
Info :
Change colour to 801 snow
Round 8 :
sc into BLO [15]
Round 9 :
(dec, sc 3) x 3 [12]
Info :
change colour to 817 Noir
Round 10 :
sc into BLO [12]
Round 12 :
inc, inc, (sc 1, dec) x 3, inc [12]
Round 14 :
(dec, sc 2) x 3 [9]
Round 15 :
(dec, sc 1) x 3 [6]
Info :
Tie off and leave a long tail for sewing.
— Wings :
Round 1 :
sc 6 into a mr [6]
Round 3 :
(sc 1, inc) x 6 [18]
Round 4 :
(sc 2, inc) x 6 [24]
Round 5 :
(sc 3, inc) x 6 [30]
Round 7 :
(sc 4, inc) x 6 [36]
Round 9 :
(sc 5, inc) x 6 [42]
Round 12 :
(sc 6, inc) x 6 [48]
Round 14 :
(sc 7, inc) x 6 [54]
Round 15 :
(sc 8, inc) x 6 [60]
Round 16 :
fold flat, chain 1 and sc 30 to close. Go through both loops of both sides. Do not tie off. [30]
Wing One :
chain 1, turn sc 14 then (sc, 2dc, 2dc, sc) x 4. Tie off and leave a long tail for sewing
Wing Two :
chain 1, turn (sc, 2dc, 2dc, sc) x 4 then sc 14. Tie off and leave a long tail for sewing
— Legs :
Round 2 :
sc into the second chain from the hook, sc 2, 3sc into the last stitch. (Then working on the opposite side of the chain) sc 2, inc [10]
Round 3 :
inc, sc 2, (inc x 3), sc 2, (inc x 2) [16]
Round 5 :
dec, sc 2, (dec x 3), sc 2, (dec x 2) [10]
Round 6 :
(sc 3, dec) x 2 [8]
Round 19 :
sc, bobble in the following stitch then sc 6 [8]
Info :
Change colour to 865 hot pink
Round 31 :
(sc 1, inc) x 4 [12]
Info :
Tie off and leave a long tail of yarn for sewing. Do not stuff the legs.
This elegant Florence the Flamingo pattern combines intermediate crochet techniques with stunning results! The unique construction method creates her graceful curved neck and beautiful textured wings that make her truly special. With comprehensive photo guides and detailed instructions, you'll love watching this gorgeous flamingo come to life stitch by stitch. Perfect for gifting or adding a touch of tropical charm to your home! 🦩