๐Ÿงถ Beautiful โœจ Detailed ๐Ÿ’ Adorable

Flower Bouquet C Crochet Pattern

Flower Bouquet C Crochet Pattern
4.5โ˜… Rating
8-10 Hours Time Needed
1.2K Made This
โœ‚๏ธ

Intermediate Level

Ideal for those with basic knitting experience, featuring slightly more advanced stitches and techniques to expand your skills.

โฑ๏ธ

All-Day Adventure

Requires 8-10 hours, ideal for a full day of immersive knitting.

๐ŸŒธ

Spring Bloom

Light and fresh designs for warmer days, capturing the renewal and brightness of the season.

About This Flower Bouquet C Crochet Pattern

This comprehensive flower bouquet pattern includes multiple flower varieties that combine to create a stunning decorative piece. The pattern features detailed instructions for tulips with small and big petals, classic daisies with realistic centers, two different rose styles, baby daisies, and leafy branches. Each flower incorporates wire for realistic shaping and positioning, making this bouquet perfect for long-lasting home decoration or as a heartfelt handmade gift.

Flower Bouquet C Crochet Pattern crochet pattern - detailed view of completed project

Wire reinforcement in petals and leaves allows for natural positioning and reshaping. The pattern uses basic stitches combined in creative ways to achieve realistic flower textures and forms.

Why You'll Love This Flower Bouquet C Crochet Pattern

I absolutely love how this pattern brings together multiple flower types to create such a realistic and beautiful bouquet. The wire reinforcement technique makes each flower poseable and long-lasting, while the variety of flowers means you'll never get bored working through the different sections. The finished piece is so stunning that people often mistake it for real flowers from a distance!

Flower Bouquet C Crochet Pattern step 1 - construction progress Flower Bouquet C Crochet Pattern step 2 - assembly progress Flower Bouquet C Crochet Pattern step 3 - details and accessories Flower Bouquet C Crochet Pattern step 4 - final assembly and finishing

Switch Things Up

I love experimenting with different color combinations to create unique seasonal bouquets with this pattern. For spring, I use soft pastels like blush pink roses with white daisies and fresh green leaves. Summer calls for bright yellows and oranges that remind me of sunshine gardens.

For autumn arrangements, I switch to deep burgundy roses, cream-colored daisies, and golden yellow accents that capture the warm fall palette. Winter bouquets look stunning in whites and silvers with touches of deep forest green.

I also enjoy varying the flower quantities - sometimes I make an all-rose bouquet for romantic occasions, or go daisy-heavy for a cheerful spring feeling. The wire technique lets me reshape the same flowers into different arrangements whenever I want a fresh look.

Adding small touches like blush on petal edges or gradient effects with similar colored yarns creates even more realistic results. I've found that mixing different yarn textures - like using a slightly fuzzy yarn for rose centers - adds beautiful depth to the finished bouquet.

Common Mistakes & How to Fix Them

โœ— Forgetting to add wire during crocheting - always insert wire when pattern specifies for proper flower positioning โœ— Making petals too tight - keep stitches loose enough to allow natural flower shaping and movement โœ— Not securing wire ends properly - always wrap wire ends safely to prevent poking through yarn โœ— Rushing the assembly process - take time to position each flower naturally for the most realistic bouquet appearance

Flower Bouquet C Crochet Pattern

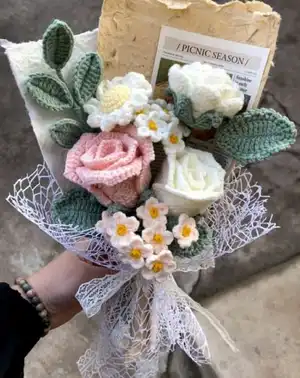
Create a stunning handcrafted flower bouquet featuring beautiful tulips, daisies, roses, and leafy branches with this comprehensive crochet pattern. This detailed guide includes instructions for multiple flower types including two rose variations, baby daisies, and realistic leaves. Perfect for home decoration, gifts, or special occasions, this pattern combines simple techniques with elegant results to bring everlasting beauty to any space.

Intermediate 8-10 Hours

Materials Needed for Flower Bouquet C Crochet Pattern

โ€” Main Fabric

  • 01
    Cotton yarn in various colors (4 ply weight recommended)
  • 02
    Acrylic yarn alternative in preferred flower colors
  • 03
    Milk yarn option for softer texture finish

โ€” Tools Required

  • 01
    Crochet hook size 2-2.5mm
  • 02
    Thin moldable wire (0.6mm for petals and leaves)
  • 03
    Thick wire or wooden sticks (2mm for stems)
  • 04
    Hot glue gun and glue sticks
  • 05
    Scissors
  • 06
    Yarn needle for sewing
  • 07
    Stitch markers
  • 08
    Wire cutters

Progress Tracker

0% Complete

โ€” Tulips :

Small petals (x3) :

R1: Chain 12

R2 :

(add wire) sk, sc, hdc, 7dc, hdc, w, hdc, 7dc, hdc, sc

R3 :

23 sc, sl, FO

Big petals (x3) :

R1: chain 13

R2 :

sk, 11 sc, w, 11 sc

R3 :

(add wire) sc, hdc, 9dc, hdc, w, hdc, 9dc, hdc, sc

R4 :

27sc, sl, FO

Big leaf :

R1: chain 31

R2 :

(add wire) sk, 3 sc, 3 hdc, 18 dc, 3 hdc, 2 sc, w, 2sc, 3 hdc, 18 dc, 3hdc, 3 sc, sl, FO

โ€” Daisy flower :

Center of the flower :

R1: 6 sc magic ring

R2 :

6 inc

R3 :

12 sc and FO

Petals :

(3 ch, dc, 3 ch, sl st) Rep 12

โ€” Baby daisy flower :

R1 :

5 sc magic ring

R2 :

(2 ch, 3 dc, 2 ch) Rep 5 times

โ€” Rose flower type 1 :

Flower petals :

R1: chain 53

R2 :

52 sc

R3 :

chain 5, dc, sk2, to begin with. The rest rep (dc, 2ch, dc) sk2 until the end

R4 :

chain 3, in the next hole work (2dc, 2ch, 2dc); Work on the hole of the upper part (2dc, 2ch, 2dc) Rep until the end

R5 :

ch 1, and in the hole of the upper part work 8dc. In the next hole work 1 sc. And repeat until the end and sl, FO

Flower bottom :

R1: (3 ch, 20 dc, sl st) magic ring

R2 :

8ch, ((sk, 2sc, 2hdc, 2dc, 1 tc) on chain) sk3, sl st Repeat 5 times and sl, FO

Rose leaf :

R1: 12ch, sk, sc, hdc, 7dc, hdc; on the other side of the chain: w, hdc, 7dc, hdc, sc

R2 :

(add wire), sc, 2ch. Rep until reached the end and sl, FO

โ€” Rose flower type 2 :

Small petal (x4) :

R1: 10 dc magic ring

R2 :

10 hdc inc

R3 :

6 sc, 8 hdc inc, 6 sc

Midi petal (x4) :

R1: 10 dc magic ring

R2 :

10 hdc inc

R3 :

(2 sc, sc inc) rep

R4 :

8 sc, 9 hdc inc, 9 sc

Big petal (x5) :

R1: 10 dc magic ring

R2 :

10 hdc inc

R3 :

(hdc, hdc inc) rep

R4 :

8 sc, 6 hdc inc, (hdc, dc in same st), 3 ch, (dc, hdc in same st), 6 hdc inc, 8 sc

Flower bottom :

R1: 6 sc magic ring

R2 :

6 inc

R3 :

6 (sc, inc)

R4 :

18sc

R5 :

[9 ch, (sk1 backward, 2 sl st, 2sc, 2 hdc, dc, tc in chain), sk 2, sl st] rep 6 times

โ€” Leafs :

R1 :

Chain 12

R2 :

(add metallic wire to secure the position) sk, sc, hdc, dc, 5 tc, dc, hdc, w, hdc, dc, 5 tc, dc, hdc, sc, sl, FO

Assembly Instructions

  • Start sticking with glue around the stick the small tulip petals, then add the bigger ones in a circular way
  • Attach tulip leaf to the lower part of the stick and roll yarn around to secure and create natural stem
  • For daisies, connect yellow and green centers, stuff lightly with fiberfill, then attach petals around the edge
  • Roll rose type 1 petals starting from the first chain at center, secure with glue, then attach bottom and leaves
  • For rose type 2, layer petals from small to big, rolling and gluing each layer for realistic rose shape
  • Connect wire or wooden sticks to all flowers, positioning stems naturally for bouquet arrangement
  • Create leaf branches by connecting multiple leaves to one stem, spacing them naturally along the wire

Important Notes

  • ๐Ÿ’กAdd wire during crocheting when specified in pattern for proper flower shaping and positioning
  • ๐Ÿ’กUse hot glue carefully and allow to cool completely before handling assembled flowers
  • ๐Ÿ’กKeep stitches loose enough to allow natural flower movement and realistic positioning
  • ๐Ÿ’กRoll yarn around all stems to create natural appearance and secure all connections
  • ๐Ÿ’กPosition flowers at varying heights for most realistic bouquet arrangement
  • ๐Ÿ’กWire ends should be properly secured to prevent poking through finished work

This beautiful Flower Bouquet C pattern brings together the elegance of multiple flower types in one stunning arrangement. From delicate tulips and cheerful daisies to romantic roses and realistic leafy branches, each element combines to create a masterpiece that will brighten any space. The wire reinforcement technique ensures your flowers stay beautifully positioned for years to come. Perfect for gifting or decorating your own home with handmade beauty that never wilts! ๐ŸŒธ

You ask,

we answer.

FAQs

What type of wire should I use for the flowers?

Use thin moldable wire around 0.6mm for petals and leaves, and thicker 2mm wire or wooden sticks for stems. The wire must be flexible enough to shape but strong enough to hold position.

Can I make this bouquet without wire reinforcement?

While possible, the wire is essential for the realistic positioning and long-lasting shape of the flowers. Without wire, the flowers will be more limp and harder to arrange naturally.

How do I prevent the wire from poking through the yarn?

Always wrap wire ends carefully and ensure they're positioned in the center of your work. Cover all stems with yarn wrapping to hide and secure the wire completely.

What yarn weight works best for this pattern?

4-ply cotton yarn with a 2-2.5mm hook gives the best results for the size shown. You can use thicker yarn and larger hook for bigger flowers, or thinner for more delicate versions.

How long will this bouquet project take to complete?

Expect 8-10 hours total, depending on your skill level and how many of each flower type you choose to make. The roses take the longest, while baby daisies are quickest to complete.