🧢 Beautiful ✨ Detailed πŸ’ Adorable

Graceful Ballerina Amigurumi Pattern

Graceful Ballerina Amigurumi Pattern
4.6β˜… Rating
8-10 Hours Time Needed
1.7K Made This
βœ‚οΈ

Intermediate Level

Ideal for those with basic knitting experience, featuring slightly more advanced stitches and techniques to expand your skills.

⏱️

All-Day Adventure

Requires 8-10 hours, ideal for a full day of immersive knitting.

🧸

Cute Companion

An adorable friend to cherish, handcrafted with love to bring comfort and joy for years to come.

About This Graceful Ballerina Amigurumi Pattern

This elegant ballerina pattern brings together classic dance charm with modern amigurumi techniques. The doll features a beautiful orange updo hairstyle, expressive embroidered eyes, and a stunning layered tutu dress in sophisticated gray tones. Every detail has been carefully designed to capture the grace and poise of a real ballerina, from her delicate arms positioned in dance pose to her authentic ballet shoes.

Graceful Ballerina Amigurumi Pattern crochet pattern - detailed view of completed project

The finished ballerina measures approximately 20 cm in circumference and about 10 cm in length, making her the perfect size for cuddling or display. Her poseable limbs and carefully structured dress create a truly special keepsake piece.

Why You'll Love This Graceful Ballerina Amigurumi Pattern

I absolutely love how this pattern combines elegance with playfulness! The way her little tutu dress flows and her hair sits in that perfect ballerina bun just melts my heart every time. What I find most rewarding is watching her personality emerge as you work through each section - from her graceful arms to those tiny detailed ballet shoes. The color combination is simply stunning, and I love how the gray dress contrasts beautifully with her warm pink skin tone.

Graceful Ballerina Amigurumi Pattern step 1 - construction progress Graceful Ballerina Amigurumi Pattern step 2 - assembly progress Graceful Ballerina Amigurumi Pattern step 3 - details and accessories Graceful Ballerina Amigurumi Pattern step 4 - final assembly and finishing

Switch Things Up

I love experimenting with different color combinations for this ballerina pattern! Sometimes I'll create her in soft pastels like lavender and cream for a dreamy fairy-tale look, or go bold with deep jewel tones for a more dramatic dancer. I've also tried adding tiny sequins or beads to her tutu for extra sparkle - though I'm always careful to secure them well if the doll is for a child.

Another fun variation I enjoy is changing up her hairstyle slightly by creating longer chain loops for flowing hair instead of the classic bun, or even adding tiny flower accessories. I've found that using metallic thread for small details like shoe buckles or hair pins can really make her shine under the lights, just like a real ballerina on stage!

Common Mistakes & How to Fix Them

βœ— Forgetting to stuff the body firmly enough before closing - this affects the doll's shape and posture significantly βœ— Not maintaining consistent tension when creating the tutu dress layers which can make the skirt look uneven βœ— Placing the hair attachment incorrectly which throws off the entire ballerina look and proportions of the head βœ— Skipping stitch markers during color changes in the dress which leads to misaligned pattern sections

Graceful Ballerina Amigurumi Pattern

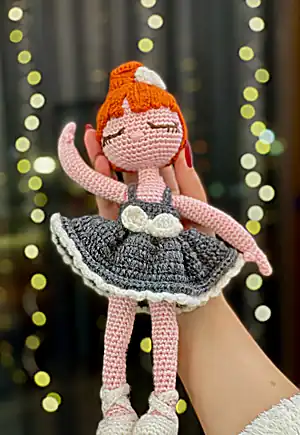
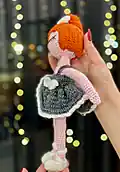
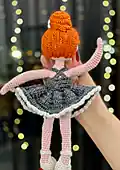
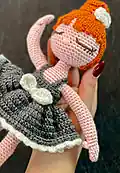
Create your own enchanting ballerina with this delightful amigurumi pattern! This charming doll features beautiful orange hair, a classic gray tutu dress, and adorable ballet shoes. Perfect for gifting to dance lovers or adding a touch of elegance to any nursery. The pattern includes detailed instructions for creating every element from her graceful pose to her tiny ballet accessories.

Intermediate 8-10 Hours

Materials Needed for Graceful Ballerina Amigurumi Pattern

β€” Main Fabric

  • 01
    Light Pink yarn for skin tone (body, head, arms, legs)
  • 02
    Black yarn for dress base and shoes
  • 03
    Gray yarn for main tutu dress sections
  • 04
    Mustard/Orange yarn for hair and hair accessories
  • 05
    White/Cream yarn for dress details and shoe accents

β€” Tools Required

  • 01
    2.5mm crochet hook or size that fits your yarn
  • 02
    Scissors
  • 03
    Stuffing
  • 04
    Tapestry needle
  • 05
    Stitch markers
  • 06
    Pins for assembly

Progress Tracker

0% Complete

β€” LEGS & BODY :

Round 1-10 :

ch.10 ch into 20 sc

Round 2-5 :

(4 ring)sc into sc(20)

Round 6-7 :

sc into sc(6 sc dec)7 sc into sc(14)

Round 7-5 :

sc into sc(4 sc dec)5 sc into sc(10)

Round 8-4 :

sc into sc(2 sc dec)4 sc into sc(8)

Round 9-16 :

(8 ring)sc into sc(8)

Round 17-2 :

sc inc(10)

Round 18-21 :

(4 ring)sc into sc(10)

Round 22-2 :

sc inc(12)

Round 23-30 :

(8 ring)sc into sc(12)

Round 31-2 :

sc inc(14)

Round 32-35 :

(4 ring)sc into sc(14)fo.

Info :

Bring the legs together. make 2 ch between

Round 36-14 :

sc into sc 2ch into sc 14 sc into sc(30 sc)

Round 37-43 :

(7 ring)sc into sc(30 sc)

Round 44 :

(6 times)3 sc into sc next dec(24)

Round 45 :

sc into sc(24)

Round 46 :

(6 times)3 sc into sc next inc(30)

Info :

Fill the body. Keep filling as you go.

Round 47-53 :

(7 ring)sc into sc(30)

Round 54-5 :

sc into sc join the first arm (5 sc)10 sc into sc

Info :

join the second arm (5 sc)5 sc into sc(30 sc)

Round 55 :

(6 times)3 sc into sc next dec(24)

Round 56 :

(6 times)2 sc into sc next dec(18)

Round 57 :

sc into sc(18)

Round 58 :

(6 times)1sc into sc next dec(12)

Round 59-62 :

(4 ring)sc into sc(12)fo.Leave a long thread to sew on.

β€” ARMS :

Round 1 :

6 sc in a mr

Round 2-6 :

(5 ring)sc into sc (6)

Round 7-3 :

ch.turn.3ch into sc 6 sc into sc

Round 8 :

(4 times)sc inc(10 sc)

Round 9-28 :

(20 ring)sc into sc(10)fo. Fill the sleeves.

Info :

FLOWER BUCKLE - Rnd 1-18 ch.

Round 2 :

(6 times)1 ch into 3 hdc 1 ch into sc

Round 3 :

(6 times)1 ch into 3 cr 1 ch into sc fo.

Info :

Leave a long thread to sew on.

β€” DRESS :

Round 1 :

35 ch.

Round 2 :

35 ch into sc(35 sc)turn

Round 3-9 :

(7 ring)sc into sc(35)

Round 10 :

(35 times)1 sc into 3 cr(105 cr)

Round 11-15 :

(5 ring)cr into cr(105 cr)

Round 16 :

in blo cr into hdc(105 hdc)

Round 17 :

A COLOR - in flo along the ring 1 sc into sc 1 sc into 3 hdc fo.

β€” BOW & HANGERS :

Info :

BOW - A color- 10 ch.

Round 2 :

(2 ring)10 ch into cr fo.Wrap it in the middle. sew it to the waist of the dress.

Info :

HANGER - MAKE 2

Round 1 :

21 ch.

Round 2 :

21 ch into sc fo.

Info :

Leave a long thread to sew on.

β€” HEAD :

Round 1 :

6 sc in a mr

Round 2 :

6 sc inc(12)

Round 3 :

(6 times)1 sc into sc next inc(18)

Round 4 :

(6 times)2 sc into sc next inc(24)

Round 5 :

(6 times)3 sc into sc next inc(30)

Round 6 :

(6 times)4 sc into sc next inc(36)

Round 7 :

(6 times)5 sc into sc next inc(42)

Round 8-17 :

(10 ring)sc into sc(42)

Round 18 :

(6 times)5 sc into sc next dec(36)

Round 19 :

(6 times)4 sc into sc next dec(30)

Round 20 :

(6 times)3 sc into sc next dec(24)

Round 21 :

(6 times)2 sc into sc next dec(18)

Round 22 :

(6 times)1 sc into sc next dec(12)

Round 23 :

6 sc dec (6 sc)fo.

Info :

Leave a long thread to sew on.

β€” HAIRS :

Round 1 :

6 sc in a mr

Round 2 :

6 sc inc(12)

Round 3 :

1 sc into sc next inc(18)

Round 4 :

First Layer 20 ch.ch into sc(20 sc)(12 hair strands)

Info :

13 ch.ch into sc(10 hair strands)

Info :

Top Layer-50 ch.ch into sc(5 hair strands)

Info :

Gather strands of hair, wrap and sew.

β€” SHOES :

Round 1 :

12 ch.

Round 2 :

12 ch inc(24 sc)

Round 3-6 :

(4 ring)sc into sc (24)

Round 7-8 :

sc into sc(4 sc dec)8 sc into sc(20)

Round 8-2 :

sc into sc 14 ch.Turn 14 ch into sc(14 sc)

Round 9 :

14 sc into sc 14 ch.Turn ch into sc fo.

Info :

Leave a long thread to sew on.

Assembly Instructions

  • Attach the head to the body by sewing the neck opening securely to the top of the body
  • Sew the arms to the sides of the body, positioning them slightly forward to create a graceful dance pose
  • Attach the dress by slipping it over the body and securing the shoulder straps in place
  • Position and sew the bow accent to the waist area of the dress for decorative detail
  • Attach the hair piece to the top of the head, ensuring it sits like a proper ballerina bun
  • Sew the ballet shoes to the feet, making sure they're positioned correctly for a dance stance

Important Notes

  • πŸ’‘Use stitch markers consistently throughout the pattern to maintain accurate stitch counts
  • πŸ’‘Stuff each body part firmly but evenly to maintain the doll's elegant proportions
  • πŸ’‘Take extra care when attaching the hair to ensure it resembles a classic ballerina updo
  • πŸ’‘Position all pieces before final sewing to ensure the doll maintains proper dance posture
  • πŸ’‘Pay attention to color changes in the dress pattern to achieve the layered tutu effect

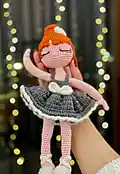
This enchanting ballerina amigurumi pattern captures the grace and beauty of classical dance in adorable miniature form! With her elegant orange hair styled in a perfect bun, sophisticated gray tutu, and delicate ballet shoes, she's sure to pirouette her way into your heart. The pattern combines intermediate techniques with stunning visual results, making it a rewarding project for crochet enthusiasts who love creating something truly special. 🩰 Happy crocheting! 🧢✨

You ask,

we answer.

FAQs

What size will the finished ballerina be?

The completed ballerina measures approximately 20 cm in circumference and about 10 cm in length, making her perfect for display or cuddling.

Can I use different colors for the dress?

Absolutely! While the pattern uses gray for the tutu, you can substitute any color you prefer. Pink, white, or purple would create beautiful alternatives.

Is this pattern suitable for beginners?

This is an intermediate pattern that requires knowledge of basic crochet stitches and color changes. Beginners should have some amigurumi experience before attempting this project.

How do I achieve the proper hair texture?

The hair is created using multiple chain loops of varying lengths. Follow the pattern carefully for the layered effect, and don't be afraid to adjust strand placement for the perfect ballerina bun.

What's the best way to position the arms for a dance pose?

Attach the arms slightly forward from the sides of the body and position them at a gentle angle. You can stuff them firmly to help maintain the graceful dance position.