🧢 Beautiful ✨ Detailed πŸ’ Adorable

Halloween Pumpkin Amigurumi Pattern

Halloween Pumpkin Amigurumi Pattern
4.0β˜… Rating
3-4 Hours Time Needed
3.1K Made This
βœ‚οΈ

Intermediate Level

Ideal for those with basic knitting experience, featuring slightly more advanced stitches and techniques to expand your skills.

⏱️

Bite-Sized Project

Complete in under 2 hoursβ€”quick, fun, and perfect for a little creative escape.

πŸŽƒ

Holiday Cheer

Festive fun for the season, bringing handmade magic to celebrations and creating new family traditions.

About This Halloween Pumpkin Amigurumi Pattern

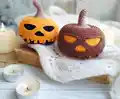
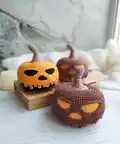
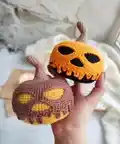
This Halloween pumpkin pattern combines classic amigurumi techniques with festive seasonal charm. The design features a realistic pumpkin shape with ridged texture created through strategic color changes and special stitching techniques. What makes this pattern special is the interchangeable facial features - you can create different expressions from friendly to frightfully fun. The pattern includes detailed instructions for creating the dripping wax effect and decorative elements that make each pumpkin unique.

Halloween Pumpkin Amigurumi Pattern crochet pattern - detailed view of completed project

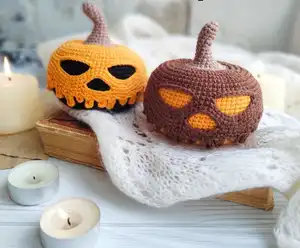
Perfect for Halloween decorating or autumn home decor, this 3.94-inch pumpkin works up quickly and makes wonderful gifts. The pattern uses basic amigurumi techniques with clear photo tutorials to guide you through each step.

Why You'll Love This Halloween Pumpkin Amigurumi Pattern

I absolutely love how this pattern captures the essence of Halloween while remaining adorable rather than scary! The ability to customize facial expressions means I can create a whole pumpkin family with different personalities. The detailed photo instructions make even the trickier parts like the dripping wax effect totally manageable, and the finished result looks professionally made. There's something so satisfying about creating seasonal decorations that can be treasured year after year, and this little pumpkin brings such cozy autumn vibes to any space.

Halloween Pumpkin Amigurumi Pattern step 1 - construction progress Halloween Pumpkin Amigurumi Pattern step 2 - assembly progress Halloween Pumpkin Amigurumi Pattern step 3 - details and accessories Halloween Pumpkin Amigurumi Pattern step 4 - final assembly and finishing

Switch Things Up

I love experimenting with different color combinations for this pumpkin pattern! While the traditional orange is classic, I've had amazing results using deep burgundy with gold accents for an elegant autumn look, or even white and silver for a sophisticated Halloween vibe.

One of my favorite modifications is creating a whole pumpkin patch by making different sizes - I use the same pattern but with different yarn weights and hook sizes. The variation in scale creates such a charming display!

For a more whimsical approach, I sometimes add small crocheted leaves to the stem or create tiny stems in different shades of brown and green. You could even make a few baby pumpkins and attach them with thin chains to create a connected pumpkin vine.

I've also experimented with different stuffing techniques - adding a small amount of rice or plastic pellets to the bottom gives the pumpkin a more realistic weight and helps it sit better on surfaces.

Common Mistakes & How to Fix Them

βœ— Forgetting to stuff the pumpkin firmly enough before closing - this affects the final shape significantly βœ— Not maintaining consistent tension when changing colors - leads to visible gaps in the fabric βœ— Placing facial features too high or too low - always pin first before sewing permanently βœ— Overstuffing the stem section - it should be firm but not rock hard for proper proportions

Halloween Pumpkin Amigurumi Pattern

Create your own adorable Halloween pumpkin with this detailed amigurumi crochet pattern! This spooky-cute design features interchangeable facial expressions, from sweet smiles to scary grins, making it perfect for autumn decorations. The pattern includes step-by-step instructions with 32 detailed photos to guide you through every stitch. Whether you're decorating for Halloween parties or creating cozy fall ambiance, this charming pumpkin brings handmade warmth to your seasonal celebrations.

Intermediate 3-4 Hours

Materials Needed for Halloween Pumpkin Amigurumi Pattern

β€” Main Fabric

  • 01
    Sport weight/4ply yarn Yarn Art Jeans in orange, brown, and light brown colors
  • 02
    Alternative: Any sport weight cotton or acrylic yarn in similar autumn colors

β€” Tools Required

  • 01
    Crochet hook 1.75mm
  • 02
    Fiberfill stuffing
  • 03
    Scissors
  • 04
    Needle for embroidery and sewing pieces
  • 05
    Pins for attaching details
  • 06
    Stitch markers

Progress Tracker

0% Complete

β€” Pumpkin Body :

Round 1 :

8 sc in MR

Round 2 :

8 inc (16)

Round 3 :

(1 sc, inc) * 8 (24)

Round 4 :

1 sc, inc, (2 sc, inc) * 7, 1 sc (32)

Round 5 :

(3 sc, inc) * 8 (40)

Round 6 :

2 sc, inc, (4 sc, inc) * 7, 2 sc (48)

Round 7 :

(5 sc, inc) * 8 (56)

Round 8 :

3 sc, inc, (6 sc, inc) * 7, 3 sc (64)

Round 9 :

(7 sc, inc) * 8 (72)

Rounds 10-12 :

72 sc (3 rounds)

Info :

Change color to orange

Round 13 :

BLO: 72 sc

Rounds 14-27 :

72 sc (14 rounds)

Round 28 :

(7 sc, dec) * 8 (64)

Round 29 :

3 sc, dec, (6 sc, dec) * 7, 3 sc (56)

Round 30 :

(5 sc, dec) * 8 (48)

Round 31 :

2 sc, dec, (4 sc, dec) * 7, 2 sc (40)

Round 32 :

(3 sc, dec) * 8 (32)

Info :

Stuff the toy, spread the fiberfill inside from center to sides

Round 33 :

1 sc, dec, (2 sc, dec) * 7, 1 sc (24)

Round 34 :

(1 sc, dec) * 8 (16)

Round 35 :

8 dec (8)

Info :

Fasten off, leaving long thread for pumpkin shaping

β€” Face Details :

Eyes :

26 sc, make chain 12, skip 8 sc, 4 sc, make chain 12, skip 8 sc, 26 sc (80)

Next Round :

26 sc, 12 sc on chain, 4 sc, 12 sc on chain, 26 sc (80)

Nose :

37 sc, make chain 7, skip 8 sc, 35 sc (79)

Next Round :

37 sc, 7 sc on chain, 35 sc (79)

Info :

Continue crocheting drip details alternating chain lengths from 3 to 7

β€” Pumpkin Stalk :

Round 1 :

6 sc in MR

Round 2 :

(1 sc, inc) * 3 (9)

Rounds 3-6 :

9 sc (4 rounds)

Round 7 :

4 sl st, 5 sc (9)

Round 8 :

9 sc

Round 9 :

4 sl st, 5 sc (9)

Round 10 :

9 sc

Round 11 :

(2 sc, inc) * 3 (12)

Round 12 :

12 sc

Round 13 :

(1 sc, inc) * 6 (18)

Round 14 :

18 sc

Round 15 :

(2 sc, inc) * 6 (24)

Round 16 :

24 sc

Info :

Fill stalk with fiberfill and fasten off with long thread for sewing

Assembly Instructions

  • Create pumpkin ridges by inserting needle through base and pulling thread to opposite side repeatedly
  • Shape the pumpkin by tightening threads and creating vertical indentations for realistic segments
  • Pin facial features in desired positions before sewing permanently to ensure proper placement
  • Attach dripping wax details around the face opening, varying lengths for realistic melted effect
  • Stuff the stalk firmly but not overly tight, then sew securely to the top center of pumpkin
  • Add final touches and ensure all loose ends are woven in and secured

Important Notes

  • πŸ’‘Use stitch markers to keep track of rounds, especially during color changes
  • πŸ’‘Stuff firmly but not too tightly for best shape and structure
  • πŸ’‘Pin all facial features before sewing to ensure correct positioning and expression
  • πŸ’‘Work with consistent tension throughout to maintain even fabric appearance
  • πŸ’‘Take photos during assembly to remember placement for future pumpkins

This delightful Halloween pumpkin pattern brings the magic of autumn right into your home! With its customizable facial expressions and realistic dripping details, each pumpkin becomes a unique character full of seasonal charm. The clear instructions and detailed photos make this an enjoyable project for crocheters looking to add handmade Halloween spirit to their decorations. Perfect for gifting or keeping as treasured seasonal decor that will bring smiles year after year. Happy crocheting and have a spook-tacular Halloween!

You ask,

we answer.

FAQs

Can I make this pumpkin in different sizes?

Yes! You can easily adjust the size by using different yarn weights and hook sizes. For a larger pumpkin, try worsted weight yarn with a 4mm hook, or for tiny pumpkins, use thread with a smaller hook.

How do I get the pumpkin ridges to look realistic?

The key is in the shaping technique after finishing. Pull the yarn through from base to top several times at different points around the circumference, creating natural-looking segments.

Can I skip the dripping wax effect?

Absolutely! You can create a simple Jack-o'-lantern face instead, or even make it plain without facial features for a more subtle autumn decoration.

What if my pumpkin doesn't hold its shape well?

Make sure you're stuffing firmly enough and that your tension is consistent. You can also add a small weight in the bottom before stuffing to help it sit properly.

How do I make different facial expressions?

The pattern shows one expression, but you can easily modify by changing the shape and placement of the openings. Try different eye shapes or add a smile instead of the drip effect.