🧢 Beautiful ✨ Detailed πŸ’ Adorable

Harry Potter Ear Saver Pattern

Harry Potter Ear Saver Pattern
4.1β˜… Rating
1-2 Hours Time Needed
1.6K Made This
βœ‚οΈ

Beginner Friendly Level

Perfect for those just starting their sewing journey, with clear instructions and simple techniques

⏱️

Bite-Sized Project

Complete in under 2 hoursβ€”quick, fun, and perfect for a little creative escape.

🧣

Snug Essential

Everyday comfort with practical charm, designed for both functionality and style through changing seasons.

About This Harry Potter Ear Saver Pattern

This Harry Potter ear saver pattern brings magical comfort to mask-wearing with its charming owl button design in classic Gryffindor scarlet and gold colors. The pattern includes two versions - a simple owl face and a more detailed full owl - allowing you to choose your preferred level of detail. The flexible gauge makes it adaptable to different yarn weights, while the practical design provides relief from mask elastic discomfort.

Harry Potter Ear Saver Pattern crochet pattern - detailed view of completed project

Designed with both functionality and fandom in mind, this ear saver features secure button attachment that allows mask elastic to slide underneath while staying firmly in place. The pattern is easily adjustable for different head sizes by simply adding or subtracting chain stitches.

Why You'll Love This Harry Potter Ear Saver Pattern

I absolutely love how this pattern combines everyday practicality with magical charm! The owl details are so adorable and the Gryffindor colors make it perfect for any Harry Potter fan. What makes me especially excited is how quickly this works up - you can create a functional accessory that brings a smile to your face every time you use it. The two button options mean you can customize the complexity level, and the washable cotton construction ensures it'll last through countless uses.

Harry Potter Ear Saver Pattern step 1 - construction progress Harry Potter Ear Saver Pattern step 2 - assembly progress Harry Potter Ear Saver Pattern step 3 - details and accessories Harry Potter Ear Saver Pattern step 4 - final assembly and finishing

Switch Things Up

I love experimenting with different color combinations for this ear saver pattern! While the traditional Gryffindor scarlet and gold is magical, you could easily create versions for other Hogwarts houses - imagine deep green and silver for Slytherin, or blue and bronze for Ravenclaw. I've also made these using variegated yarns for a more subtle magical effect.

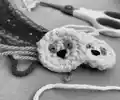
For the owl buttons, I sometimes add tiny seed beads for extra sparkle in the eyes, or use metallic thread for the facial details to make them really pop. The pattern works beautifully with cotton blends too, giving a softer feel while maintaining washability.

I've discovered that making these in different sizes works wonderfully - smaller versions make adorable keychains or bag charms, while larger ones can become decorative elements for other projects. The versatility of this simple pattern never ceases to amaze me!

Common Mistakes & How to Fix Them

βœ— Not leaving long enough tails when fastening off buttons for secure attachment βœ— Sewing button edges closed which prevents mask elastic from fitting underneath properly βœ— Working too tightly on the band making it inflexible and uncomfortable to wear βœ— Forgetting to use back loop only technique which creates the distinctive texture in owl buttons

Harry Potter Ear Saver Pattern

Create magical comfort with this adorable Harry Potter-themed ear saver pattern! Perfect for protecting ears from mask elastic, this delightful accessory features charming owl buttons in Gryffindor colors. Whether you choose the simple owl face design or the detailed full owl version, this quick project combines practicality with wizarding world charm. The adjustable band ensures a comfortable fit while adding a touch of magic to your daily routine.

Beginner Friendly 1-2 Hours

Materials Needed for Harry Potter Ear Saver Pattern

β€” Main Fabric

  • 01
    Medium weight yarn (4) in scarlet red: approximately 3 yards
  • 02
    Medium weight yarn (4) in gold: approximately 2.7 yards
  • 03
    White yarn for owl buttons: medium weight (4) approximately 4.6 yards for version 1
  • 04
    Fine weight yarn (2) in white: approximately 6.5 yards for version 2
  • 05
    Black thread: approximately 1 yard for facial details

β€” Tools Required

  • 01
    5mm crochet hook
  • 02
    2.5mm crochet hook (for version 2 buttons only)
  • 03
    Sewing needle
  • 04
    Scissors
  • 05
    Stitch marker (optional)
  • 06
    Tapestry needle

Progress Tracker

0% Complete

β€” Buttons - Version 1 - Owl Face :

Round 1 :

4 sc into a magic ring (4)

Round 2 :

inc in each st around (8)

Round 3 :

using BLO - inc in each st around (16)

Round 4 :

using FL left from previous rnd - inc in each st around (16)

Info :

Fasten off, leaving a tail of approx 12 in/30 cm. Using the tail of yarn, whip stitch through both sets of sts created in rnds 3 and 4

β€” Buttons - Version 2 - Full Owl Head :

Round 1 :

4 sc into a magic ring (4)

Round 2 :

inc in each st around (8)

Round 3 :

(sc, ch 2, sl) in next st, sl inc in next 3 sts, (sl, ch 2, sc) in next st, inc in each st around (20)

Info :

Fasten off, leaving a long tail for sewing

β€” Buttons - Version 2 - Full Owl Body :

Round 1 :

6 sc into a magic ring (6)

Round 2 :

using BLO - inc in each st around (12)

Round 3 :

using FL left from previous rnd - inc in each st around (12)

Round 4 :

working though both sets of sts from rnds 3 and 4 - inc around (24)

Info :

Fasten off, leaving a long tail for sewing

β€” Band :

Round 1 :

ch 21 (21)

Round 2 :

beginning in 2nd ch from hook - sc 19, sc 3 in next st. Moving up the other side of chain - sc 18, inc in last ch (42)

Info :

Switching to gold yarn

Round 4 :

inc, sc 18, inc, sc, inc, sc 18, inc, sc (46)

Info :

Fasten off

Assembly Instructions

  • Create owl facial features using gold yarn for french knot eyes and black thread for pupils and beak
  • For version 2, attach owl head slightly in front of and overlapping the body using long tails
  • Attach buttons securely at each end of band using long tails left after fastening off
  • Work around the outside of the center indent of button to secure while allowing room for elastic
  • For version 2, work between feather details so they don't get covered during attachment
  • Ensure not to sew button edges closed as mask elastic needs to fit underneath
  • Weave in all loose ends securely

Important Notes

  • πŸ’‘Use cotton yarn for durability through repeated machine washing
  • πŸ’‘Pattern can be easily adjusted by adding or subtracting chain stitches from band
  • πŸ’‘Use stitch markers to track rounds when working in continuous spiral
  • πŸ’‘Leave long tails when fastening off buttons for secure attachment
  • πŸ’‘Gauge is flexible - adjust stitches so ear saver measures about 5.5 inches long

This enchanting Harry Potter ear saver pattern combines magical fandom with practical comfort! The adorable owl buttons in Gryffindor colors make mask-wearing a little more magical while providing real relief from elastic discomfort. With two button versions to choose from, this quick project is perfect for beginners and Harry Potter fans alike. 🧢 Happy crocheting! ✨

You ask,

we answer.

FAQs

Can I adjust the size if the ear saver doesn't fit properly?

Yes! Simply add or subtract chain stitches from the initial band chain to make it longer or shorter. The pattern is very flexible and can be customized to fit different head sizes.

Which owl button version should I choose?

Version 1 (owl face) is simpler and perfect for beginners, while version 2 (full owl) offers more detail and dimension. Both are functional and adorable!

What type of yarn works best for this project?

Cotton yarn is recommended since ear savers need to withstand frequent washing, but any medium weight yarn will work. The pattern is gauge-flexible.

How do I make sure the mask elastic will fit under the buttons?

When attaching buttons, work around the outside edge and avoid sewing the center area or edges closed. This creates space for the elastic to slide underneath.