๐Ÿงถ Beautiful โœจ Detailed ๐Ÿ’ Adorable

Hungry Hamsters Amigurumi Pattern

Hungry Hamsters Amigurumi Pattern
4.2โ˜… Rating
4-5 Hours Time Needed
3.3K Made This
โœ‚๏ธ

Intermediate Level

Ideal for those with basic knitting experience, featuring slightly more advanced stitches and techniques to expand your skills.

โฑ๏ธ

Weekend Treat

Takes 5-7 hours, making it an enjoyable project to finish over a couple of days.

๐Ÿงธ

Cute Companion

An adorable friend to cherish, handcrafted with love to bring comfort and joy for years to come.

About This Hungry Hamsters Amigurumi Pattern

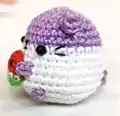
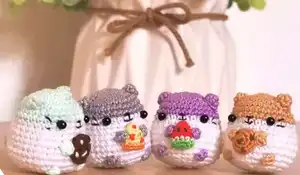
The Hungry Hamsters pattern brings together the charm of chubby hamsters with an adorable collection of miniature treats. Each hamster is designed with a distinctive colored head and white belly, creating the perfect canvas for their tiny paws to hold delicious snacks. The pattern includes instructions for both palm-sized (6cm) and mini (3cm) versions, allowing you to create a whole family of hungry friends. The attention to detail in the facial features and tiny treats makes these amigurumi truly special.

Hungry Hamsters Amigurumi Pattern crochet pattern - detailed view of completed project

What makes this pattern unique is the variety of interchangeable snacks your hamsters can hold. From chocolate chip cookies to pizza slices, each treat is carefully designed to fit perfectly in their little paws, creating endless storytelling possibilities.

Why You'll Love This Hungry Hamsters Amigurumi Pattern

I absolutely love how these hamsters bring such personality to any space! The way their little paws hold different treats makes me smile every time I see them. There's something so satisfying about creating these chubby, content little creatures that seem to be enjoying their snacks. I find myself making different colored hamsters and switching up their treats to match seasons or moods. The combination of simple techniques with adorable results makes this one of my go-to patterns when I want to create something that brings pure joy.

Hungry Hamsters Amigurumi Pattern step 1 - construction progress Hungry Hamsters Amigurumi Pattern step 2 - assembly progress Hungry Hamsters Amigurumi Pattern step 3 - details and accessories Hungry Hamsters Amigurumi Pattern step 4 - final assembly and finishing

Switch Things Up

I love experimenting with different color combinations for these hamsters - imagine creating a whole rainbow family! Try making seasonal versions like autumn hamsters in burnt orange and brown, or spring ones in soft pastels. You could even create themed collections where each hamster represents a different food group with matching treats.

For advanced crocheters, I sometimes add tiny embroidered details like rosy cheeks or different facial expressions to give each hamster unique personality. You can also experiment with different yarn textures - a fuzzy yarn creates an adorable fluffy effect that makes the hamsters look even more cuddly and realistic.

Common Mistakes & How to Fix Them

โœ— Placing safety eyes too low - they should touch the colored portion with minimal white gaps between โœ— Overstuffing the body which can distort the round hamster shape and make assembly difficult โœ— Not using appropriately sized hooks for treats - treats should use hooks 3-4 sizes smaller than body โœ— Forgetting to leave long tails for sewing when finishing off individual parts and pieces

Hungry Hamsters Amigurumi Pattern

Create the most adorable hungry hamsters that will steal your heart! These chubby little companions come with their own collection of tiny treats including cookies, pizza slices, watermelon, strawberries, and acorns. Perfect for both palm-sized and mini versions, this pattern combines simple stitches with delightful details to bring these sweet critters to life. Watch as your hamsters hold their favorite snacks with their tiny paws, creating endless possibilities for display and play.

Intermediate 4-5 Hours

Materials Needed for Hungry Hamsters Amigurumi Pattern

โ€” Main Fabric

  • 01
    Monaco Mercerized Cotton Thread for mini hamsters and all treat accessories
  • 02
    Monaco Acrylic Yarn (3-ply) in beige and white for palm-sized hamster bodies
  • 03
    DMC Embroidery threads for micro crochet details and treat embellishments
  • 04
    Various colors including beige, white, brown, green, red, pink, yellow for treats

โ€” Tools Required

  • 01
    1.10mm Crochet Hook
  • 02
    2.25mm Crochet Hook
  • 03
    0.75mm Crochet Hook
  • 04
    Safety eyes 3mm (for mini hamsters)
  • 05
    Safety eyes 6mm (for palm-sized hamsters)
  • 06
    Stitch markers
  • 07
    Black embroidery/sewing threads
  • 08
    Tapestry/sewing needle
  • 09
    Toy stuffing
  • 10
    Scissors
  • 11
    Sewing pins for assembly placement

Progress Tracker

0% Complete

โ€” Head/Body :

Round 1 :

6sc in MR (6)

Round 2 :

inc x6 (12)

Round 3 :

(inc, sc) x6 (18)

Round 4 :

(inc, 2sc) x6 (24)

Round 5 :

(inc, 3sc) x6 (30)

Round 6-7 :

sc around [2 rounds] (30)

Round 8-9 :

s2white sc around [2 rounds] (30)

Info :

Insert eyes between Rounds 8 & 9 (about 6 stitches apart)

Round 10 :

(inc, 4sc) x6 (36)

Round 11-12 :

sc around [2 rounds] (36)

Round 13 :

(inc, 5sc) x6 (42)

Round 14 :

(dec, 5sc) x6 (36)

Round 15 :

(dec, 4sc) x6 (30)

Round 16 :

(dec, 3sc) x6 (24)

Info :

Start filling with polyfill until semi-firm

Round 17 :

(dec, 2sc) x6 (18)

Round 18 :

(dec, sc) x6 (12)

Round 19 :

dec x6 (6)

Info :

Finish off and add more stuffing until body is well-shaped. Sew close

โ€” Legs :

Info :

Make 4 in beige. Leave some allowance before you start your chain

Instructions :

Ch 2 and hdc in 2nd ch from hook

Info :

Finish off and leave long tail for sewing

โ€” Ears :

Info :

Make 2 in beige

Round 1 :

Ch2, 4sc in 2nd ch from hook (4)

Round 2 :

(inc, sc) x2 (6)

Info :

Cut thread and leave long tail for sewing

โ€” Tail :

Info :

Make in beige

Round 1 :

Ch2, 4sc in 2nd ch from hook (4)

Info :

Cut thread and leave long tail for sewing

โ€” Cookie A :

Round 1 :

In MR, ch2 then 8 hdc around (8)

Round 2 :

Sl st in each st around (8)

Info :

Leave long yarn tail for sewing. With brown yarn, sew on small chocolate chips

โ€” Cookie 2 :

Round 1 :

6sc in MR (6)

Round 2 :

inc x6 (12)

Round 3 :

(inc, sc) x6 (18)

Round 4 :

sc around BLO (18)

Round 5 :

(dec, sc) x6 (12)

Round 6 :

dec x6 (6)

Info :

Finish off and leave long tail for sewing. With dark brown thread/yarn, sew small triangles to make choco chips. Sew close

โ€” Mini Watermelon/Pizza :

Round 1 :

4sc in MR (4)

Round 2 :

(inc, sc) x2 (6)

Round 3 :

(inc, 2sc) x2 (8)

Round 4 :

(inc, 3sc) x2 (10)

Round 5 :

(inc, 4sc) x2 (12)

Round 6 :

(inc, 5sc) x2 (14)

Info :

Finish off and leave long tail for sewing. Flatten triangle, making sure that the yarn tail is situated on the side

Infos :

For the watermelon slice, sew on some black thread to put watermelon seeds (this part is optional). For the pizza slice, embroider 3-4 pepperoni slices with red thread. Sew 4-5 times over the same stitch (careful not to make them overlap). Embroider peppers by sewing green thread 2-3 times diagonally randomly on the pizza. Sew close the pizza/watermelon slice close by threading the yarn tail through the back loops of the last round

โ€” Mini Strawberry :

Round 1 :

6sc in MR (6)

Round 2 :

sc around (6)

Round 3 :

inc x6 (12)

Round 4 :

(inc, 2sc) x4 (16)

Round 5 :

sc around (16)

Round 6 :

(dec, sc) x4 (12)

Round 7 :

dec x6 (6)

Info :

Stuff lightly and finish off with long tail for sewing. Embroider strawberry seeds with white yarn and sew close. Do not cut off yarn tail so you can use it to sew on to the hamster

โ€” Strawberry Leaf :

Info :

Make in green

Instructions :

In a magic ring, *ch 2 then sl st in the 2nd ch from hook. Sl st again into the magic ring*. Repeat ** 4 more times

Info :

Leave long tail for sewing and sew on top of strawberry

โ€” Mini Acorn :

Round 1 :

6sc in MR (6)

Round 2 :

(inc, sc) x3 (9)

Round 3 :

(inc, 2sc) x3 (12)

Round 4 :

sc around (12)

Round 5 :

(inc, 3sc) x3 (15)

Round 6 :

sc around BLO (15)

Info :

Finish off. Do not sew close

โ€” Acorn Cap :

Info :

Make in dark brown

Round 1 :

6sc in MR (6)

Round 2 :

inc x6 (12)

Round 3 :

(inc, sc) x6 (18)

Round 4 :

sl st around (18)

Info :

Finish off with long thread for sewing and sew the front loops of the acorn cap to the edge of the acorn. Embroider a French knot to the top as the nub

Assembly Instructions

  • Sew mouth with black thread - small dash between eyes at R7&8, vertical line from center down, and diagonal v-lines for smile
  • Add whiskers by sewing two diagonal lines beside each eye using black thread
  • Attach ears to top of head about 6 stitches apart using their long tails
  • Sew chosen snack to center of white belly area using matching thread colors
  • Position and sew hands/legs as if holding the snack, using pins first for placement
  • Attach legs horizontally 2 rounds below hands, aligning with eye placement facing belly
  • Sew tail to back of hamster around Round 15 using beige thread

Important Notes

  • ๐Ÿ’กUse stitch markers to keep track of rounds, especially during color changes from beige to white
  • ๐Ÿ’กSafety eyes should touch the colored portion with minimal white gaps - adjust size or placement if needed
  • ๐Ÿ’กUse hooks 3-4 sizes smaller for treats compared to hamster body for proper proportions
  • ๐Ÿ’กPin all parts in place before sewing to ensure correct positioning and symmetry
  • ๐Ÿ’กLeave long tails when finishing off pieces as they will be used for assembly
  • ๐Ÿ’กStuff body semi-firm but not too tightly to maintain the rounded hamster shape

These adorable Hungry Hamsters bring endless charm to any space with their chubby cheeks and collection of tiny treats! Each hamster is designed to hold their favorite snacks with their little paws, creating delightful scenes that spark joy and storytelling. The combination of simple techniques with irresistible results makes this pattern perfect for creating gifts or adding whimsy to your home. Whether you make the palm-sized version or the mini companions, these content little creatures will steal hearts wherever they go. Happy crocheting and may your hamsters always be well-fed!

You ask,

we answer.

FAQs

Can I make these hamsters in different colors?

Absolutely! While the pattern uses beige and white, you can create hamsters in any color combination you like. Gray, brown, or even fantasy colors work wonderfully!

What's the difference between the palm-sized and mini versions?

Palm-sized hamsters are about 6cm tall using 2.25mm hook with acrylic yarn, while mini versions are 3cm tall using 1.10mm hook with cotton thread. The treats are also scaled accordingly.

Can the treats be switched between different hamsters?

Yes! The treats are designed to be interchangeable. You can switch them between hamsters or make multiple treats for variety.

Do I need special skills for the micro crochet treats?

The micro treats require more precision but use the same basic stitches. Take your time and use good lighting. The 0.75mm hook work is optional - you can use larger hooks if preferred.

How do I ensure the safety eyes are placed correctly?

The eyes should be inserted between rounds 8-9, about 6 stitches apart, with the top slightly touching the colored portion. If there are white gaps, use larger eyes or adjust placement.