๐Ÿงถ Beautiful โœจ Detailed ๐Ÿ’ Adorable

Jellyfish Amigurumi Pattern

Jellyfish Amigurumi Pattern
4.1โ˜… Rating
5-7 Hours Time Needed
1.5K Made This
โœ‚๏ธ

Intermediate Level

Ideal for those with basic knitting experience, featuring slightly more advanced stitches and techniques to expand your skills.

โฑ๏ธ

Weekend Treat

Takes 5-7 hours, making it an enjoyable project to finish over a couple of days.

๐Ÿฐ

Whimsical Buddy

Playful characters full of personality, designed to spark imagination and become cherished playtime favorites.

About This Jellyfish Amigurumi Pattern

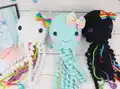
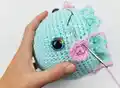
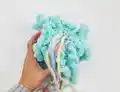
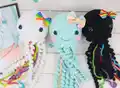
This Jellyfish amigurumi pattern creates a stunning 16-inch ocean friend that's perfect for nursery decor or as a cuddly companion. The pattern features a large crocheted head with expressive safety eyes and embroidered details, plus a decorative ridge that wraps around the head for added dimension. What really brings this jellyfish to life are the twelve flowing tentacles - seven curly spiral tentacles and five smooth chain tentacles that cascade beautifully from the body, creating graceful movement and texture.

Jellyfish Amigurumi Pattern crochet pattern - detailed view of completed project

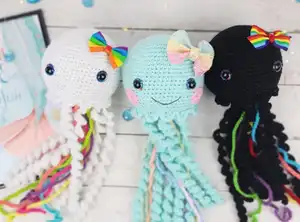
The combination of different tentacle styles gives this jellyfish realistic flowing movement, while the sweet facial features and pink cheeks add an adorable personality. This pattern works up quickly with worsted weight yarn and basic crochet stitches.

Why You'll Love This Jellyfish Amigurumi Pattern

I absolutely adore this jellyfish pattern because it's such a unique take on ocean-themed amigurumi! The flowing tentacles create such beautiful movement and texture - every time you pick it up, the tentacles cascade differently. What I love most is how the curly tentacles spiral naturally, giving the jellyfish that authentic underwater look without any complicated techniques. The decorative ridge around the head is such a clever detail that adds professional-looking dimension. It's also incredibly satisfying to watch this project come together - the head works up quickly, and then you get to create twelve unique tentacles that transform it into something truly special. The size is perfect too - at 16 inches, it makes a statement piece that's still huggable and cuddly!

Jellyfish Amigurumi Pattern step 1 - construction progress Jellyfish Amigurumi Pattern step 2 - assembly progress Jellyfish Amigurumi Pattern step 3 - details and accessories Jellyfish Amigurumi Pattern step 4 - final assembly and finishing

Switch Things Up

I love experimenting with different color combinations for this jellyfish pattern! Try creating an ombre effect by gradually changing tentacle colors from dark to light, or make a rainbow jellyfish with each tentacle a different vibrant color. For a more realistic look, use translucent-looking colors like pale blues, purples, or even white with iridescent yarn if you can find it.

You can also play with the tentacle ratios - I've made versions with all curly tentacles for maximum drama, or all chain tentacles for a sleeker, more streamlined look. Some people even add beads to the ends of the chain tentacles for a weighted, flowing effect that looks beautiful when the jellyfish is hung up.

For the face, don't be afraid to get creative! I've made jellyfish with closed sleepy eyes using embroidery, or added eyelashes for a more feminine look. You can also experiment with different mouth shapes - a wavy line creates a playful expression, while a simple curve gives a gentle, calm personality.

If you want to make this jellyfish even more special, try adding some embellishments like small embroidered stars or sequins to the head for a bioluminescent effect. You could also create a whole family by making different sizes using various yarn weights - a mama jellyfish with baby jellyfish looks absolutely adorable displayed together!

Common Mistakes & How to Fix Them

โœ— Not using a stitch marker to track rounds, causing you to lose your place and end up with uneven increases or decreases โœ— Placing the safety eyes too close together or too far apart - measure 11 holes between them as specified for proper facial proportions โœ— Forgetting to stuff the head before completing the final decreases, making it nearly impossible to stuff properly without distorting the shape โœ— Not leaving long enough tails on tentacles for sewing, which makes assembly frustrating and can result in weak attachment points โœ— Skipping the BLO (back loops only) instruction in round 26, which is crucial for creating the ridge attachment point on the head โœ— Not pinning tentacles in place before sewing, resulting in uneven spacing and an asymmetrical jellyfish that doesn't hang properly

Jellyfish Amigurumi Pattern

Dive into the enchanting world of ocean creatures with this adorable Jellyfish amigurumi pattern! This 16-inch beauty features a rounded head with safety eyes, adorable pink cheeks, and a charming smile. What makes this jellyfish truly special are its flowing tentacles - 7 curly spiral tentacles and 5 chain tentacles that create mesmerizing movement. The pattern includes a unique decorative ridge around the head that adds dimensional texture. Perfect for intermediate crocheters ready to create a whimsical sea creature that will brighten any room!

Intermediate 5-7 Hours

Materials Needed for Jellyfish Amigurumi Pattern

โ€” Main Fabric

  • 01
    Worsted Weight #4 yarn, approximately 100g of main color (Color A)
  • 02
    Worsted Weight #4 yarn, 50-75g for tentacles (Color B)
  • 03
    Worsted Weight #4 yarn in pink for cheeks (Color C)
  • 04
    Recommended: I Love This Yarn in Mint (teal), White, Black, and Pink

โ€” Tools Required

  • 01
    Crochet hook size D or 3.25mm
  • 02
    18mm safety eyes
  • 03
    Scissors
  • 04
    Sewing needle
  • 05
    Stitch marker
  • 06
    Fiberfill stuffing
  • 07
    Black embroidery thread
  • 08
    Pins

Progress Tracker

0% Complete

โ€” Head :

Round 1 :

Make 6 sc into a magic ring (6)

Round 2 :

Increase in each st around (12)

Round 3 :

(sc, inc) x 6 (18)

Round 4 :

(2 sc, inc) x 6 (24)

Round 5 :

(3 sc, inc) x 6 (30)

Round 6 :

(4 sc, inc) x 6 (36)

Round 7 :

(5 sc, inc) x 6 (42)

Round 8 :

(6 sc, inc) x 6 (48)

Round 9 :

(7 sc, inc) x 6 (54)

Round 10 :

(8 sc, inc) x 6 (60)

Round 11-21 :

sc in each st around (60)

Info :

Place the eyes between rounds 17 and 18, leaving 11 holes in between them

Round 22 :

(8 sc, dec) x 6 (54)

Round 23 :

(7 sc, dec) x 6 (48)

Round 24 :

(6 sc, dec) x 6 (42)

Round 25 :

(5 sc, dec) x 6 (36)

Round 26 :

BLO (4 sc, dec) x 6 (30)

Info :

Start stuffing the head

Round 27 :

(3 sc, dec) x 6 (24)

Round 28 :

(2 sc, dec) x 6 (18)

Round 29 :

(sc, dec) x 6 (12)

Round 30 :

dec x 6 (6)

Finishing :

F/O and sew the hole closed

โ€” Ridge on Head :

Instructions :

Attach the yarn to round 26 of the head. *(hdc, dc, tr, dc, hdc) in one st, sl st in the 2 stitches*. Repeat from * to * around the head. F/O and weave in the tail ends

โ€” Curly Tentacles (Make 7) :

Instructions :

CH 71

Round 1 :

sc in 2nd ch from hook, inc in next st, (sc, inc) across the chain

Finishing :

F/O and leave a long tail for sewing

โ€” Chain Tentacles (Make 5) :

Instructions :

CH 75

Round 1 :

Sl st in 2nd ch from hook and across

Finishing :

F/O and leave a long tail for sewing

โ€” Cheeks (Make 2) :

Round 1 :

Make 6 sc into a magic ring (6)

Round 2 :

Increase in each st around (12)

Finishing :

F/O and leave a long tail for sewing

Assembly Instructions

  • Mark 2 spots on the head with pins approximately between rounds 21 and 22 for the mouth placement.
  • Cut a long strand of black embroidery thread. Thread your needle and insert it into a hole on the side of the head.
  • Bring your needle up to the first pin and then bring the needle to the 2nd pin to create a smile line. Wrap the thread around the middle of the smile to hold it in place, then weave in the tail ends.
  • Pin the pink cheeks next to the eyes and sew them into place with matching thread.
  • Pin the 5 chain tentacles in the middle of the jellyfish bottom in a circle, then sew them securely onto the jellyfish.
  • Pin the 7 curly tentacles around the chain tentacles, spacing them evenly for a balanced look, then sew the curly tentacles onto the jellyfish.

Important Notes

  • ๐Ÿ’กDo not join rounds unless stated - work in a continuous spiral throughout the pattern
  • ๐Ÿ’กUse a stitch marker to mark the beginning of each round to avoid losing your place
  • ๐Ÿ’กAll stitches are worked in both loops unless stated otherwise (like BLO in round 26)
  • ๐Ÿ’กThe type of stuffing you use and how you stuff matters - Polyfil stuffing is recommended for best results
  • ๐Ÿ’กYou can use different eye sizes, but you might have to adjust the placement between rounds
  • ๐Ÿ’กDifferent hook sizes and yarn weights will change the size of your jellyfish and may require eye placement adjustments
  • ๐Ÿ’กLeave long tails on all tentacles and cheeks for easier sewing during assembly

This enchanting Jellyfish amigurumi pattern brings the magic of the ocean into your home! With its flowing curly and chain tentacles, adorable embroidered smile, and sweet pink cheeks, this 16-inch sea creature is sure to become a treasured companion. The pattern combines simple increases and decreases with creative tentacle techniques to create something truly special. Whether you're making it for a nursery, as a gift for an ocean lover, or just because jellyfish are amazing, this pattern will guide you every step of the way! ๐ŸŒŠโœจ๐Ÿชผ

You ask,

we answer.

FAQs

How long are the finished tentacles on this jellyfish?

The curly tentacles are made from a 71-chain foundation and will spiral to create flowing, dimensional tentacles. The chain tentacles are made from a 75-chain foundation and create smooth, straight tentacles. The exact length will vary slightly based on your tension, but they're designed to create a balanced, flowing look when assembled together.

Can I make this jellyfish in different sizes?

Absolutely! You can use different hook sizes and yarn weights to adjust the size. The pattern as written uses worsted weight #4 yarn with a 3.25mm hook to create a 16-inch jellyfish. Using bulky yarn and a larger hook will make a bigger jellyfish, while using sport or DK weight yarn with a smaller hook will create a smaller version. Just remember to adjust your safety eye size accordingly.

What does the ridge around the head do?

The ridge is a decorative element that adds dimension and visual interest to the jellyfish head. It's worked into round 26 (which was worked in back loops only) and creates a raised, textured band that wraps around the head. This gives the jellyfish a more polished, professional look and adds to its ocean-creature aesthetic.

Do I need to make all 12 tentacles?

While the pattern calls for 7 curly tentacles and 5 chain tentacles, you can adjust the numbers to your preference! More tentacles will create a fuller, more dramatic look, while fewer tentacles will give a simpler appearance. Just try to maintain some balance between curly and chain tentacles for the best visual effect.

How do I keep track of rounds when working in a continuous spiral?

The pattern notes emphasize using a stitch marker to mark the beginning of each round. Place the marker in the first stitch of the round, then move it up as you complete each round. This is especially important for the head where you need to know exactly which rounds to place the eyes between.

What's the best way to attach all the tentacles evenly?

The pattern recommends pinning all tentacles in place before sewing. Start by pinning the 5 chain tentacles in a circle in the middle of the bottom, spacing them evenly. Then pin the 7 curly tentacles around them. Step back and look at the spacing to make sure it's balanced before you start sewing. This prevents uneven attachment that would be difficult to fix later.