🧢 Beautiful ✨ Detailed πŸ’ Adorable

Ladybug Keychain Amigurumi Pattern

Ladybug Keychain Amigurumi Pattern
4.6β˜… Rating
1-2 Hours Time Needed
4.1K Made This
βœ‚οΈ

Beginner Friendly Level

Perfect for those just starting their sewing journey, with clear instructions and simple techniques

⏱️

Bite-Sized Project

Complete in under 2 hoursβ€”quick, fun, and perfect for a little creative escape.

🎁

Tiny Treasure

Small, sweet, and gift-worthy creations that fit perfectly in the palm of your hand with detailed charm.

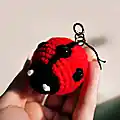
About This Ladybug Keychain Amigurumi Pattern

This delightful ladybug keychain pattern combines the classic charm of a ladybug with practical functionality. The pattern uses simple amigurumi techniques to create a small, portable companion that's perfect for everyday use. With its bright red body, black spots, and sweet embroidered eyes, this little creature captures the essence of garden magic in miniature form.

Ladybug Keychain Amigurumi Pattern crochet pattern - detailed view of completed project

The keychain attachment makes it both decorative and functional, while the small size ensures it won't weigh down your keys or bag. Perfect for nature lovers and anyone who appreciates handmade accessories.

Why You'll Love This Ladybug Keychain Amigurumi Pattern

I absolutely love how this pattern transforms simple stitches into such a recognizable and beloved creature. The satisfaction of creating those perfect little felt spots and watching the ladybug come to life is truly magical. Plus, there's something so satisfying about making something that's both beautiful and useful - every time you reach for your keys, you'll smile at your handmade creation.

Ladybug Keychain Amigurumi Pattern step 1 - construction progress Ladybug Keychain Amigurumi Pattern step 2 - assembly progress Ladybug Keychain Amigurumi Pattern step 3 - details and accessories Ladybug Keychain Amigurumi Pattern step 4 - final assembly and finishing

Switch Things Up

I love experimenting with different color combinations for this ladybug pattern! While the classic red and black is timeless, you could create a whole collection with different colors. Try making a pink and purple ladybug for a whimsical twist, or go bold with orange and black for a Halloween version.

For a more sophisticated look, consider using metallic thread for the spots instead of felt - it adds a lovely shimmer that catches the light beautifully. You could also vary the number of spots or create different patterns like stripes or hearts.

If you're making these as gifts, consider personalizing them with tiny embroidered initials on the body or using the recipient's favorite colors. The pattern is so quick to work up that you can easily make a whole family of ladybugs in different sizes by adjusting your hook and yarn weight.

Common Mistakes & How to Fix Them
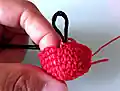
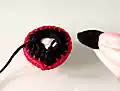
βœ— Forgetting to stuff the body before closing - stuff firmly after round 9 to maintain the ladybug's rounded shape βœ— Placing felt spots unevenly - use pins to position all seven spots before gluing them permanently βœ— Making the color change too abrupt - work the last red stitch with black yarn for a cleaner transition βœ— Not securing the keychain ring properly - ensure the ring goes through the first round and is firmly attached

Ladybug Keychain Amigurumi Pattern

Create this adorable little ladybug keychain that's perfect for attaching to your keys, bags, or giving as a sweet handmade gift. This charming red and black spotted ladybug features a classic design with embroidered eyes and felt spots. The compact size makes it ideal for beginners who want to practice their amigurumi skills while creating something practical and cute.

Beginner Friendly 1-2 Hours

Materials Needed for Ladybug Keychain Amigurumi Pattern

β€” Main Fabric

  • 01
    Crochet thread size 3 in red, black, and white colors
  • 02
    Black felt pieces for spots

β€” Tools Required

  • 01
    Crochet hook 2.75mm
  • 02
    Yarn needle
  • 03
    Scissors
  • 04
    Stuffing material
  • 05
    Keychain materials (small ring and lobster hook with black cord)
  • 06
    Pliers to open the ring
  • 07
    Pins for assembling
  • 08
    Bijoux glue

Progress Tracker

0% Complete

β€” Ladybug Body :

Round 1 :

6 sc in magic ring [6]

Round 2 :

6 inc [12]

Round 3 :

*1 sc, 1 inc **, repeat from * to ** 6 times [18]

Round 4 :

*2 sc, 1 inc **, repeat from * to ** 6 times [24]

Round 5-7 :

24 sc [24]

Info :

Switch color yarn to black

Round 8 :

*2 sc, 1 dec **, repeat from * to ** 6 times BLO [18]

Round 9 :

*1 sc, 1 dec **, repeat from * to ** 6 times [12]

Info :

Stuff firmly

Round 10 :

6 dec [6]

Info :

Fasten off leaving a long tail for sewing firmly the last 6 stitches

β€” Ladybug Head :

Round 1 :

Work 3 ch. 1 sc on the second chain from hook. 4 sc in next chain. Turn your work 180Β° clockwise and work 3 sc in next chain. Slip stitch on the first stitch of the row [8]

Round 2 :

1 ch, 8 sc, 1 sl st on the first stitch of the row [8]

Info :

Fasten off leaving a long tail for sewing

Assembly Instructions

  • Using pins, position the head on the body of the ladybug and sew it firmly in place
  • Before cutting the thread, use it to embroider the black line down the center of the ladybug body
  • Cut 7 rounded pieces of black felt and glue them on the ladybug body - one near the head, 3 on each side of the black line
  • Embroider 2 small eyes with white yarn using your favorite technique (French knot recommended)
  • Use pliers to open the small ring and put it through the first round of the body
  • Attach the lobster hook with black cord to complete your keychain

Important Notes

  • πŸ’‘Switch from red to black yarn by working the last red stitch with black yarn for a cleaner color transition
  • πŸ’‘Place a small piece of black felt inside before closing round 10 to separate stuffing and create a cleaner finish
  • πŸ’‘Use pins to position all felt spots before gluing to ensure even placement
  • πŸ’‘Stuff firmly but not too tightly to maintain the ladybug's natural rounded shape
  • πŸ’‘Secure the keychain ring through the first round of the body for maximum durability

This sweet ladybug keychain brings a touch of garden magic to your everyday accessories. With its classic red and black spotted design, it's both nostalgic and timeless. The simple construction makes it perfect for beginners, while the charming details ensure it's a project you'll be proud to show off. 🐞 Happy crocheting! 🧢✨

You ask,

we answer.

FAQs

What size will the finished ladybug keychain be?

The finished ladybug keychain is approximately 2-3 inches in diameter, making it the perfect size for keys or bags without being too bulky.

Can I use different yarn weights for this pattern?

This pattern is designed for crochet thread size 3. Using thicker yarn will create a larger keychain, while thinner thread will make it smaller. Adjust your hook size accordingly.

How do I make the felt spots look professional?

Cut 7 small, evenly-sized circles from black felt. Use pins to position them before gluing - one near the head and three on each side of the center line for authentic ladybug placement.

What's the best way to embroider the eyes?

The pattern suggests using French knots with white yarn, but you can use any embroidery technique you prefer. Small satin stitches or even tiny beads would work well too.

How do I attach the keychain hardware securely?

Use pliers to open the small ring and thread it through the first round of the ladybug body. This distributes the weight evenly and prevents tearing with regular use.