๐Ÿงถ Beautiful โœจ Detailed ๐Ÿ’ Adorable

LED Tealight Holder Let it Snow Pattern

LED Tealight Holder Let it Snow Pattern
4.1โ˜… Rating
3-4 Hours Time Needed
4.0K Made This
โœ‚๏ธ

Intermediate Level

Ideal for those with basic knitting experience, featuring slightly more advanced stitches and techniques to expand your skills.

โฑ๏ธ

Weekend Treat

Takes 5-7 hours, making it an enjoyable project to finish over a couple of days.

๐Ÿก

Cozy Accent

A warm touch for your space that transforms ordinary corners into inviting nooks filled with handmade charm.

About This LED Tealight Holder Let it Snow Pattern

This beautiful LED tealight holder pattern creates stunning snowflake-shaped decorative pieces that add magical ambiance to any space. The intricate design features elegant puff stitches and front post techniques that create dimensional texture and beautiful shadows when lit. Each holder is approximately 11cm in diameter and perfectly sized for standard LED tealights.

LED Tealight Holder Let it Snow Pattern crochet pattern - detailed view of completed project

The pattern combines traditional crochet techniques with modern home decor styling, making it perfect for both beginners looking to advance their skills and experienced crafters seeking a quick yet impressive project.

Why You'll Love This LED Tealight Holder Let it Snow Pattern

I absolutely love how this pattern transforms simple yarn into something truly magical - there's nothing quite like watching the soft LED light dance through those delicate puff stitches, creating enchanting shadows that make any room feel cozy and special. The satisfaction of creating something both beautiful and functional makes every stitch worthwhile.

LED Tealight Holder Let it Snow Pattern step 1 - construction progress LED Tealight Holder Let it Snow Pattern step 2 - assembly progress LED Tealight Holder Let it Snow Pattern step 3 - details and accessories LED Tealight Holder Let it Snow Pattern step 4 - final assembly and finishing

Switch Things Up

I love experimenting with different colorways for this pattern - imagine creating a whole collection in winter whites, soft grays, and icy blues for a complete winter wonderland theme. You could also try making them in warm autumn colors like deep reds, oranges, and golds for a cozy fall atmosphere.

For special occasions, I've made these in metallic yarns that catch and reflect the LED light beautifully, creating an almost magical sparkle effect. Another fun variation is working them in gradient colors, starting with a dark base and gradually lightening toward the snowflake points.

The pattern also works wonderfully when scaled up slightly for larger LED candles or battery-operated string lights woven through the openings.

Common Mistakes & How to Fix Them

โœ— Not maintaining consistent tension in puff stitches can create uneven texture - practice on a swatch first โœ— Forgetting to work into back loops only during specified rounds will affect the dimensional structure โœ— Skipping the hook size change for the edge can result in improper fit for LED tealights โœ— Rushing through the final assembly without proper sewing technique may cause the piece to lose its shape

LED Tealight Holder Let it Snow Pattern

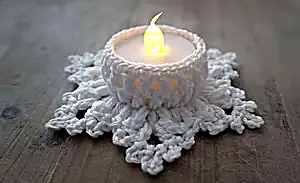
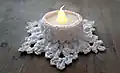
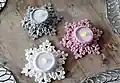
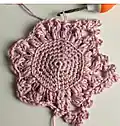
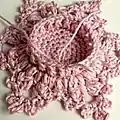
Create these magical snowflake-inspired LED tealight holders that bring winter wonderland charm to your home decor. This elegant crochet pattern features intricate puff stitches and decorative edges that create beautiful light patterns when illuminated. Perfect for cozy winter evenings, holiday decorating, or as thoughtful handmade gifts that capture the essence of snowfall.

Intermediate 3-4 Hours

Materials Needed for LED Tealight Holder Let it Snow Pattern

โ€” Main Fabric

  • 01
    Schachenmayr Catania yarn (LL 125 m / 50 g), Sport - 5ply Fine (2) weight
  • 02
    Approximately 10 grams per tealight holder in your choice of color
  • 03
    Any leftover sport weight cotton or acrylic yarn can be substituted

โ€” Tools Required

  • 01
    Crochet hook 2.5 mm
  • 02
    Crochet hook 3.0 mm
  • 03
    Sewing needle
  • 04
    LED tealights
  • 05
    Scissors
  • 06
    Stitch markers (optional but helpful)

Progress Tracker

0% Complete

โ€” Main Body :

Round 1 :

Ch 1, 6 sc in ring. Join with slst in first stitch (= 6 sc)

Round 2 :

Ch 1, 2 sc in each stitch around. Join with slst in first stitch (= 12 sc)

Round 3 :

Ch 1, (sc in next sc, 2 sc in next sc) around. Join with slst in first stitch (= 18 sc)

Round 4 :

Ch 1, (sc in next 2 sc, 2 sc in next sc) around. Join with slst in first stitch (= 24 sc)

Round 5 :

Ch 1, (sc in next 3 sc, 2 sc in next sc) around. Join with slst in first stitch (= 30 sc)

Round 6 :

Ch 1, (sc in next 4 sc, 2 sc in next sc) around. Join with slst-blo in first stitch (= 36 sc)

Round 7 :

Ch 2, 1 dc-blo (into the same puncture site as slst), 35 puff st-blo. Join with slst in first stitch (= 36 stitches)

Round 8 :

Ch 2, 1 FPpuff st around ch2 and dc of round 7, Insert hook between the 1st and 2nd stitch of last round and crochet 1 puff st, ch3, insert hook between the 2nd and 3rd stitch of last round and crochet 1 puff st, crochet in the 3rd stitch 1FPpuff st, ch 2, skip 1 stitch, crochet 1 FPslst in next stitch, ch 2, skip 1 stitch. Repeat pattern 4 more times, do not close the round here

Round 9 :

[slst, ch 3, slst] in 1st stitch, ch 1, skip 1 stitch, crochet in first ch3-space: [slst, ch 3, slst in 2nd chain from hook, ch 1, slst in ch3-space, ch 4, slst in 2nd chain from hook, ch 2, slst in ch3-space, ch 3, slst in 2nd chain from hook, ch 1, slst in ch3-space]. Ch 1, skip 1 stitch, [slst, ch 3, slst] in next stitch. Continue pattern, repeat 4 more times. Fasten off. Close the round with sewing

โ€” Edge for Tea Light :

Round 1 (edge) :

Continue crocheting with crochet hook 2.5 mm. All stitches of this round are crocheted into the non-crocheted front loops of the 6th round. Insert at one stitch of the 6th round, yarn over and pull up a loop, crochet ch 2. Crochet 1 dc into the same stitch. Ch 1, skip 1 stitch, 1 puff st in next stitch, repeat 16 more times. Ch 1, join with slst in first stitch

Round 2 (edge) :

[1 slst, ch 2, 1 dc] in first ch1-space, ch 1, puff st in next ch1-space, repeat 16 more times. Ch 1, join with slst in first stitch

Round 3 (edge) :

Ch 1, sc in first stitch, sc in next ch1-space, sc in next stitch, sc in next ch1-space, repeat 16 more times. Fasten off. Close the round with sewing

Assembly Instructions

  • Start with a magic ring and work rounds 1-6 to create the base circle
  • Add the decorative puff stitch border in rounds 7-9, paying attention to the special slip stitches
  • Work the edge rounds using the smaller hook size for proper tealight fit
  • Sew the final round closed neatly to maintain the circular shape
  • Place LED tealight in the center depression created by the edge rounds

Important Notes

  • ๐Ÿ’กUse the correct hook sizes - 3.0mm for main body, 2.5mm for edge (adjust if you crochet loosely)
  • ๐Ÿ’กPay attention to back loop only instructions to create proper dimensional effect
  • ๐Ÿ’กDon't close Round 8 - it connects with Round 9's first slip stitch
  • ๐Ÿ’กThe special slip stitches in Round 9 create the snowflake points between puff stitches
  • ๐Ÿ’กLED tealights work best - never use real candles with this design

This enchanting LED tealight holder brings winter magic to your home with its delicate snowflake design and soft, glowing ambiance. The combination of puff stitches and decorative edging creates beautiful light patterns that make any space feel cozy and special. Perfect for holiday decorating or year-round home accent pieces! ๐Ÿ•ฏ๏ธ Happy crocheting! โ„๏ธโœจ

You ask,

we answer.

FAQs

Can I use different yarn weights for this pattern?

The pattern is designed for sport weight yarn. Using different weights will change the size and may affect how well it fits LED tealights.

What if my tealight holder is too tight or loose for my LED lights?

Adjust your hook size - use smaller hooks for looser crocheters or larger hooks for tighter crocheters. The edge rounds are especially important for proper fit.

Can I make this pattern larger or smaller?

Yes, but you'll need to adjust the number of stitches proportionally and test with your tealights to ensure proper fit.

Is this safe to use with real candles?

No, this pattern is designed specifically for LED tealights only. Never use real flames with crocheted items.