🧢 Beautiful ✨ Detailed πŸ’ Adorable

Little Spark Lightbulb Amigurumi Pattern

Little Spark Lightbulb Amigurumi Pattern
4.6β˜… Rating
2-3 Hours Time Needed
2.2K Made This
βœ‚οΈ

Beginner Friendly Level

Perfect for those just starting their sewing journey, with clear instructions and simple techniques

⏱️

Bite-Sized Project

Complete in under 2 hoursβ€”quick, fun, and perfect for a little creative escape.

🎁

Tiny Treasure

Small, sweet, and gift-worthy creations that fit perfectly in the palm of your hand with detailed charm.

About This Little Spark Lightbulb Amigurumi Pattern

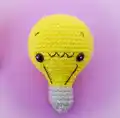
This Little Spark lightbulb pattern is a delightful beginner-friendly project that brings a whimsical character to life. Standing approximately 8 cm tall, this cute amigurumi features a bright yellow bulb with expressive eyes and charming embroidered details including eyebrows, a lightning bolt smile, and decorative lines. The realistic silver screw base adds authenticity, making this little companion perfect for desk decoration, keychain attachment, or as a thoughtful handmade gift for someone who needs a spark of inspiration in their life.

Little Spark Lightbulb Amigurumi Pattern crochet pattern - detailed view of completed project

Working in continuous rounds with simple increases and decreases, this pattern teaches fundamental amigurumi techniques while creating an adorable finished piece. The color change from yellow to silver creates a realistic lightbulb effect that's both fun and impressive.

Why You'll Love This Little Spark Lightbulb Amigurumi Pattern

I absolutely love this Little Spark pattern because it transforms something ordinary into something extraordinary! There's something magical about taking simple yellow and silver yarn and watching it become this cheerful little character with so much personality. I love how quick it works up – perfect for when I need a creative break or want to make a last-minute gift. The embroidery details really bring the face to life, and every time I make one, it feels like I'm creating a tiny friend that brings brightness wherever it goes. It's the kind of project that makes you smile throughout the entire process!

Little Spark Lightbulb Amigurumi Pattern step 1 - construction progress Little Spark Lightbulb Amigurumi Pattern step 2 - assembly progress Little Spark Lightbulb Amigurumi Pattern step 3 - details and accessories Little Spark Lightbulb Amigurumi Pattern step 4 - final assembly and finishing

Switch Things Up

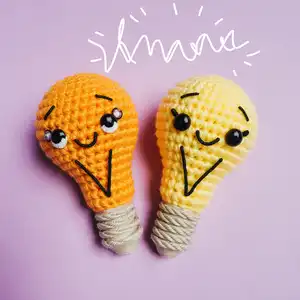
I absolutely love experimenting with this Little Spark pattern to create different moods and styles! One of my favorite variations is making a rainbow collection – imagine a whole string of colorful lightbulbs in vibrant pinks, blues, purples, and greens lined up together. They look absolutely magical!

For a more sophisticated look, I've tried using metallic silver or gold yarn for the bulb section with a dark bronze or copper for the base, creating an elegant vintage Edison bulb vibe that's perfect for modern home decor. You could even add a tiny loop at the top to turn them into unique Christmas ornaments or keychain charms.

Another fun idea is varying the facial expressions – try different eyebrow positions for surprised, sleepy, or mischievous looks, or change the lightning bolt to a simple smile or even a little heart. I've also made some without faces for a more minimalist aesthetic.

Want to make it extra special? Consider adding a small LED tea light inside before closing (make sure it's battery-operated and cool-touch), or attach a tiny clip to the base so it can perch on a shelf or book. Some crafters even connect multiple bulbs with chain stitches to create adorable garland decorations!

Common Mistakes & How to Fix Them

βœ— Placing safety eyes too far apart or too close together can affect the lightbulb's expression; measure 10 visible stitches between them for the perfect look. βœ— Forgetting to stuff before closing rounds 20-25 makes it difficult to achieve proper shaping; add stuffing gradually as you decrease for best results. βœ— Skipping the back loops only instruction on rounds 26-30 will prevent the screw ridges from forming correctly and won't create the realistic texture. βœ— Pulling embroidery thread too tightly can distort the face shape; use gentle tension when adding eyebrows and the lightning bolt smile for balanced features.

Little Spark Lightbulb Amigurumi Pattern

Brighten up your crochet collection with this adorable Little Spark lightbulb amigurumi! This charming pattern creates a cheerful yellow bulb character complete with expressive safety eyes, embroidered details, and a realistic silver screw base. Perfect for beginners, this quick project combines simple stitches with delightful personality, making it an ideal gift or decoration that's sure to spark joy in any space.

Beginner Friendly 2-3 Hours

Materials Needed for Little Spark Lightbulb Amigurumi Pattern

β€” Main Fabric

  • 01
    Cotton yarn 125m/50g in yellow color (approximately 15g needed)
  • 02
    Cotton yarn 125m/50g in silver/grey color (approximately less than 10g needed)
  • 03
    Small amount of black embroidery thread for facial details
  • 04
    Recommended brands: Paintbox Cotton or Yarn & Colors Must Have

β€” Tools Required

  • 01
    Crochet hook size 2.5mm
  • 02
    Safety eyes 8mm (2 pieces) - or black embroidery thread as alternative
  • 03
    Toy stuffing/polyester fiberfill
  • 04
    Tapestry needle for construction and embroidery
  • 05
    Stitch marker
  • 06
    Scissors

Progress Tracker

0% Complete

β€” The Bulb (Yellow) :

Round 1 :

Sc x 6 in to a MR (6)

Round 2 :

Inc x 6 (12)

Round 3 :

(Sc, inc) x 6 (18)

Round 4 :

(Sc x 2, inc) x 6 (24)

Round 5 :

(Sc x 3, inc) x 6 (30)

Round 6 :

Sc x 2, inc, (Sc x 4, inc) x 5, Sc x 2 (36)

Round 7 :

(Sc x 5, inc) x 6 (42)

Round 8 :

Sc x 3, inc, (Sc x 6, inc) x 5, Sc x 3 (48)

Round 9-17 :

Sc x 48 (48) - Work 9 rounds

Round 18 :

(Sc x 6, dec) x 6 (42)

Round 19 :

(Sc x 5, dec) x 6 (36)

Round 20 :

(Sc x 4, dec) x 6 (30)

Info :

Insert the safety eyes between round 16-17 with a space of 10 stitches visible between them. Start to add stuffing and continue to stuff as you go.

Round 21 :

(Sc x 4, dec) x 5 (25)

Round 22 :

Sc x 25 (25)

Round 23 :

(Sc x 3, dec) x 5 (20)

Round 24 :

Sc x 20 (20)

Round 25 :

(Sc x 2, dec) x 5 (15)

Info :

Change to Silver yarn

Round 26-30 :

BLO, Sc x 15 (15) - Work 5 rounds

Round 31 :

(Sc, dec) x 5 (10)

Round 32 :

dec x 5 (5)

Info :

Break the yarn and pull through. Weave the yarn tail through the FLO of the final round to close.

β€” Embroidery Details :

Eyebrows :

With black thread embroider small eyebrows above the eyes over round 11

Lightning Smile :

Embroider a zig zag between the eyes on round 16

Detail Lines :

Embroider a line from the base of each eye down towards the screw base of the lightbulb (over rounds 19-25)

β€” The Screw Fitting :

Step 1 :

Turn the light bulb upside down, so that the yellow bulb is at the bottom and the grey is at the top

Step 2 :

Join Silver yarn to the first grey open front loop of round 26

Step 3 :

Ss in all open front loops of rounds 26-30

Step 4 :

Cut the yarn and pull through. Weave in the loose end

Assembly Instructions

  • Complete all embroidery details with black thread before finishing the screw base for easier access to the face.
  • Insert and secure safety eyes between rounds 16-17 with exactly 10 visible stitches between them for proper spacing.
  • Begin stuffing the bulb after round 20 and continue adding small amounts as you decrease to maintain firm shape.
  • When changing to silver yarn at round 26, work in back loops only for 5 rounds to create the screw ridge texture.
  • After completing round 32, weave yarn tail through front loops only of the final round to create a neat closure.
  • Turn the finished piece upside down and join silver yarn to first open front loop of round 26 for screw detail.
  • Work slip stitches through all remaining front loops of rounds 26-30 to complete the realistic screw fitting appearance.

Important Notes

  • πŸ’‘Work in continuous rounds throughout the pattern unless specifically instructed otherwise for best results
  • πŸ’‘Safety eyes are not recommended for young children under 3 years; use embroidered eyes as a safer alternative
  • πŸ’‘Use a stitch marker to track the beginning of each round and prevent losing your place during construction
  • πŸ’‘The finished lightbulb measures approximately 8cm tall when using recommended 125m/50g cotton yarn with 2.5mm hook
  • πŸ’‘Back loops only (BLO) technique on rounds 26-30 is essential for creating the distinctive screw thread texture
  • πŸ’‘Embroider facial features after stuffing but before completing final rounds for easier needle maneuvering and better results

This delightful Little Spark lightbulb pattern was designed by Alexa Templeton (Lex in Stitches) to bring a bright smile to your crafting journey! Perfect for beginners, this charming character combines simple crochet techniques with creative embroidery to create a personality-packed friend that's ready to illuminate any space. Whether you're making it as a cheerful desk companion, a unique gift, or your first amigurumi adventure, this pattern promises a rewarding and fun experience. Let your creativity shine bright! πŸ§ΆπŸ’‘βœ¨

You ask,

we answer.

FAQs

Can I use different yarn weights for this pattern?

While the pattern is designed for 125m/50g cotton yarn with a 2.5mm hook, you can use different weights! Just keep in mind that your finished lightbulb will be larger or smaller depending on your yarn choice. Thicker yarn with a larger hook will create a bigger bulb, while thinner yarn makes a more delicate version.

Is this pattern safe to make for young children?

The pattern includes 8mm safety eyes which are not recommended for children under 3 years old due to choking hazards. However, you can easily make this child-safe by embroidering the eyes with black thread instead, creating a completely secure toy for little ones.

What if I've never done embroidery on amigurumi before?

Don't worry! The embroidery details in this pattern are very simple – just basic straight stitches and a small zigzag. Take your time, use a tapestry needle, and gently pull the thread through. You can always practice on a scrap piece first to build confidence.

Why do I need to work in back loops only for the screw section?

Working in back loops only (BLO) for rounds 26-30 creates those distinctive ridges that make the silver screw base look realistic. The front loops are left open so you can come back later and slip stitch through them to complete the threaded effect.

How do I prevent the neck area from looking wobbly?

Make sure to stuff the bulb section firmly but not too tightly before working the silver screw base. The stuffing should support the shape without stretching the stitches. Adding small amounts of stuffing gradually as you decrease helps maintain even tension and a smooth appearance.