🧢 Beautiful ✨ Detailed πŸ’ Adorable

LULU the Mermaid Amigurumi Pattern

LULU the Mermaid Amigurumi Pattern
4.1β˜… Rating
8-10 Hours Time Needed
3.4K Made This
βœ‚οΈ

Advanced Level

Designed for experienced knitters, these patterns involve intricate designs and complex techniques to challenge and inspire.

⏱️

All-Day Adventure

Requires 8-10 hours, ideal for a full day of immersive knitting.

🧸

Whimsical Buddy

Playful characters full of personality, designed to spark imagination and become cherished playtime favorites.

About This LULU the Mermaid Amigurumi Pattern

LULU the Mermaid is an intricate amigurumi pattern that creates a stunning 26cm tall mermaid doll with incredible attention to detail. This pattern features advanced techniques including color changes, back loop only stitches, invisible decreases, and complex shaping for the tail. The design includes multiple components: a beautifully shaped head with detailed facial features, removable hair wig with optional buns and flowing strands, gracefully curved tail with fins, and delicate embroidered details.

LULU the Mermaid Amigurumi Pattern crochet pattern - detailed view of completed project

What makes this pattern special is the level of customization available - choose from four different color schemes and create your own unique mermaid personality. The pattern includes comprehensive instructions for eye shaping, facial embroidery, and finishing techniques that bring LULU to life.

Why You'll Love This LULU the Mermaid Amigurumi Pattern

I'm absolutely captivated by this pattern because it combines technical challenge with artistic beauty in the most rewarding way. The intricate construction process feels like sculpting a work of art, with each component building toward something truly magical. I love how the removable wig feature allows for endless styling possibilities, and the detailed facial work creates such an expressive, lifelike character. The satisfaction of mastering the complex tail shaping and seeing those graceful curves come together is unmatched. This isn't just a crochet project - it's creating a treasured companion that will be cherished for generations.

LULU the Mermaid Amigurumi Pattern step 1 - construction progress LULU the Mermaid Amigurumi Pattern step 2 - assembly progress LULU the Mermaid Amigurumi Pattern step 3 - details and accessories LULU the Mermaid Amigurumi Pattern step 4 - final assembly and finishing

Switch Things Up

I'm constantly amazed by how versatile this mermaid pattern can be with just a few creative modifications! You could easily transform LULU into a fantasy sea goddess by using metallic yarns and adding sequins or beads to her tail for that magical shimmer effect. I've experimented with creating different mer-folk by adjusting the hair colors and styles - imagine a punk rock mermaid with bright colored mohawk-style hair strands!

For a completely different vibe, try making LULU in pastels for a sweet nursery decoration, or go bold with jewel tones for a more sophisticated look. I love how you can modify the flower crown concept from doll 3 - try creating seasonal themes with autumn leaves, winter snowflakes, or spring cherry blossoms instead.

The embroidered bustier opens up endless possibilities too - you could create different patterns, add small pearls for texture, or even crochet tiny shell appliquΓ©s for extra dimension. I've seen crafters make entire mermaid families by scaling the pattern up or down, and the techniques you master here will definitely inspire your next underwater adventure project!

Common Mistakes & How to Fix Them

βœ— Not maintaining consistent tension throughout the spiral rounds can cause uneven shaping in the head and body βœ— Forgetting to stuff the tail gradually as you work can result in difficult stuffing and poor fin positioning later βœ— Skipping the invisible decrease technique will create visible gaps and holes that detract from the finished appearance βœ— Not paying attention to color change placement in back loops only can create messy transitions between tail and body sections

LULU the Mermaid Amigurumi Pattern

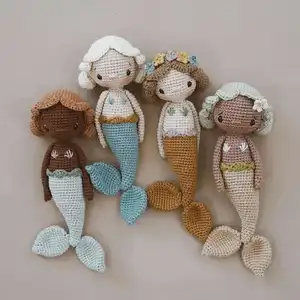
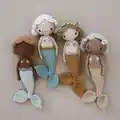
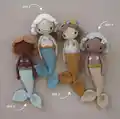
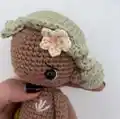
Dive into an enchanting underwater adventure with LULU, the adorable mermaid amigurumi! This comprehensive pattern creates a stunning 26cm tall mermaid doll featuring beautiful flowing hair, graceful tail fins, and charming details like embroidered bustiers and delicate flowers. With options for four different color combinations and customizable hairstyles including buns and hair strands, LULU brings magical oceanic charm to any collection. Perfect for advanced crocheters ready to tackle detailed construction techniques and create a truly special handmade treasure.

Advanced 8-10 Hours

Materials Needed for LULU the Mermaid Amigurumi Pattern

β€” Main Fabric

  • 01
    Cotton yarn in six different colors (115 yard / 50g total)
  • 02
    Skin tone color A (25g)
  • 03
    Hair color B (15g)
  • 04
    Tail fin color C (17g)
  • 05
    Wavy hem color D
  • 06
    Flower color E
  • 07
    Bustier color F

β€” Tools Required

  • 01
    2.5mm crochet hook
  • 02
    8mm safety eyes (dolls 2 and 3) or 9mm safety eyes (dolls 1 and 4)
  • 03
    Sharp sewing needle for sewing and embroidering
  • 04
    Thin cotton yarn in black or brown for eyebrows
  • 05
    White cotton yarn for eye highlights
  • 06
    Polyfiber fill stuffing
  • 07
    Pins
  • 08
    Scissors
  • 09
    Pink blush for cheeks and flowers
  • 10
    Stitch marker (optional)
  • 11
    Thin sewing yarn in hair color for attaching hair strands (optional)
  • 12
    Foam curler for head stabilization (optional)

Progress Tracker

0% Complete

β€” Head :

Round 1 :

6 sc into a MR (6)

Round 2 :

inc x 6 (12)

Round 3 :

(1 sc, inc) x 6 (18)

Round 4 :

1 sc, inc, (2 sc, inc) x 5, 1 sc (24)

Round 5 :

(3 sc, inc) x 6 (30)

Round 6 :

2 sc, inc, (4 sc, inc) x 5, 2 sc (36)

Round 7 :

(5 sc, inc) x 6 (42)

Round 8 :

3 sc, inc, (6 sc, inc) x 5, 3 sc (48)

Rounds 9-18 :

48 sc (48) - 10 rounds

Info :

Attach the eyes between rnd 16 & 17, with a distance of 11 visible stitches

Round 19 :

3 sc, dec, (6 sc, dec) x 5, 3 sc (42)

Round 20 :

(5 sc, dec) x 6 (36)

Round 21 :

2 sc, dec, (4 sc, dec) x 5, 2 sc (30)

Round 22 :

(3 sc, dec) x 6 (24)

Round 23 :

1 sc, dec, (2 sc, dec) x 5, 1 sc (18)

Info :

Start to stuff the head with polyfiber

Round 24 :

(1 sc, dec) x 6 (12)

β€” Hair Wig :

Round 1 :

6 sc into a MR (6)

Round 2 :

inc x 6 (12)

Round 3 :

(1 sc, inc) x 6 (18)

Round 4 :

1 sc, inc, (2 sc, inc) x 5, 1 sc (24)

Round 5 :

(3 sc, inc) x 6 (30)

Round 6 :

2 sc, inc, (4 sc, inc) x 5, 2 sc (36)

Round 7 :

(5 sc, inc) x 6 (42)

Round 8 :

3 sc, inc, (6 sc, inc) x 5, 3 sc (48)

Rounds 9-15 :

48 sc (48) - 7 rounds

Round 16 :

3 sc, dec, (6 sc, dec) x 5, 3 sc (42)

β€” Hair Strands (Make 2) :

Row 1 :

Crochet ch 20, turn the chain (20)

Row 2 :

Start into the 3rd chain from hook and crochet dc inc (36)

β€” Buns (Make 2) :

Round 1 :

6 sc into a MR (6)

Round 2 :

inc x 6 (12)

Round 3 :

(1 sc, inc) x 6 (18)

Round 4 :

1 sc, inc, (2 sc, inc) x 5, 1 sc (24)

Round 5 :

24 sc (24)

Round 6 :

1 sc, dec, (2 sc, dec) x 5, 1 sc (18)

Round 7 :

dec x 9 (9)

β€” Arms (Make 2) :

Round 1 :

6 sc into a MR (6)

Round 2 :

(2 sc, inc) x 2 (8)

Rounds 3-17 :

8 sc (8) - 15 rounds

Info :

Do not stuff the arm. Flatten the arm and crochet both sides together with 3 sc

β€” Tail & Body :

Round 1 :

6 sc into a MR (6)

Round 2 :

(1 sc, inc) x 3 (9)

Rounds 3-4 :

9 sc (9) - 2 rounds

Round 5 :

(2 sc, inc) x 3 (12)

Round 6 :

dec, 4 sc, inc, 5 sc (12)

Round 7 :

(3 sc, inc) x 3 (15)

Round 8 :

dec, 6 sc, inc, 6 sc (15)

Round 9 :

(4 sc, inc) x 3 (18)

Round 10 :

dec, 7 sc, inc, 8 sc (18)

Round 11 :

(5 sc, inc) x 3 (21)

Round 12 :

dec, 9 sc, inc, 9 sc (21)

Round 13 :

(6 sc, inc) x 3 (24)

Round 14 :

dec, 10 sc, inc, 11 sc (24)

Round 15 :

(7 sc, inc) x 3 (27)

Round 16 :

dec, 12 sc, inc, 12 sc (27)

Round 17 :

(8 sc, inc) x 3 (30)

Round 18 :

dec, 13 sc, inc, 14 sc (30)

Round 19 :

(9 sc, inc) x 3 (33)

Round 20 :

dec, 15 sc, inc, 15 sc (33)

Round 21 :

(10 sc, inc) x 3 (36)

Rounds 22-23 :

dec, 16 sc, inc, 17 sc (36) - 2 rounds

Rounds 24-26 :

36 sc (36) - 3 rounds

Round 27 :

(10 sc, dec) x 3 (33)

Info :

Colour change to colour A

Round 28 :

33 sc, into BLO! (33)

Rounds 29-30 :

33 sc (33) - 2 rounds

Round 31 :

(9 sc, dec) x 3 (30)

Rounds 32-33 :

30 sc (30) - 2 rounds

Round 34 :

(8 sc, dec) x 3 (27)

Rounds 35-36 :

27 sc (27) - 2 rounds

Round 37 :

(7 sc, dec) x 3 (24)

Round 38 :

24 sc (24)

Round 39 :

1 sc, dec, (2 sc, dec) x 5, 1 sc (18)

Round 40 :

(1 sc, dec) x 6 (12)

β€” Fins (Make 2) :

Round 1 :

6 sc into a MR (6)

Round 2 :

6 sc (6)

Round 3 :

(1 sc, inc) x 3 (9)

Round 4 :

1 sc, inc, (2 sc, inc) x 2, 1 sc (12)

Round 5 :

(1 sc, inc) x 6 (18)

Round 6 :

1 sc, inc, (2 sc, inc) x 5, 1 sc (24)

Rounds 7-14 :

24 sc (24) - 8 rounds

Round 15 :

dec x 12 (12)

Round 16 :

dec x 6 (6)

Info :

Do not stuff the fin with polyfill

β€” Wavy Hem :

Instructions :

Take the yarn and make a standing sc into the first front loop of rnd 28 of the tail. (skip 2 sts, 5 dc into a st, skip 2 sts, 1 sc into a st) x 5. In the last unit just skip only 1st, so that you achieve 6 waves all around. Crochet 1 sl st into the first sc of the previous round

β€” Flower in Hair :

Instructions :

Start with a MR (leave a long starting yarn tail). (1 sc, ch 2, 1 sc into 2nd chain from hook) x 5. Sl st into the first st. Cut the yarn and fasten off by pulling the tail of yarn until the MR is closed

Assembly Instructions

  • Attach safety eyes to head between rounds 16-17 with 11 visible stitches distance, then model eyes inward using color A thread
  • Stuff head firmly and sew onto body ensuring the tail fin curve creates an S-shape when viewed from the side
  • Place hair wig symmetrically on head and optionally sew for small children, then attach hair strands and buns as desired
  • Sew arms to body between rounds 39-40 running diagonally backwards from the body center
  • Attach both fins to tail starting from round 4 and sewing downwards, positioning at different angles for natural movement
  • Add wavy hem detail to round 28 front loops using color D in scalloped pattern
  • Embroider facial features including nose, eyebrows, and white eye highlights using appropriate colored threads

Important Notes

  • πŸ’‘Use invisible decrease technique throughout to maintain smooth shaping and avoid visible holes
  • πŸ’‘Work color changes at the end of previous stitch for clean transitions between tail and body sections
  • πŸ’‘Stuff tail gradually and loosely at bottom, increasing firmness as it widens toward the body
  • πŸ’‘All body parts are worked in continuous spiral rounds using back loops only for textured appearance
  • πŸ’‘Optional foam curler can be inserted between head and body for stability in decorative displays
  • πŸ’‘Eye modeling technique is crucial for achieving the characteristic mermaid facial expression

LULU the Mermaid represents the pinnacle of amigurumi artistry, combining advanced crochet techniques with enchanting design elements that create a truly magical companion. This pattern challenges experienced crocheters with complex shaping, detailed assembly, and intricate finishing work that results in a stunning 26cm masterpiece. From the gracefully curved tail to the expressive embroidered features and customizable hair options, every element has been thoughtfully designed to create a mermaid that captures the imagination and becomes a treasured heirloom. Happy crocheting, and may your LULU bring waves of joy to all who meet her!

You ask,

we answer.

FAQs

Can I make LULU in different colors than shown in the pattern?

Absolutely! While the pattern provides four beautiful color combinations, you can customize LULU with any colors you prefer. Just maintain the same yarn weight and adjust safety eye sizes if needed for your color choices.

Is the hair wig removable or permanently attached?

The hair wig is designed to fit snugly and can be removable for styling changes. For dolls intended for small children, you can sew it permanently for safety, but otherwise it stays in place naturally.

What makes this pattern advanced level?

This pattern requires mastery of invisible decreases, complex color changes, back loop only techniques, detailed embroidery work, eye modeling, and precise assembly of multiple components with specific positioning.

Can I skip the optional foam curler for head stabilization?

Yes, the foam curler is optional. It helps prevent wobbling if LULU will be displayed, but isn't necessary if she'll be played with or if you prefer a softer feel.

How important is the invisible decrease technique?

Very important! Invisible decreases prevent holes and gaps that would be especially noticeable on LULU's smooth surfaces. Standard decreases will create an unfinished appearance.