🧶 Beautiful ✨ Detailed 💝 Adorable

Meninas Ladies in Waiting Amigurumi Pattern

Meninas Ladies in Waiting Amigurumi Pattern
4.9★ Rating
8-10 Hours Time Needed
3.4K Made This
✂️

Intermediate Level

Ideal for those with basic knitting experience, featuring slightly more advanced stitches and techniques to expand your skills.

⏱️

All-Day Adventure

Requires 8-10 hours, ideal for a full day of immersive knitting.

🎭

Elegant Drape

Soft flow with graceful movement, designed to flatter all body types with sophisticated comfort.

About This Meninas Ladies in Waiting Amigurumi Pattern

This exquisite pattern recreates the elegance of Velázquez's famous Ladies in Waiting from Las Meninas. Each doll features intricate period details including layered skirts, puffed sleeves, and elaborate hairstyles. The pattern includes instructions for two different dress styles (Type A and Type B) allowing you to create a complete court scene. With careful attention to historical accuracy, these dolls capture the grace and nobility of 17th-century Spanish court fashion.

Meninas Ladies in Waiting Amigurumi Pattern crochet pattern - detailed view of completed project

The structured base keeps each lady standing proudly while the detailed clothing construction creates authentic period silhouettes. These make stunning display pieces or meaningful gifts for art and history enthusiasts.

Why You'll Love This Meninas Ladies in Waiting Amigurumi Pattern

I absolutely love how this pattern combines my passion for art history with crochet! The attention to detail in recreating the court dresses is incredible - from the layered skirts to the delicate lace collars. Each stitch brings these historical figures to life, and I find myself getting lost in the meditative process of creating something so beautiful and meaningful. The finished dolls are museum-quality pieces that spark conversations about art and craftsmanship.

Meninas Ladies in Waiting Amigurumi Pattern step 1 - construction progress Meninas Ladies in Waiting Amigurumi Pattern step 2 - assembly progress Meninas Ladies in Waiting Amigurumi Pattern step 3 - details and accessories Meninas Ladies in Waiting Amigurumi Pattern step 4 - final assembly and finishing

Switch Things Up

I love experimenting with this pattern by changing up the color schemes to create my own royal court! Try using rich jewel tones like deep purples and emerald greens for a more regal look, or soft pastels for a romantic interpretation. You could even create seasonal versions - imagine autumn ladies in burnt oranges and golds, or winter courtiers in icy blues and silvers.

For added drama, I sometimes use metallic threads worked into the collar or skirt details to catch the light beautifully. Another fun variation is creating different hairstyles by adjusting the hair pattern - try making elaborate updos or adding small braided details using embroidery techniques.

Common Mistakes & How to Fix Them

✗ Working sleeves too tightly can restrict arm movement and make assembly difficult ✗ Forgetting to stuff the skirt adequately before closing will result in poor posture and stability ✗ Skipping the cardboard base reinforcement makes the dolls unable to stand properly without support ✗ Not pinning pieces before sewing leads to uneven attachment and crooked seams throughout the garment

Meninas Ladies in Waiting Amigurumi Pattern

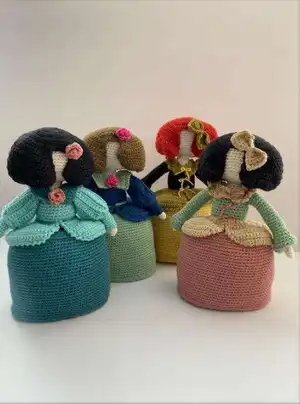
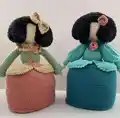
Create these enchanting Ladies in Waiting inspired by Velázquez's famous painting! This intermediate pattern guides you through making elegant dolls with detailed period dresses, complete with overskirts, sleeves, and beautiful hair accessories. Perfect for those who love historical art and want to bring classical beauty into their crochet projects.

Intermediate 8-10 Hours

Materials Needed for Meninas Ladies in Waiting Amigurumi Pattern

— Main Fabric

  • 01
    Schachenmayr Organic Cotton yarn in flesh color for head and arms
  • 02
    Various colors for dress (can be 2-3 colors depending on chosen style)
  • 03
    Hair color yarn (brown, black, or blonde as preferred)
  • 04
    Small amount of white yarn for details

— Tools Required

  • 01
    Crochet hook size 2.5mm
  • 02
    Darning needle
  • 03
    Fiber filling
  • 04
    Cardboard piece for base
  • 05
    Pins for positioning
  • 06
    Scissors
  • 07
    Wooden skewer or stick for internal support

Progress Tracker

0% Complete

— Arms :

Row 1 :

4 sc in a magic ring

Row 2 :

(1 inc) x 4 (8sc)

Row 3 to 21 :

8sc

Info :

Cut the thread and close. Leave aside until later. Make both the same.

— Body :

Foundation :

With the colour chosen for the body, make 28 chains and close with a sl.st.

Rows 1 to 12 :

28sc

Row 13 :

With flesh colour, 28 slip stitches

Row 14 :

2sc, 1 dec, 3sc, attach one arm with 6sc around the top, 3sc, 1 dec, 4sc, 1 dec, 3sc, attach other arm with 6sc, 3sc, 1 dec, 2sc (36 sts)

Row 15 :

(4sc, 1 dec) x 6 (30 sts)

Row 16 :

(3sc, 1 dec) x 6 (24 sts)

Row 17 :

1sc, 1 dec, 1sc, 2 dec, 1sc, 1 dec, 2sc, 1 dec, 1sc, 2 dec, 1sc, 1 dec, 1sc (16 sts)

Row 18 :

1sc, 1 dec, 2sc, 1 dec, 2sc, 1 dec, 2sc, 1 dec, 1sc (12 sts)

Rows 19 to 21 :

12sc

— Head :

Row 1 :

1 inc in every stitch (24 sts)

Row 2 :

(3sc, 1 inc) x 6 (30 st)

Row 3 :

(1 inc, 4sc) x 6 (36 sts)

Row 4 :

2sc, 1 inc, (5sc, 1 inc) x 5, 3sc (42 sts)

Row 5 :

(6sc, 1 inc) x 6 (48 sts)

Rows 6 to 14 :

48sc

Row 15 :

(6sc, 1 dec) x 6 (42 sts)

Row 16 :

2sc, 1 dec, (5sc and 1 dec) x 5, 3sc (36 sts)

Row 17 :

(4sc, 1 dec) x 6 (30 sts)

Row 18 :

(3sc, 1 dec) x 6 (24 sts)

Row 19 :

(2sc and 1 dec) x 6 (18 sts)

Info :

Fill the head

Row 20 :

(1sc and 1 dec) x 6 (12 sts)

Info :

Finish filling

Row 21 :

6 dec (6 sts)

Assembly Instructions

  • Fill the body and sew closed along the bottom
  • Attach sleeves to shoulders and sew collar around neckline, pinning first for even placement
  • Position skirt around waist with pins and sew to body, then attach overskirt in same manner
  • Insert wooden stick or skewer from base through body to head for structural support
  • Attach cardboard base to bottom of skirt using slip stitches through both layers
  • Position hair on head and secure with pins before final sewing
  • Add bow or flower to hair fringe corner as desired

Important Notes

  • 💡Use Schachenmayr Organic Cotton or similar weight yarn for best results
  • 💡Stuff firmly but not too tightly to maintain proper shape
  • 💡Pin all pieces in place before sewing to ensure correct positioning
  • 💡Work gauge swatch first to ensure proper fit of all components
  • 💡Keep consistent tension throughout to avoid puckering in dress sections

These elegant Ladies in Waiting bring the timeless beauty of Velázquez's masterpiece into your hands. Each doll captures the grace and sophistication of 17th-century Spanish court fashion with meticulous attention to detail. From the layered period dresses to the elaborate hairstyles, every element reflects the artistic heritage that inspired this pattern. Perfect for display or as a meaningful gift for art lovers and history enthusiasts.

You ask,

we answer.

FAQs

Can I use different yarn weights for this pattern?

The pattern is designed for worsted weight cotton yarn. Using different weights will change the finished size and may affect the structural integrity of the standing dolls.

How do I make the dolls stand properly?

The cardboard base and internal wooden support are essential. Make sure to stuff the skirt adequately and insert the support stick from base to head before final assembly.

What's the difference between Type A and Type B ladies?

Type A features a lace neckline and bow details, while Type B has a structured collar and different sleeve construction. Both represent different court dress styles.

Can I make these smaller or larger?

Yes, but you'll need to adjust hook size and yarn weight accordingly. Remember that changing size will also affect the amount of stuffing and internal support needed.