๐Ÿงถ Beautiful โœจ Detailed ๐Ÿ’ Adorable

My Little Cat Amigurumi Pattern

My Little Cat Amigurumi Pattern
4.1โ˜… Rating
4-6 Hours Time Needed
2.1K Made This
โœ‚๏ธ

Beginner Friendly Level

Perfect for those just starting their sewing journey, with clear instructions and simple techniques

โฑ๏ธ

Weekend Treat

Takes 5-7 hours, making it an enjoyable project to finish over a couple of days.

๐Ÿงธ

Cute Companion

An adorable friend to cherish, handcrafted with love to bring comfort and joy for years to come.

About This My Little Cat Amigurumi Pattern

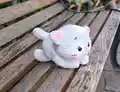
This delightful little cat pattern creates the perfect pocket-sized companion with its sweet face and cuddly proportions. Using soft chenille or velvet yarn, you'll craft a kitten that's irresistibly touchable and perfect for gifting or keeping as your own special friend. The pattern includes detailed facial embroidery instructions to give your cat its charming personality and expression.

My Little Cat Amigurumi Pattern crochet pattern - detailed view of completed project

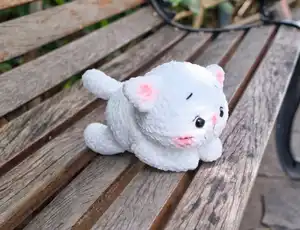
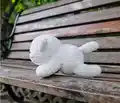
The finished kitten measures approximately 11cm tall and 19cm long, making it the ideal size for little hands to hold and love. This pattern combines simple stitches with adorable results, perfect for creating lasting memories.

Why You'll Love This My Little Cat Amigurumi Pattern

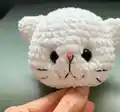
I absolutely love how this pattern captures the essence of a sleepy kitten in the most endearing way! The soft chenille yarn creates such a luxurious texture that you won't be able to stop cuddling your finished creation. What really makes my heart melt is how the simple facial embroidery brings so much personality to this little one - from the tiny pink nose to those sweet whiskers that give it such character.

My Little Cat Amigurumi Pattern step 1 - construction progress My Little Cat Amigurumi Pattern step 2 - assembly progress My Little Cat Amigurumi Pattern step 3 - details and accessories My Little Cat Amigurumi Pattern step 4 - final assembly and finishing

Switch Things Up

I love experimenting with different yarn textures for this little cat - try using a sparkly yarn for a magical effect, or go bold with bright colors instead of classic white. You could also add a tiny crocheted collar or bow tie to give your kitten some personality.

For a more realistic look, consider using gray or orange yarn and adding tabby stripes with surface crochet. Some makers love creating a whole family by making multiple cats in different sizes using various hook sizes.

I've seen beautiful variations where people add embroidered closed eyes for a sleeping cat, or even create different expressions by changing the mouth embroidery. The possibilities are endless when you let your creativity run wild!

Common Mistakes & How to Fix Them

โœ— Forgetting to stuff body parts firmly enough resulting in floppy limbs and poor shape retention โœ— Placing safety eyes too far apart or at wrong rounds making the face look unbalanced โœ— Not using stitch markers causing rounds to spiral incorrectly and creating uneven shaping โœ— Overstuffing the head making it too hard and difficult to attach properly to body

My Little Cat Amigurumi Pattern

Create your own adorable little white kitten with this charming amigurumi pattern! This sweet feline friend features soft curves, delicate facial details including safety eyes and embroidered features, and a cuddly body perfect for snuggling. The pattern uses plush chenille yarn to achieve that irresistibly soft texture that makes this kitty so huggable. Complete with detailed step-by-step instructions, helpful photos, and sewing guidance to bring your little companion to life.

Beginner Friendly 4-6 Hours

Materials Needed for My Little Cat Amigurumi Pattern

โ€” Main Fabric

  • 01
    Plush/Velvet/Chenille yarn in white color (140m or 1.5 skeins)
  • 02
    Recommended brands: Himalaya Velvet, Himalaya Dolphin baby, YarnArt Dolce, Premier Parfait Chunky

โ€” Tools Required

  • 01
    Crochet hook 4mm
  • 02
    Safety eyes 14mm
  • 03
    Safety nose 8mm
  • 04
    Polyester fiber fill stuffing
  • 05
    Tapestry needle
  • 06
    White and black thread
  • 07
    Scissors
  • 08
    Pins
  • 09
    Stitch markers

Progress Tracker

0% Complete

โ€” HEAD :

Round 1 :

MR 8 sc (8)

Round 2 :

8 inc (16)

Round 3 :

(1 sc, inc) x 8 times (24)

Round 4 :

1 sc, inc, (2sc, inc) x 7 times, 1 sc (32)

Round 5 :

(3 sc, inc) x 8 times (40)

Round 6-8 :

40 sc (40)

Round 9 :

14 sc, 4 inc, 4 sc, 4 inc, 14 sc (48)

Round 10-12 :

48 sc (48)

Info :

Insert safety eyes between rounds 10 and 11, distance between 2 eyes is 5 sts. Start stuffing the head.

Round 13 :

14 sc, 4 dec, 4 sc, 4 dec, 14 sc (40)

Round 14 :

40 sc (40)

Round 15 :

(3 sc, dec) x 8 times (32)

Round 16 :

(2 sc, dec) x 8 times (24)

Round 17 :

12 dec (12)

Info :

Stuff the head firmly with fiberfill.

Round 18 :

6 dec, slst (6)

โ€” BODY :

Round 1 :

MR 8 sc (8)

Round 2 :

8 inc (16)

Round 3 :

(1 sc, inc) x 8 times (24)

Round 4 :

(1 sc, inc, 1 sc) x 8 times (32)

Round 5 :

(3 sc, inc) x 8 times (40)

Round 6-10 :

40 sc (40)

Round 11 :

(3 sc, dec) x 8 times (32)

Round 12-14 :

32 sc (32)

Round 15 :

(14 sc, dec) x 2 times (30)

Round 16 :

30 sc, slst (30)

Info :

Stuff the body firmly with fiberfill.

โ€” EARS (Make 2) :

Round 1 :

MR 6sc (6)

Round 2 :

6 inc (12)

Round 3 :

(5 sc, inc) x 2 times (14)

Round 4-5 :

14 sc (14)

Round 6 :

7 sc, slst (7)

Info :

Do not stuff the ears. Flatten the opening and work through both layers to close.

โ€” ARMS/LEGS (Make 4) :

Round 1 :

MR 6 sc (6)

Round 2 :

6 inc (12)

Round 3-12 :

4 sc, inc, 5 sc, dec (12)

Round 13 :

6 sc, slst (6)

Info :

Stuff the arms/legs firmly with fiberfill. Flatten the opening and work through both layers to close.

โ€” TAIL :

Round 1 :

MR 6 sc (6)

Round 2 :

(2 sc, inc) x 2 times (8)

Round 3 :

(3 sc, inc) x 2 times (10)

Round 4-10 :

3 sc, inc, 4 sc, dec (10)

Round 11 :

5 sc, slst (5)

Info :

Stuff the tail lightly with fiberfill. Flatten the opening and work through both layers to close.

Assembly Instructions

  • Sew the ears to the head between rounds 4-8, with 8 stitches distance between the two ears
  • Create facial features by embroidering the nose, mouth and whiskers using black thread
  • Attach the head to the body by sewing one stitch on the body to one stitch on the head
  • Sew the legs to round 6 of the body with 10 stitches distance between the two legs
  • Attach the arms to rounds 12-15 of the body for proper positioning
  • Sew the tail to the back of the body for a natural cat pose

Important Notes

  • ๐Ÿ’กWork in continuous spiral unless otherwise stated - do not join rounds
  • ๐Ÿ’กUse stitch markers to mark the beginning of each round for accurate counting
  • ๐Ÿ’กStuff all parts firmly but not too tightly to maintain proper shape
  • ๐Ÿ’กInsert safety eyes before completing the head rounds for easier attachment
  • ๐Ÿ’กRead through the entire pattern before starting to familiarize yourself with the steps

This precious little cat pattern brings so much joy with its sweet sleeping pose and soft cuddly texture. The combination of simple stitches and detailed finishing creates a truly special companion that will be treasured for years to come. Perfect for gifting to cat lovers or adding to your own collection of handmade friends. Happy crocheting and enjoy creating your adorable feline buddy!

You ask,

we answer.

FAQs

What size will my finished cat be?

Using the recommended materials, your cat will measure approximately 11cm (4.3 inches) tall and 19cm (7.5 inches) long.

Can I use different yarn weights?

Yes! Using bulkier yarn and larger hook will make a bigger cat, while thinner yarn and smaller hook will create a smaller version.

When should I insert the safety eyes?

Insert the safety eyes between rounds 10 and 11 of the head, with 5 stitches distance between them, before completing the head.

How do I create the facial features?

Use black thread to embroider the nose, mouth lines, and whiskers as shown in the pattern photos for guidance.

Is this pattern suitable for beginners?

Yes! This pattern uses basic stitches and includes helpful photos and tips, making it perfect for beginners to amigurumi.