๐Ÿงถ Beautiful โœจ Detailed ๐Ÿ’ Adorable

Neon the Horse Amigurumi Pattern

Neon the Horse Amigurumi Pattern
4.5โ˜… Rating
4-6 Hours Time Needed
2.5K Made This
โœ‚๏ธ

Intermediate Level

Ideal for those with basic knitting experience, featuring slightly more advanced stitches and techniques to expand your skills.

โฑ๏ธ

Weekend Treat

Takes 5-7 hours, making it an enjoyable project to finish over a couple of days.

๐Ÿงธ

Cute Companion

An adorable friend to cherish, handcrafted with love to bring comfort and joy for years to come.

About This Neon the Horse Amigurumi Pattern

Neon the Horse is a unique and girly amigurumi pattern that brings magic to life. She features a beautiful apricot body with purple accents and a flowing pink mane that captures her dreamy personality. This pattern includes detailed instructions for creating her distinctive patch marking and fluffy textured mane and tail. The finished horse sits at approximately 15cm tall, making her the perfect size for cuddling and display.

Neon the Horse Amigurumi Pattern crochet pattern - detailed view of completed project

This pattern uses 4ply yarn with a 2.0mm hook to create tight, professional-looking stitches. The color combination of beige, apricot, purple, and pink creates a soft, magical appearance that both children and adults will adore.

Why You'll Love This Neon the Horse Amigurumi Pattern

I absolutely love how Neon captures that dreamy, whimsical spirit that makes amigurumi so special. The way her pink mane flows and her gentle expression comes together creates such a magical feeling. The pattern combines simple techniques with beautiful details, making it satisfying to create without being overwhelming. There's something so peaceful about working with these soft pastel colors - it feels like crocheting a little piece of a fairy tale.

Neon the Horse Amigurumi Pattern step 1 - construction progress Neon the Horse Amigurumi Pattern step 2 - assembly progress Neon the Horse Amigurumi Pattern step 3 - details and accessories Neon the Horse Amigurumi Pattern step 4 - final assembly and finishing

Switch Things Up

I love how versatile this Neon pattern can be with just a few simple modifications! You can easily transform her into a unicorn by adding a twisted horn in white or sparkly yarn right between her ears. For a more traditional look, try using brown and tan colors instead of the pastels - she becomes a classic pony instantly.

Consider making her mane and tail in multiple colors for a rainbow effect, or use metallic yarn to give her that magical sparkle. You could even add small flowers or ribbons to her mane for extra charm. If you want to make her larger, simply use a thicker yarn with an appropriately sized hook - she'll maintain her proportions perfectly.

For a winter version, add a tiny crocheted scarf around her neck or make her in white and pale blue for a snow pony effect. The possibilities are truly endless with this sweet pattern!

Common Mistakes & How to Fix Them

โœ— Forgetting to stuff the head gradually while crocheting can make final stuffing difficult and create an uneven shape โœ— Not placing safety eyes at the correct position between rounds 15-16 with proper spacing can affect facial symmetry โœ— Skipping the back loops only instruction in round 10 of the head will prevent proper color transition โœ— Not securing the mane and tail properly can cause them to become loose or fall off with handling

Neon the Horse Amigurumi Pattern

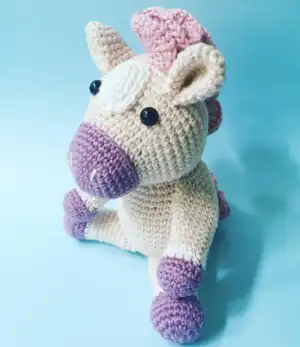
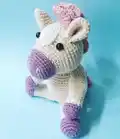
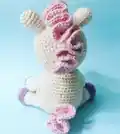
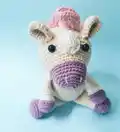
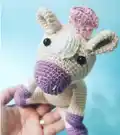
Meet Neon, the dreamy horse who spends her days thinking about fairy floss and rainbows! This intermediate-level amigurumi pattern creates an adorable 15cm tall seated horse with a fluffy pink mane and tail. Perfect for those who love magical creatures, Neon features beautiful pastel colors and charming details that make her irresistible. She's waiting to gallop into your heart and become someone's cherished companion.

Intermediate 4-6 Hours

Materials Needed for Neon the Horse Amigurumi Pattern

โ€” Main Fabric

  • 01
    4ply yarn/fingering weight in BEIGE, APRICOT, PURPLE and PINK colors
  • 02
    Hobbii Cotton Kings 8/4 in colour 02 (BEIGE)
  • 03
    Hobbii Rainbow Cotton 8/4 in colour 89 (APRICOT)
  • 04
    Hobbii Rainbow Cotton 8/4 in colour 39 (PURPLE)
  • 05
    Hobbii Rainbow Glitter Gold in colour 044 (PINK)

โ€” Tools Required

  • 01
    2.0mm crochet hook (B-1 US)
  • 02
    8mm safety eyes
  • 03
    Scissors
  • 04
    Tapestry needle
  • 05
    Polyester toy stuffing
  • 06
    Stitch marker

Progress Tracker

0% Complete

โ€” Ears (APRICOT, make 2) :

Round 1 :

6 sc in MR [6]

Round 2 :

inc x 6 [12]

Round 3 :

(sc, inc) x 6 [18]

Rounds 4-9 :

sc x 18 [18]

Info :

Fasten off, fold ears in half and half again (you should have 4 edges together) and sew across the bottom. Leave a tail for sewing.

โ€” Head (PURPLE) :

Round 1 :

6 sc in MR [6]

Round 2 :

inc x 6 [12]

Round 3 :

(sc, inc) x 6 [18]

Round 4 :

(sc x 2, inc) x 6 [24]

Round 5 :

(sc x 3, inc) x 6 [30]

Rounds 6-9 :

sc x 30 [30]

Info :

Change to APRICOT.

Round 10 :

in BLO: sc x 30 [30]

Round 11 :

sc x 30 [30]

Round 12 :

(sc x 4, inc) x 6 [36]

Round 13 :

(sc x 5, inc) x 6 [42]

Round 14 :

(sc x 6, inc) x 6 [48]

Round 15 :

(sc x 7, inc) x 6 [54]

Rounds 16-20 :

sc x 54 [54]

Round 21 :

(sc x 7, dec) x 6 [48]

Round 22 :

sc x 48 [48]

Round 23 :

(sc x 6, dec) x 6 [42]

Round 24 :

(sc x 5, dec) x 6 [36]

Round 25 :

(sc x 4, dec) x 6 [30]

Info :

If using safety eyes, insert between rounds 15 and 16, 11 stitches apart.

Round 26 :

(sc x 3, dec) x 6 [24]

Info :

Stuff the head and continue stuffing until fastened off.

Round 27 :

(sc x 2, dec) x 6 [18]

Round 28 :

(sc, dec) x 6 [12]

Round 29 :

dec x 6 [6]

Info :

Fasten off and weave tail through final round, pull to close.

โ€” Arms (PURPLE, make 2) :

Round 1 :

6 sc in MR [6]

Round 2 :

inc x 6 [12]

Round 3 :

(sc, inc) x 6 [18]

Round 4 :

sc x 18 [18]

Round 5 :

in BLO: sc x 18 [18]

Round 6 :

(sc x 7, dec) x 2 [16]

Info :

Change to BEIGE.

Round 7 :

(sc x 6, dec) x 2 [14]

Round 8 :

sc x 14 [14]

Info :

Change to APRICOT.

Rounds 9-18 :

sc x 14 [14]

Info :

Fasten off, stuff rounds 1-8 and sc across top. Leave a tail for sewing.

โ€” Legs (PURPLE, make 2) :

Round 1 :

8 sc in MR [8]

Round 2 :

inc x 8 [16]

Round 3 :

(sc, inc) x 8 [24]

Rounds 4-5 :

sc x 24 [24]

Round 6 :

in BLO: (sc x 6, dec) x 3 [21]

Round 7 :

(sc x 5, dec) x 3 [18]

Info :

Change to BEIGE.

Rounds 8-9 :

sc x 18 [18]

Info :

Change to APRICOT.

Rounds 10-18 :

sc x 18 [18]

Info :

Fasten off, stuff and sc across the top to close. Leave a tail for sewing.

โ€” Body (APRICOT) :

Round 1 :

6 sc in MR [6]

Round 2 :

inc x 6 [12]

Round 3 :

(sc, inc) x 6 [18]

Round 4 :

(sc x 2, inc) x 6 [24]

Round 5 :

(sc x 3, inc) x 6 [30]

Round 6 :

(sc x 4, inc) x 6 [36]

Round 7 :

(sc x 5, inc) x 6 [42]

Rounds 8-15 :

sc around [42]

Round 16 :

(sc x 5, dec) x 6 [36]

Rounds 17-20 :

sc x 36 [36]

Round 21 :

(sc x 4, dec) x 6 [30]

Round 22 :

sc x 30 [30]

Round 23 :

(sc x 3, dec) x 6 [24]

Info :

Stuff and continue stuffing until fastened off.

Round 24 :

(sc x 2, dec) x 6 [18]

Round 25 :

(sc, dec) x 6 [12]

Info :

Fasten off, weave tail through final round and pull to close. Leave a tail for sewing.

โ€” Mane (PINK) :

Info :

Leave a long tail at the beginning for sewing. You will work in rows and turn at the end of each row. Chains do not count as a stitch.

Row 1 :

ch16, sc in 2nd ch from hook, sc x 14 [15]

Row 2 :

ch2 and 3dc in same stitch, 3dc x 14 [45]

Row 3 :

ch2 and 3dc in same stitch, 3dc x 44 [135]

Info :

Fasten off and leave a tail for sewing.

โ€” Tail (PINK) :

Info :

Leave a long tail at the beginning for sewing. You will work in rows and turn at the end of each row. Chains do not count as a stitch.

Row 1 :

ch9, sc in 2nd ch from hook, sc x 7 [8]

Row 2 :

ch2 and 3dc in same stitch, 3dc x 7 [24]

Row 3 :

ch2 and 3dc in same stitch 3dc x 24 [72]

Info :

Fasten off and leave a tail for sewing.

โ€” Patch (BEIGE) :

Round 1 :

ch 6, sc in 2nd chain from hook, sc x 3, 3sc in the final chain, turn and work on the other side: sc x 3, inc [12]

Round 2 :

inc, sc x 3, inc, sc, inc, sc x 3, inc, sc [16]

Round 3 :

sc, inc, sc x 4, inc, sc, inc, sc x 5, inc, sc [20]

Info :

Fasten off and leave a tail for sewing.

Assembly Instructions

  • Using APRICOT yarn, sew over a stitch on the inner part of each safety eye and pull slightly to create an indent, then tie off and hide yarn tails inside the head
  • Sew the beige patch to the centre of the head covering rounds 12-19
  • Attach the head to the body by going around twice to make it secure
  • Sew ears to either side of the head over rounds 18-22, approximately 3 stitches from the patch
  • Attach legs to rounds 5-7 of the body pointing outwards, 3 stitches apart
  • Sew arms to the body over rounds 17-22 on a diagonal so they point slightly forward and rest on the legs
  • Attach the mane approximately 1 round after the patch, sewing down the back of the head
  • Sew the tail to the back of the body over rounds 6-11
  • Using APRICOT yarn, create nostrils by making 2 vertical lines over rounds 3-5, approximately 5 stitches apart

Important Notes

  • ๐Ÿ’กUse a yarn with no stretch for best results - cotton or cotton blend works perfectly for amigurumi
  • ๐Ÿ’กKeep stitches tight by using a smaller hook than usual for the yarn weight
  • ๐Ÿ’กUse stitch markers to keep track of rounds, especially during color changes
  • ๐Ÿ’กStuff firmly but not too tightly for the best shape and structure
  • ๐Ÿ’กInsert safety eyes between rounds 15 and 16 with proper spacing before closing the head
  • ๐Ÿ’กPin all parts in place before sewing to ensure correct positioning

This enchanting Neon the Horse pattern captures all the magic of childhood dreams in soft pastel colors. With her flowing pink mane and gentle expression, she's ready to become someone's most treasured companion. The pattern combines intermediate techniques with clear instructions to create a truly special amigurumi friend. Perfect for gifting or keeping as your own little piece of magic! ๐Ÿฆ„โœจ

You ask,

we answer.

FAQs

What size will my finished Neon the Horse be?

When made with the specified materials (4ply yarn and 2.0mm hook), Neon will be approximately 15cm (5ยพ inches) tall when seated.

Can I use different colors for this pattern?

Absolutely! While Neon looks beautiful in pastels, you can use traditional horse colors or any color combination you prefer. Just maintain the same yarn weight for best results.

Is this pattern suitable for beginners?

This is an intermediate level pattern. You should be comfortable with basic amigurumi techniques including magic ring, increases, decreases, and color changes.

Can I use embroidered eyes instead of safety eyes?

Yes, you can embroider the eyes if you prefer. This is especially recommended if making the toy for very young children.

How much yarn will I need for this project?

You'll need less than 50g total of 4ply yarn in the four colors specified (beige, apricot, purple, and pink).

What's the best way to attach the fluffy mane and tail?

Sew the mane securely down the back of the head starting about one round after the patch, and attach the tail to rounds 6-11 on the back of the body for best positioning.