๐Ÿงถ Beautiful โœจ Detailed ๐Ÿ’ Adorable

Pineapple Rex Amigurumi Pattern

Pineapple Rex Amigurumi Pattern
4.5โ˜… Rating
4-5 Hours Time Needed
4.0K Made This
โœ‚๏ธ

Intermediate Level

Ideal for those with basic knitting experience, featuring slightly more advanced stitches and techniques to expand your skills.

โฑ๏ธ

Weekend Treat

Takes 5-7 hours, making it an enjoyable project to finish over a couple of days.

๐Ÿงธ

Cute Companion

An adorable friend to cherish, handcrafted with love to bring comfort and joy for years to come.

About This Pineapple Rex Amigurumi Pattern

The Pineapple Rex pattern brings together two beloved elements - the playful charm of a dinosaur and the tropical sweetness of a pineapple. This pattern features special techniques including invisible decreases for a polished finish and unique spike construction that creates dimension and character. The freestanding design with its sturdy tail allows your finished creation to sit proudly on display, while the embroidered facial details give it personality and warmth.

Pineapple Rex Amigurumi Pattern crochet pattern - detailed view of completed project

With its compact size and distinctive features including textured belly details and whimsical spikes, this pattern offers an enjoyable making experience that results in a truly one-of-a-kind creation perfect for dinosaur lovers and fruit enthusiasts alike.

Why You'll Love This Pineapple Rex Amigurumi Pattern

I absolutely love this pattern because it combines two unexpected elements into one irresistibly cute design that never fails to make people smile. The clever construction techniques, from joining the legs seamlessly to the body to creating those adorable dimensional spikes, make the process engaging without being overwhelming. I appreciate how the pattern includes clear photo references throughout, making it easy to see exactly how each piece should look at every stage. The finished Pineapple Rex has such wonderful character with its sweet expression and freestanding pose, and watching it come together as you work through each section is incredibly satisfying. It's one of those projects that's just as fun to make as it is to display or gift to someone special.

Pineapple Rex Amigurumi Pattern step 1 - construction progress Pineapple Rex Amigurumi Pattern step 2 - assembly progress Pineapple Rex Amigurumi Pattern step 3 - details and accessories Pineapple Rex Amigurumi Pattern step 4 - final assembly and finishing

Switch Things Up

I absolutely love experimenting with this Pineapple Rex pattern because it offers so many creative possibilities! One of my favorite modifications is playing with color combinations - imagine a purple and teal version for a galaxy-inspired dino-fruit, or soft pastels for a dreamy aesthetic. I've also tried adding small embroidered details like hearts or stars to the belly instead of just the textured rows, which adds a personalized touch.

For a different look, I sometimes make the spikes larger or add more of them for a truly prehistoric appearance, or keep them smaller and fewer for a subtler pineapple crown effect. You could even experiment with gradient yarn to create an ombre effect that transitions beautifully from the body to the spikes.

I've found that using different eye sizes dramatically changes the character's personality - smaller eyes create a more sophisticated look while larger ones enhance the kawaii cuteness factor. Another fun variation I love is adding tiny feet details with contrasting embroidery, or even creating a whole family of different-sized Pineapple Rexes using various yarn weights.

Some makers I know have added accessories like tiny crocheted flowers, bows, or even little fruit-themed decorations. The possibilities truly are endless, and each variation brings its own unique charm to this already adorable design!

Common Mistakes & How to Fix Them

โœ— Forgetting to stuff the body before completing all decrease rounds - always stuff as you go during the decreasing process to avoid lumpy or misshapen results โœ— Positioning the safety eyes incorrectly or too close together - remember they should be placed between rounds 19-20 with six visible stitches apart for proper expression โœ— Not leaving long enough tails when finishing pieces - adequate tail length is essential for secure attachment and invisible seaming of all components โœ— Attaching the spikes in the wrong direction or placement - they should start from the center of the snout and flow naturally down the back with the chain-2 section falling where body meets tail โœ— Skipping the invisible decrease technique - using regular decreases instead of invisible ones will create visible holes and an unpolished appearance throughout your finished amigurumi

Pineapple Rex Amigurumi Pattern

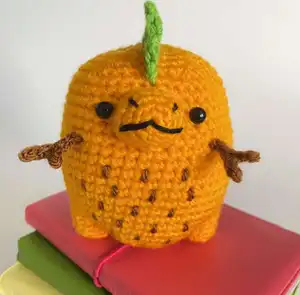
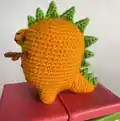
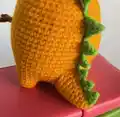
Create your very own adorable Pineapple Rex with this delightful amigurumi pattern! This charming dinosaur-pineapple hybrid features a sweet sunny yellow body, playful green spikes running down its back, and the cutest little arms and tail. Standing at approximately 11cm tall when made with the recommended yarn, this lovable character combines the tropical vibes of a pineapple with the prehistoric charm of a T-Rex. Perfect for gifting or adding a touch of whimsy to your home decor, this pattern will guide you through creating a unique companion that's bursting with personality and sure to bring smiles wherever it goes.

Intermediate 4-5 Hours

Materials Needed for Pineapple Rex Amigurumi Pattern

โ€” Main Fabric

  • 01
    Stylecraft Special DK yarn in Sunshine (yellow/orange)
  • 02
    Stylecraft Special DK yarn in Grass Green
  • 03
    Stylecraft Special DK yarn in Gingerbread (brown)

โ€” Tools Required

  • 01
    2.5mm crochet hook
  • 02
    Two 6mm safety eyes
  • 03
    Stitch markers
  • 04
    Yarn needle
  • 05
    Scissors
  • 06
    Fibrefill stuffing
  • 07
    Black embroidery floss

Progress Tracker

0% Complete

โ€” Legs (make two) :

Round 1 :

6 sc in MR (6)

Round 2 :

inc each st around (12)

Round 3 :

in BLO sc each st around (12)

Round 4 :

sc each st around (12)

Info :

Cut yarn and weave in ends

โ€” Body :

Info :

Using Sunshine ch9

Round 1 :

sc in second ch from hook, 6sc, 3sc in next st, working down the other side of the ch, 6sc, inc (18)

Round 2 :

inc, 6sc, 3inc, 6sc, 2inc (24)

Round 3 :

sc, inc, 6sc, *sc, inc* rep 3 times, 6sc, *sc, inc* rep 2 times (30)

Round 4 :

2sc, inc, 2sc, with the body still on your hook insert hook through any st in leg 1 and through the next st of rnd 3, complete sc, complete a further 2sc in this way, sc, *2sc, inc* rep 3 times, 2sc, 3sc through leg 2, sc, *2sc, inc* rep 2 times (36)

Info :

Both legs should now be attached to the body

Round 5 :

6sc, 9sc around leg 1, 15sc, 9sc around leg 2, 9sc (48)

Rounds 6-22 :

sc each st around (48) (17 rnds)

Round 23 :

*6sc, dec* rep 6 times (42)

Round 24 :

*5sc, dec* rep 6 times (36)

Infos :

Insert safety eyes between rnds 19-20 six visible sts apart. Although at this stage it does not matter which is the front or back, please use the legs as a guide to ensure the eyes are in the correct place. Start stuffing and continue to stuff while we decrease.

Round 25 :

*4sc, dec* rep 6 times (30)

Round 26 :

*3sc, dec* rep 6 times (24)

Round 27 :

*2sc, dec* rep 6 times (18)

Round 28 :

*1sc, dec* rep 6 times (12)

Round 29 :

dec 6 times (6)

Info :

Fasten off and leave a long tail. Complete invisible close and weave in ends.

โ€” Tail :

Round 1 :

6sc in MR (6)

Round 2 :

*sc, inc* rep 3 times (9)

Round 3 :

sc each st around (9)

Round 4 :

*2sc, inc* rep 3 times (12)

Round 5 :

sc each st around (12)

Round 6 :

*3sc, inc* rep 3 times (15)

Round 7 :

sc each st around (15)

Round 8 :

6sc, 3inc, 6sc (18)

Round 9 :

sc each st around (18)

Info :

Cut yarn leaving a long tail.

โ€” Snout :

Round 1 :

6sc in MR (6)

Round 2 :

sc, 3sc in same st, 2sc, 3 sc in same st, sc (10)

Round 3 :

2sc, 3sc in same st, 4sc, 3 sc in same st, 2sc (14)

Rounds 4-5 :

sc each st around (14) (2 rnds)

Infos :

Cut yarn leaving a long tail. Using black embroidery floss, stitch a mouth and nostrils onto the snout.

โ€” Arms (make 2) :

Row 1 :

Ch6, slst in 2nd ch from hook, slst, ch3, slst in 2nd chain from hook, slst, now working up the original ch, 3slst

Info :

Cut yarn leaving a long tail

โ€” Spikes :

Special Stitches :

Large Spike (LS) = Ch5, sc in 2nd ch from hook, hdc, dc, tr - Medium Spike (MS) = ch4, sc in 2nd ch from hook, hdc, dc - Small Spike (SS) = ch3, sc in 2nd ch from hook, hdc

Row 1 :

SS, MS, 4LS, MS, SS, ch2, 3SS

Info :

Cut yarn leaving a long tail. If you want your spikes extra pointy you can block them as I have done, but this is optional.

Assembly Instructions

  • Attach the arms between rounds 16-17, positioning them eleven visible stitches apart on each side of the body
  • Lightly stuff the tail and join it to the body over rounds 3-10, ensuring the tail allows your Pineapple Rex to be freestanding - make positioning adjustments if necessary
  • Lightly stuff the snout and sew it between the eyes, covering rounds 17-21 for proper placement
  • Starting from the centre of the snout, attach the spikes over the top of the head, down the back and onto the tail - the ch2 section should fall where the body meets the tail
  • Using Gingerbread yarn, add five rows of decorative stitches to the belly for added textural detail and character

Important Notes

  • ๐Ÿ’กUse stitch markers consistently throughout to track your rounds, especially when working the body and during color changes
  • ๐Ÿ’กWork invisible decreases as instructed rather than regular decreases to achieve a polished, professional finish without visible holes
  • ๐Ÿ’กLeave long tails when finishing each piece - this makes assembly much easier and ensures secure attachment of all components
  • ๐Ÿ’กPin all pieces in place before sewing them permanently to ensure correct positioning and balanced proportions
  • ๐Ÿ’กStuff firmly but not too tightly - overstuffing can distort the shape while understuffing creates a floppy appearance
  • ๐Ÿ’กPay attention to the leg orientation when attaching them to the body to ensure proper positioning of the eyes later
  • ๐Ÿ’กThe tail positioning is crucial for the freestanding feature - test stability before securing it permanently

This absolutely adorable Pineapple Rex pattern was designed to bring together the best of both worlds - the prehistoric charm of a dinosaur and the tropical sweetness of a pineapple! The pattern combines straightforward techniques with creative details like dimensional spikes and textured belly embellishments to create a character bursting with personality. The freestanding design means your finished creation will proudly display itself, becoming an instant conversation starter and beloved companion. Whether you're making it as a gift for a dinosaur enthusiast, a fruit lover, or simply treating yourself to a delightful stitching adventure, this pattern promises hours of enjoyable crafting and a finished piece you'll treasure. ๐Ÿงถ Happy crocheting! ๐Ÿ๐Ÿฆ–โœจ

You ask,

we answer.

FAQs

What size will my finished Pineapple Rex be?

When made using Stylecraft Special DK yarn and a 2.5mm crochet hook as recommended, your finished Pineapple Rex will measure approximately 11cm (about 4.3 inches) tall. Using different yarn weights or hook sizes will result in a different finished size.

Can I use different yarn colors for this pattern?

Absolutely! While the pattern calls for Sunshine yellow, Grass Green, and Gingerbread brown, you can customize your Pineapple Rex with any colors you like. Consider making a rainbow version, pastel colors, or even seasonal variations to suit your preferences.

Do I need to know invisible decreases to make this pattern?

Yes, this pattern uses invisible decreases to create a polished, professional finish. The pattern includes detailed photo instructions showing exactly how to work invisible decreases step-by-step, so even if you haven't used this technique before, you'll be able to follow along successfully.

Why won't my Pineapple Rex stand up on its own?

The freestanding feature depends on proper tail positioning and stuffing. Make sure you've lightly stuffed the tail and attached it over rounds 3-10 of the body at the correct angle. The tail should be firm enough to support the weight but not so stiff it can't be adjusted. Test the positioning before permanently securing it.

Can I make the spikes in a different way?

The pattern includes special spike stitches (Small, Medium, and Large Spikes) for a dimensional effect. While you could experiment with different spike constructions, following the pattern as written ensures the characteristic pineapple-like appearance. The pattern also notes that blocking the spikes is optional for extra pointiness.

What's the best way to attach the small arms?

The arms are made using chain stitches and slip stitches in Gingerbread brown. Use the long tail left after completing each arm to sew them securely between rounds 16-17, positioned eleven visible stitches apart. Pin them in place first to ensure symmetrical placement before permanently attaching them.