๐Ÿงถ Beautiful โœจ Detailed ๐Ÿ’ Adorable

Pinwheel Square Crochet Pattern

Pinwheel Square Crochet Pattern
4.5โ˜… Rating
3-4 Hours Time Needed
1.4K Made This
โœ‚๏ธ

Intermediate Level

Ideal for those with basic knitting experience, featuring slightly more advanced stitches and techniques to expand your skills.

โฑ๏ธ

Weekend Treat

Takes 5-7 hours, making it an enjoyable project to finish over a couple of days.

๐Ÿก

Cozy Accent

A warm touch for your space that transforms ordinary corners into inviting nooks filled with handmade charm.

About This Pinwheel Square Crochet Pattern

This pinwheel square pattern creates a mesmerizing swirl effect using an innovative technique where each petal is worked outward from the center ring, then back in the opposite direction. The reverse single crochet edges form beautiful raised textures that give this square its distinctive three-dimensional appearance. The pattern uses four coordinating colors to enhance the spinning pinwheel effect.

Pinwheel Square Crochet Pattern crochet pattern - detailed view of completed project

The finished 12x12 inch square works perfectly as part of a larger blanket project or as a standalone decorative piece. The advanced beginner level makes it accessible while still providing an engaging challenge.

Why You'll Love This Pinwheel Square Crochet Pattern

I absolutely love how this pattern challenges traditional crochet methods with its unique construction technique. The way each petal builds upon the last creates such a satisfying rhythm, and watching the pinwheel take shape is incredibly rewarding. The raised edges add beautiful texture and dimension that makes this square truly special.

Pinwheel Square Crochet Pattern step 1 - construction progress Pinwheel Square Crochet Pattern step 2 - assembly progress Pinwheel Square Crochet Pattern step 3 - details and accessories Pinwheel Square Crochet Pattern step 4 - final assembly and finishing

Switch Things Up

I love experimenting with different color combinations to create completely new moods with this pattern. Try using gradient colors from light to dark for an ombre effect, or go bold with high-contrast colors for a more dramatic pinwheel. You could also work all petals in one color and use a contrasting border for a more subtle approach.

Consider using variegated yarns for some petals to add extra visual interest, or incorporate metallic threads for special occasion pieces. The pattern also works beautifully in seasonal colors - think autumn oranges and browns, or winter blues and whites.

Common Mistakes & How to Fix Them

โœ— Forgetting to place stitch markers in the back loops of treble stitches can make finding them difficult later โœ— Working reverse single crochets in both loops instead of front loop only will prevent proper petal construction โœ— Not maintaining consistent tension when working back loops can create loose or tight sections โœ— Mixing up color changes or skipping the alternating pattern will disrupt the pinwheel effect

Pinwheel Square Crochet Pattern

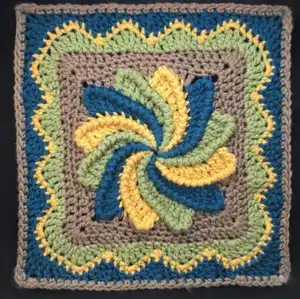
Create this stunning colorful pinwheel square that will add a mesmerizing swirl effect to your blanket projects. This unique design features petals worked from a center ring using reverse single crochet edges to form beautiful raised textures. Perfect for intermediate crocheters looking to challenge their skills while creating something truly eye-catching.

Intermediate 3-4 Hours

Materials Needed for Pinwheel Square Crochet Pattern

โ€” Main Fabric

  • 01
    4 colors worsted weight yarn in coordinating shades
  • 02
    Red Heart With Love 100% acrylic yarn in Peacock, Cornsilk, Lettuce, and Taupe (as shown in sample)

โ€” Tools Required

  • 01
    J hook (6.0mm) or hook to achieve gauge
  • 02
    13 stitch markers (recommended)
  • 03
    Scissors
  • 04
    Tapestry needle for weaving in ends

Progress Tracker

0% Complete

โ€” Pinwheel Construction :

Foundation :

With Color A, ch 14

First Petal :

Join with sl st in 4th ch from hook to form ring, work into remaining chs, sc in next ch, hdc in next ch, 2 hdc in next ch, dc in next ch, 2 dc in next ch, htr in next ch, 2 htr in next ch, tr in next ch, 2 tr in next ch, tr in last ch, place stitch marker in back loop of last tr made

Info :

Do not turn, working back in the other direction, revsc in the flo of each stitch across to ring (14 revscs), sl st in center of ring, do not turn

Next Petal :

Working in unused back loops of previous petal, sc in first sc changing color to B, hdc in next hdc, 2 hdc in next hdc, dc in next hdc, 2 dc in next dc, htr in next dc, 2 htr in next dc, tr in next htr, 2 tr in next htr, tr in next htr, leave remaining 4 sts unused

Info :

Do not turn, working back in the other direction, revsc in the flo of each stitch across to ring, sl st in ring, do not turn

Repeat :

Repeat Next Petal instructions for 10 more Petals. Change to color C for third Petal, then alternate colors A, B, and C around for a total of 12 petals

Joining :

Fold First Petal down so wrong side is facing you. Join last Petal to unused loops of beginning chain on First Petal with sl sts worked across. Finish off all three colors

โ€” Square Border :

Round 1 :

Join color D with a sc in blo of third unused tr, *ch 2, sc in unused blo of next tr of same petal, sk to next Petal, tr in same back loop as last tr worked into next Petal, [dc in blo of next tr, hdc in blo of next tr, sc in blo of last 2 trs, sk to next Petal, dc in same back loop as last tr worked into next Petal] 2 times, dc in blo of next tr, hdc in blo of next tr**, sc in blo of next tr; Rep from *2 more times; Rep from * to ** once, join with sl st in first sc โ€“ 60 sts and 4 ch-2 sps

Round 2 :

Ch 2, dc in first sc, *(2 dc, ch 1, 2 dc) in ch-2 sp, dc in next 2 sts, hdc in next 2 sts, sc in next 7 sts, hdc in next 2 sts**, dc in next 2 sts; Rep from * 2 more times; Rep from * to ** once, dc in last st, join with sl st in first dc โ€“ 76 sts and 4 ch-1 sps

Round 3 :

Ch 2, dc in first 3 dc, *(2 dc, ch 1, 2 dc) in ch-1 sp, dc in next 5 sts, hdc in next 3 sts, sc in next 3 sts, hdc in next 3 sts, **, dc in next 5 sts; Rep from * 2 more times; Rep from * to ** once, dc in last 2 dc, join with sl st in first dc. Finish off color D โ€“ 92 sts and 4 ch-1 sps

Round 4 :

Join color B with sl st in second dc of prev rnd, ch 2, dc in same dc as join, *3 tr in next dc, dc2tog, hdc2tog, [dc in next st, 3 tr in next st, dc in next st, hdc in next st, sc in next st, hdc in next st] 3 times**, dc in next dc; Rep from * 2 more times; Rep from * to ** once, join with sl st in first dc. Finish off color B โ€“ 120 sts

Round 5 :

Join color C with sc in second tr of prev rnd, 2 sc in same tr, *sc in each of next 5 sts, [3 sc in next tr, sc in next 2 sts, sc3tog, sc in next 2 sts] 3 times**, 3 sc in next tr; Rep from * 2 more times; Rep from * to ** once, join with sl st in first sc. Finish off color C โ€“ 128 sts

Round 6 :

Join color A with sc in second sc of prev rnd, *hdc in next sc, dc in next sc, (dc, tr) in next sc, 2 tr in next sc, (tr, dc) in next sc, dc in next sc, hdc in next sc, [sc in next sc, hdc in next sc, dc in next sc, tr3tog, dc in next sc, hdc in next sc] 3 times**, sc in next sc; Rep from * 2 more times; Rep from * to ** once, join with sl st in first sc. Finish off color A โ€“ 116 sts

Round 7 :

Join color D with sc in first sc of prev rnd, sc in next 4 sts, 2 sc in next tr, ch 2, 2 sc in next tr, *sc in next 27 sts, 2 sc in next tr, ch 2, 2 sc in next tr; Rep from * 2 more times, sc in next 22 sts, join with sl st in first sc. Finish off color D and weave in all ends โ€“ 128 sts

Assembly Instructions

  • The pinwheel is worked as one continuous piece from center outward
  • Each petal connects to the previous one through the back loop construction method
  • The final petal is joined to the first petal to complete the circle
  • The square border is worked around the completed pinwheel
  • Weave in all yarn ends securely using a tapestry needle
  • Block the finished square to achieve the proper 12x12 inch dimensions

Important Notes

  • ๐Ÿ’กUse stitch markers consistently to mark back loops of treble stitches for easier identification
  • ๐Ÿ’กMaintain consistent tension throughout to ensure even petal formation
  • ๐Ÿ’กWork reverse single crochets in front loops only to preserve back loops for next petal
  • ๐Ÿ’กKeep unused yarn colors flipped up under the hook between color changes
  • ๐Ÿ’กIf your square measures less than 12 inches, add additional rounds of single crochet around the border

This mesmerizing Pinwheel Square pattern brings dynamic movement and beautiful texture to any crochet project. The innovative construction technique creates stunning raised edges that catch the light beautifully. Whether used in a larger blanket or as a standalone decorative piece, this square is sure to become a conversation starter. The four-color design allows for endless color combinations to match your home decor perfectly.

You ask,

we answer.

FAQs

What makes this pattern different from regular granny squares?

The pinwheel technique works each petal outward from center then back inward without turning, creating unique raised edges and a three-dimensional spinning effect that traditional squares don't have.

Can I use different yarn weights for this pattern?

Yes, but you'll need to adjust your hook size accordingly and the finished size will vary. Always make a gauge swatch first to ensure proper proportions.

Why is my pinwheel not laying flat?

This could be due to tension issues. Make sure you're working the reverse single crochets in front loops only and maintaining consistent tension throughout all rounds.

How many squares do I need for a full-size blanket?

For a throw blanket, you'd typically need 20-30 squares (4x5 or 5x6 arrangement). For a larger blanket, plan for 35-42 squares (5x7 or 6x7 arrangement).