๐Ÿงถ Beautiful โœจ Detailed ๐Ÿ’ Adorable

Plush Bonanza Beechcraft V-tail Crochet Pattern

Plush Bonanza Beechcraft V-tail Crochet Pattern
4.6โ˜… Rating
8-10 Hours Time Needed
1.4K Made This
โœ‚๏ธ

Intermediate Level

Ideal for those with basic knitting experience, featuring slightly more advanced stitches and techniques to expand your skills.

โฑ๏ธ

All-Day Adventure

Requires 8-10 hours, ideal for a full day of immersive knitting.

๐Ÿงธ

Cute Companion

An adorable friend to cherish, handcrafted with love to bring comfort and joy for years to come.

About This Plush Bonanza Beechcraft V-tail Crochet Pattern

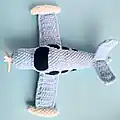
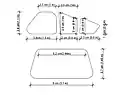
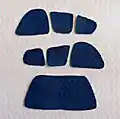
This charming Beechcraft V-tail pattern brings aviation magic to life through crochet! The design features a detailed fuselage with realistic proportions, distinctive V-shaped tail pieces, wide wings with attached engines, and a spinning propeller. The pattern includes precise instructions for creating felt windows and assembly techniques that ensure your airplane looks professional and sturdy. Every stitch has been carefully calculated to capture the essence of this classic aircraft.

Plush Bonanza Beechcraft V-tail Crochet Pattern crochet pattern - detailed view of completed project

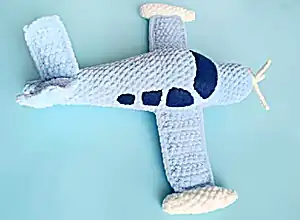
Working with plush yarn gives this airplane a wonderfully soft and huggable texture, making it perfect as both a display piece and a cuddly toy. The finished size measures approximately 30cm in length and wingspan, creating an impressive and substantial finished project.

Why You'll Love This Plush Bonanza Beechcraft V-tail Crochet Pattern

I absolutely love how this pattern combines my passion for aviation with the meditative art of crochet. There's something magical about watching a flat piece of yarn transform into a three-dimensional aircraft that actually looks like it could take flight! The combination of different textures - the soft plush yarn body contrasted with the smooth felt windows - creates such a professional finish. I find the assembly process particularly satisfying as you watch all the individual components come together to form this beautiful airplane.

Plush Bonanza Beechcraft V-tail Crochet Pattern step 1 - construction progress Plush Bonanza Beechcraft V-tail Crochet Pattern step 2 - assembly progress Plush Bonanza Beechcraft V-tail Crochet Pattern step 3 - details and accessories Plush Bonanza Beechcraft V-tail Crochet Pattern step 4 - final assembly and finishing

Switch Things Up

I love experimenting with different color combinations for this airplane pattern! While the classic blue and cream looks absolutely stunning, you could create a military version using olive green and tan, or go bold with bright red and white for a vintage racing plane look. I've also tried making smaller versions using worsted weight yarn and a smaller hook - they turn out adorable as ornaments or keychains.

Another fun variation I enjoy is adding extra details like tiny crocheted pilot figures or even making a whole fleet in different sizes. The beauty of this pattern is how well it adapts to creative modifications while maintaining that distinctive Beechcraft silhouette that makes it instantly recognizable.

Common Mistakes & How to Fix Them

โœ— Not maintaining proper tension when working with plush yarn, which can make stitches uneven and difficult to count โœ— Forgetting to stuff the fuselage gradually during crocheting, making it difficult to achieve proper shape at the end โœ— Misaligning wing placement by not finding the exact center point, causing the airplane to look lopsided โœ— Rushing through the tail piece assembly without properly joining the two halves, resulting in weak connection points

Plush Bonanza Beechcraft V-tail Crochet Pattern

Take flight with this adorable plush airplane pattern! Create your very own Beechcraft V-tail aircraft using soft plush yarn in beautiful blue and cream colors. This detailed pattern guides you through crocheting a realistic airplane complete with distinctive V-shaped tail, wings, engines, propeller, and felt windows. Perfect for aviation enthusiasts, children who love planes, or anyone wanting to craft something truly special and unique.

Intermediate 8-10 Hours

Materials Needed for Plush Bonanza Beechcraft V-tail Crochet Pattern

โ€” Main Fabric

  • 01
    One skein of plush yarn Yarnart Dolce or similar (100g/120m) in blue color
  • 02
    Small amount of plush yarn Yarnart Dolce or similar (100g/120m) in milk/cream color
  • 03
    Strong thin yarn in blue and milk colors for propeller and sewing (Yarnart Jeans 50g/160m recommended)

โ€” Tools Required

  • 01
    Crochet hook 4mm
  • 02
    Crochet hook 1.5mm
  • 03
    Blue or black felt for windows
  • 04
    Black sewing thread for windows
  • 05
    Hollofiber stuffing
  • 06
    Scissors
  • 07
    Needle
  • 08
    Stitch markers
  • 09
    Pins

Progress Tracker

0% Complete

โ€” Fuselage :

Round 1 :

9 sc in MR (9)

Round 2 :

(2 sc, 3 sc in 1 loop) * 3 (15)

Round 3 :

(4 sc, 3 sc in 1 loop) * 3 (21)

Round 4 :

21 sc for the back half of the loop (21)

Rounds 5-10 :

21 sc (21)

Round 11 :

7 sc, 6 inc, 8 sc (27)

Rounds 12-13 :

27 sc (27)

Round 14 :

11 sc, inc, 2 sc, inc, 2 sc, inc, 9 sc (30)

Rounds 15-16 :

30 sc (30)

Round 17 :

(4 sc, inc) * 6 (36)

Rounds 18-20 :

36 sc (36)

Round 21 :

(10 sc, dec) * 3 (33)

Round 22 :

33 sc (33)

Round 23 :

(9 sc, dec) * 3 (30)

Rounds 24-25 :

30 sc (30)

Info :

Fill the fuselage with filler and add it during crocheting

Round 26 :

(8 sc, dec) * 3 (27)

Rounds 27-28 :

27 sc (27)

Round 29 :

(7 sc, dec) * 3 (24)

Rounds 30-31 :

24 sc (24)

Round 32 :

(6 sc, dec) * 3 (21)

Rounds 33-34 :

21 sc (21)

Round 35 :

19 sc, dec (20)

Round 36 :

9 sc, dec, 9 sc (19)

Round 37 :

17 sc, dec (18)

Round 38 :

8 sc, dec, 8 sc (17)

Round 39 :

17 sc (17)

Round 40 :

15 sc, dec (16)

Round 41 :

16 sc (16)

Round 42 :

14 sc, dec (15)

Round 43 :

6 sc, dec, 7 sc (14)

Round 44 :

12 sc, dec (13)

Round 45 :

5 sc, dec, 6 sc (12)

Round 46 :

10 sc, dec (11)

Round 47 :

4 sc, dec, 5 sc (10)

Round 48 :

8 sc, dec (9)

Round 49 :

7 sc, dec (8)

Round 50 :

6 sc, dec (7)

Round 51 :

5 sc, dec (6) + sl st

Info :

Fasten the thread, cut and tighten the hole

โ€” Tail (Make 4 pieces) :

Foundation :

6 chains

Row 1 :

Starting from second loop from hook, 5 sc (5)

Rows 2-9 :

Turn, 1 chain, 5 sc (5)

Info :

Fasten thread on one part and cut. On second part, make one chain, do not cut thread. Fold two pieces flat and crochet on three sides using 1 sc in each stitch. In corners, crochet (1 sc + 1 hdc + 1 sc) in one loop

โ€” Wings (Make 4 pieces) :

Foundation :

8 chains

Row 1 :

Starting from second loop from hook, 7 sc (7)

Rows 2-14 :

Turn, 1 chain, 7 sc (7)

Info :

Connect two pieces using same method as tail

โ€” Engines (Make 2) :

Round 1 :

5 sc in MR (5)

Round 2 :

2 sc, inc, 2 sc (6)

Round 3 :

inc, 5 sc (7)

Round 4 :

3 sc, inc, 3 sc (8)

Round 5 :

7 sc, inc (9)

Round 6 :

4 sc, inc, 4 sc (10)

Rounds 7-10 :

10 sc (10)

Info :

Fill with stuffing during crocheting

Round 11 :

8 sc, dec (9)

Round 12 :

7 sc, dec (8)

Round 13 :

6 sc, dec (7)

Round 14 :

5 sc, dec (6)

Round 15 :

4 sc, dec (5)

Info :

Fasten with sl st and cut off. Hide thread end inside engine

โ€” Propeller Holder :

Round 1 :

5 sc in MR (5)

Round 2 :

4 sc, inc (6)

Round 3 :

5 sc, inc (7)

Round 4 :

6 sc, inc (8)

Round 5 :

(3 sc, inc) * 2 (10)

Round 6 :

(4 sc, inc) * 2 (12)

Round 7 :

(5 sc, inc) * 2 (14)

Info :

Fasten with sl st, leave long end for sewing and cut off

โ€” Propellers (Make 3) :

Info :

Leave 60cm thread, fold in half for double thickness. Make chain in middle of thread. Crochet 9 stitches using cord technique: loop on hook, yarn over from leaving thread, sc with working thread through two loops

Assembly Instructions

  • Find the center of the fuselage by locating the center between increments in row 11 and follow it down
  • Place wings between rows 14-22 at 9 sc distance from center (18 sc apart), pin and sew with strong thread
  • Attach engines to wing ends, pin and sew around perimeter with matching thread color
  • Position V-tail pieces 4-5 rows from fuselage edge at angle to form V-shape, secure and sew
  • Place propeller holder at center front of fuselage between rows 2-3, pin and sew around circumference
  • Position propeller blades correctly, pull thread ends into holder and tie in knots, hide excess threads
  • Place windows with equal spacing, starting with front window above row 11, then position side windows, sew or glue in place

Important Notes

  • ๐Ÿ’กUse stitch markers to keep track of rounds, especially during shaping sections
  • ๐Ÿ’กStuff the fuselage gradually during crocheting to maintain proper aircraft shape
  • ๐Ÿ’กWhen working with plush yarn, maintain consistent tension for even stitches
  • ๐Ÿ’กPin all components in place before sewing to ensure correct alignment and proportions
  • ๐Ÿ’กUse strong cotton thread for assembly to ensure durability during play
  • ๐Ÿ’กHide all thread tails securely inside the toy for safety and neat appearance

This delightful Beechcraft V-tail pattern captures the elegance of classic aviation in soft, huggable form! With its distinctive V-shaped tail design and realistic proportions, this airplane makes the perfect gift for aviation enthusiasts of all ages. The combination of detailed construction techniques and plush materials creates a toy that's both impressive to display and wonderful to cuddle. ๐Ÿ›ฉ๏ธ Ready for takeoff! โœˆ๏ธ๐Ÿงถ

You ask,

we answer.

FAQs

What makes this pattern intermediate level?

This pattern requires experience with shaping techniques, working in turning rows, joining multiple pieces, and precise assembly. The fuselage shaping involves strategic increases and decreases that need careful attention to maintain the aircraft proportions.

Can I use different yarn weights for this pattern?

The pattern is specifically designed for plush yarn like Yarnart Dolce. Using different weights will significantly change the finished size and may affect the structural integrity of the airplane.

How do I make sure my wings are positioned correctly?

Find the exact center of your fuselage at row 11, then measure 9 single crochet stitches on each side. The wings should be placed between rows 14-22 and be exactly 18 stitches apart from each other.

Is this pattern safe for young children?

Yes, when properly assembled with sewn (not glued) felt windows and all thread ends securely hidden. The soft plush construction makes it safe for cuddling, but always supervise very young children during play.

What if I can't find the exact yarn recommended?

Look for any plush or velvet yarn with similar weight (approximately 100g/120m). The key is using a soft, thick yarn that will give the airplane its characteristic fluffy, huggable texture.