🧢 Beautiful ✨ Detailed πŸ’ Adorable

Pocket Wall Hanging Crochet Pattern

Pocket Wall Hanging Crochet Pattern
4.9β˜… Rating
4-5 Hours Time Needed
3.3K Made This
βœ‚οΈ

Intermediate Level

Ideal for those with basic knitting experience, featuring slightly more advanced stitches and techniques to expand your skills.

⏱️

Weekend Treat

Takes 5-7 hours, making it an enjoyable project to finish over a couple of days.

🏑

Cozy Accent

A warm touch for your space that transforms ordinary corners into inviting nooks filled with handmade charm.

About This Pocket Wall Hanging Crochet Pattern

This gorgeous pocket wall hanging combines the beauty of textured diamond stitches with practical functionality. The intricate front post treble crochet creates stunning geometric patterns that catch the light beautifully. The attached pocket is perfect for holding small plants, mail, or decorative items. With its bohemian style and versatile neutral color, it's the perfect addition to modern, farmhouse, or boho-chic decor.

Pocket Wall Hanging Crochet Pattern crochet pattern - detailed view of completed project

Measuring 8" x 17" with tassels, this wall hanging makes a statement while remaining perfectly sized for any space. The detailed instructions include helpful video references and clear stitch explanations.

Why You'll Love This Pocket Wall Hanging Crochet Pattern

I absolutely love this pattern because it perfectly balances beauty with functionality - something I'm always searching for in home decor projects. The diamond stitch technique creates such gorgeous texture and depth that photographs beautifully and looks stunning in person. What really excites me is how this piece serves dual purposes: it's both artistic wall decor and practical storage. I find myself reaching for those little everyday items tucked in the pocket, and it keeps my space organized while looking intentional and stylish.

Pocket Wall Hanging Crochet Pattern step 1 - construction progress Pocket Wall Hanging Crochet Pattern step 2 - assembly progress Pocket Wall Hanging Crochet Pattern step 3 - details and accessories Pocket Wall Hanging Crochet Pattern step 4 - final assembly and finishing

Switch Things Up

I love experimenting with different color combinations for this wall hanging - imagine how stunning it would look in deep forest green with gold tassels, or soft blush pink with cream details. You could also try using a variegated yarn to create subtle color transitions throughout the diamond pattern. For a more modern look, I'd suggest using cotton rope or macrame cord instead of traditional yarn. Another fun variation is to create multiple smaller versions and hang them as a gallery wall grouping. You could even customize the pocket size based on what you plan to store - make it deeper for rolled magazines or shorter for business cards and small notes.

Common Mistakes & How to Fix Them

βœ— Forgetting to skip stitches after completing front post treble crochets - always skip one stitch before working single crochets βœ— Not maintaining proper tension when working diamond stitch pattern - keep consistent gauge throughout for even texture appearance βœ— Miscounting stitches during pocket increases - use stitch markers to track your progress during expansion rows βœ— Working turning chains too tightly - keep them loose enough to prevent curling and maintain proper row height

Pocket Wall Hanging Crochet Pattern

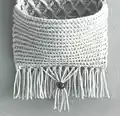
Transform your home with this beautiful boho-inspired pocket wall hanging that combines stunning diamond stitch texture with practical storage. This intermediate pattern features detailed front post treble crochet techniques to create an eye-catching geometric design topped with a functional pocket. Perfect for displaying small plants, holding mail, or adding bohemian charm to any room while keeping essentials within easy reach.

Intermediate 4-5 Hours

Materials Needed for Pocket Wall Hanging Crochet Pattern

β€” Main Fabric

  • 01
    225 yards of light grey yarn (size 4 weight)
  • 02
    Recommended: Craftsmart Value in Mushroom color or similar light worsted weight yarn

β€” Tools Required

  • 01
    5mm crochet hook
  • 02
    Yarn needle
  • 03
    Wooden dowel for hanging
  • 04
    Small brass or wooden bead
  • 05
    Scissors
  • 06
    Stitch markers (optional but helpful)

Progress Tracker

0% Complete

β€” Diamond Stitch Section :

Row 1 :

Ch 30. Starting in the 2nd ch from the hook, sc into the back bump of each ch (29)

Row 2 :

Dc into each st (29)

Row 3 :

Work a FPtr into the 2nd st from the right of row 1. [Skip a st and then sc into the next 3 sts of row 2. FPtr2tog by working into the same st as the last FPtr st worked, skip the next 3 sts of row 1, and then work into the 4th st] 6 times. When you have 5 sts left in the row, skip a st and then sc into the next 3 sts of row 2. FPtr into the same st as the last FPtr worked from row 1, but stop before completing the stitch (with 2 loops left on the hook). Work a sl st by inserting your hook into the last stitch of the row, pulling up a loop and then pulling that loop through both loops on the hook (29)

Row 4 :

Dc into each st (29)

Row 5 :

Sc 2. FPtr2tog by working around the first FPtr from row 3 and then around the following FPtr2tog (around the entire upside down "V"). [Skip a st and then sc into the next 3 sts of row 4. FPtr2tog by working around the last FPtr2tog from row 3 that you just worked around and then around the following FPtr2tog from row 3] 5 times. When there are 7 stitches left in the row, skip a st and then sc into the next 3 sts of row 4. FPtr2tog by working around the last FPtr2tog from row 3 that you just worked around and then around the final FPtr from row 3. Skip a st and then sc into the last 2 sts (29)

Row 6 :

Dc into each st (29)

Row 7 :

FPtr around the first FPtr2tog from row 5. [Skip a st and then sc into the next 3 sts of row 6. FPtr2tog by working around the last FPtr2tog you just worked around and then around the following FPtr2tog from row 5] 6 times. When you have 5 sts left in the row, skip a st and then sc into the next 3 sts of row 6. FPtr around the last FPtr2tog that you just worked around from row 5, but stop before completing the stitch (with 2 loops left on the hook). Work a sl st by inserting your hook into the last stitch, pulling up a loop and then pulling that loop through both loops on the hook (29)

Rows 8-39 :

Repeat the same sequence [rows 4-7] 8 times (29)

β€” Pocket Section :

Rows 40-42 :

Sc into the BLO of each st (29)

Row 43 :

[Sc 9, inc, sc 9, inc, sc 9] into the BLO of each st (31)

Row 44 :

Sc into the BLO of each st (31)

Row 45 :

[Sc 10, inc, sc 9, inc, sc 10] into the BLO of each st (33)

Row 46 :

Sc into the BLO of each st (33)

Row 47 :

[Sc 10, inc, sc 11, inc, sc 10] into the BLO of each st (35)

Row 48 :

Sc into the BLO of each st (35)

Row 49 :

[Sc 17, inc, sc 17] into the BLO of each st (36)

Row 50 :

Sc into the BLO of each st (36)

Row 51 :

[Sc 17, inc, sc 18] into the BLO of each st (37)

Rows 52-67 :

Sc into the BLO of each st (37)

Info :

Fasten off and weave in ends. Fold the pocket section up to overlap the diamond pattern. Using your yarn needle, create the pocket by sewing the two layers together along the edges.

β€” Tassels :

Preparation :

Cut 30 strands of 5.5 inch yarn, and 7 strands of 8.5 inch yarn

Basic Tassels :

Use 2 strands of the 5.5 inch yarn for each tassel. There will be 15 tassels placed on every other stitch, starting in one corner. To make a tassel, fold the 2 strands in half. Insert your hook up through the back of the stitch and pull up a loop of the strands. Pull the ends through the loop and tighten.

Long Center Tassels :

Make a tassel using one strand of the 8.5 inch yarn on top of each of the 7 center tassels you already created

Bead Detail :

Take one strand from each long tassel (or both if your bead is larger), and thread through the bead. Make a knot underneath the bead if you need to. Trim the remaining long strands not used in the bead to make them level with the shorter strands.

Final Assembly :

Attach the dowel to the top edge by threading the yarn around the dowel and through each stitch with a yarn needle. Weave in any loose ends.

Assembly Instructions

  • Fold the completed pocket section up to overlap with the diamond stitch pattern section
  • Using a yarn needle and matching yarn, sew the pocket to the main piece by stitching along both side edges
  • Create 15 basic tassels using 2 strands of 5.5 inch yarn each, placing them on every other stitch across the bottom edge
  • Add 7 longer tassels using 8.5 inch yarn strands on top of the center tassels for variation
  • Thread select strands through the decorative bead and secure with a knot underneath
  • Attach the wooden dowel by threading yarn around it and through each stitch along the top edge
  • Trim all tassel ends to create an even, finished appearance

Important Notes

  • πŸ’‘This pocket wall hanging is designed for lightweight items only - avoid heavy objects that could damage the structure
  • πŸ’‘For additional stability with slightly heavier items, use small tacks to secure the edges just below the pocket opening
  • πŸ’‘Maintain consistent tension throughout the diamond stitch pattern to ensure even texture and appearance
  • πŸ’‘Use stitch markers during the pocket increase rows to avoid miscounting stitches
  • πŸ’‘Secure hanging yarn to both ends of the wooden dowel to prevent corner pinching when displayed

This stunning Pocket Wall Hanging pattern brings together the best of form and function in one beautiful boho-inspired piece. The intricate diamond stitch creates gorgeous texture that plays with light and shadow, while the practical pocket keeps your essentials stylishly organized. Whether you're displaying air plants, storing mail, or simply adding handmade charm to your walls, this piece transforms any space into a cozy, intentional sanctuary. 🏑 Happy crocheting! 🧢✨

You ask,

we answer.

FAQs

Can I use a different yarn weight for this pattern?

While the pattern is designed for worsted weight yarn, you can substitute with a different weight, but you'll need to adjust your hook size accordingly and expect different finished dimensions.

How much weight can the pocket actually hold?

The pocket is designed for lightweight items like small plants, mail, or decorative objects. For anything heavier, use the suggested wall tacks for additional support.

Is the diamond stitch pattern difficult for an intermediate crocheter?

The diamond stitch uses front post treble crochet techniques which may be new to some intermediate crocheters, but the pattern includes detailed instructions and video references to help you master the technique.

Can I make the wall hanging larger or smaller?

Yes, you can adjust the size by changing your starting chain length and adjusting the number of diamond pattern repeats, but you'll need to recalculate yarn requirements.

What's the best way to hang this piece on the wall?

Thread hanging cord or yarn through both ends of the wooden dowel to prevent corner pinching, and use a sturdy wall hook or nail that can support the weight of the finished piece.