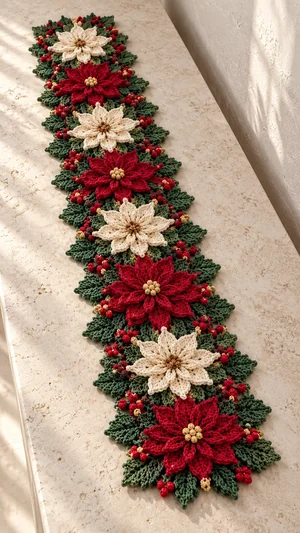
Create a festive crochet table runner with layered red and ivory poinsettias, deep green leaves, and little berry clusters that bring handmade detail to your holiday table. You will crochet the flowers, backing circles, leaves, and berries separately, then sew them into a flexible runner with alternating blooms. This original, photo-inspired design lets you build the decoration in manageable stages and adjust its length by changing the number of flower units.
Progress Tracker
0% Complete
— Before You Begin :
Design :
This is an original pattern inspired by the pictured floral runner. It uses eight joined backing circles, eight layered flowers, 48 leaves, 32 berry clusters, and eight golden centers.
Size :
No fixed finished dimensions are specified. Make one complete unit to assess its width, then join two backing circles to establish the spacing. Measure these against your table before making all eight units.
Construction Notes :
Work all backing and center rounds with the right side facing; do not turn. Beginning chains do not count as stitches. Joining slip stitches do not count as stitches. Work petals around the chain loops, rather than into individual chains.
Color Plan :
From one end of the runner to the other, arrange the flowers ivory, red, ivory, red, ivory, red, ivory, red. Each flower uses one large layer and one small layer in the same color.
— Green Backing Circles: Make 8 :
Round 1 :
With green, work 6 sc in an MR. Tighten the ring and join with a sl st to the first sc. (6 sc)
Round 2 :
Ch 1, inc in each st around. Join with a sl st to the first sc. (12 sc)
Round 3 :
Ch 1, (sc in next st, inc in next st) × 6. Join with a sl st to the first sc. (18 sc)
Round 4 :
Ch 1, (sc in next 2 sts, inc in next st) × 6. Join with a sl st to the first sc. (24 sc)
Finishing :
Fasten off, leaving a tail for sewing. Weave in the starting tail securely.
Marking :
Lay the circle right side up and number its final-round stitches 1-24 clockwise, with stitch 1 at the top. Mark stitches 1 and 13 to establish the lengthwise axis. These placement numbers are independent of where the round began.
— Large Flower Layers: Make 8 :
Info :
Make four in red and four in ivory. Each large layer has eight petals.
Round 1 :
Work 8 sc in an MR. Tighten the ring and join with a sl st to the first sc. (8 sc)
Round 2 :
Ch 1, (sc in next st, ch 7) × 8. Join with a sl st to the first sc. (8 sc and 8 ch-7 loops)
Round 3 :
Sl st into the first ch-7 loop. In each of the eight loops work: sc, hdc, 2 dc, 2 tr, ch 2, sl st in the second ch from the hook to form the point, 2 tr, 2 dc, hdc, sc. After each petal, sl st into the sc between that loop and the next loop. After the eighth petal, the final separating sl st is worked into the first sc of Round 2. (8 petals, each containing 12 main stitches and one pointed chain detail)
Finishing :
Fasten off, leaving a long tail for attaching the layer through its center. Weave in the starting tail.
— Small Flower Layers: Make 8 :
Info :
Make four in red and four in ivory, matching the large layers. Each small layer has eight petals.
Round 1 :
Work 8 sc in an MR. Tighten the ring and join with a sl st to the first sc. (8 sc)
Round 2 :
Ch 1, (sc in next st, ch 5) × 8. Join with a sl st to the first sc. (8 sc and 8 ch-5 loops)
Round 3 :
Sl st into the first ch-5 loop. In each of the eight loops work: sc, hdc, 2 dc, tr, ch 2, sl st in the second ch from the hook to form the point, tr, 2 dc, hdc, sc. After each petal, sl st into the sc between that loop and the next loop. After the eighth petal, the final separating sl st is worked into the first sc of Round 2. (8 petals, each containing 10 main stitches and one pointed chain detail)
Finishing :
Fasten off, leaving a long tail for attaching the layer through its center. Weave in the starting tail.
— Pointed Green Leaves: Make 48 :
Foundation :
With green, ch 10. Leave a starting tail long enough to secure the leaf base later.
Round 1 :
First side: starting in the second ch from the hook, work sc, hdc, dc, dc, tr, dc, dc, hdc across the next 8 chains. Tip: in the final chain work sc, sc, ch 2, sl st in the second ch from the hook, sc. Second side: rotate to work along the unused underside loops of the foundation and work hdc, dc, dc, tr, dc, dc, hdc, sc across the next 8 chain positions. Join with a sl st to the first sc. (19 main stitches and one pointed chain detail)
Finishing :
Fasten off, leaving a sewing tail. The end where the round begins and ends is the leaf base; the three-sc group and chain detail form the outer tip.
— Red Berry Clusters: Make 32 :
Bobble Method :
For a 5-dc bobble, repeat the following five times in the specified place: yo, insert hook, yo and draw up a loop, yo and draw through 2 loops. Six loops remain on the hook. Yo and draw through all 6 loops. The following ch 1 closes the bobble and is written separately in the round.
Round 1 :
With red, make an MR. Into the ring work (sc, ch 2, 5-dc bobble, ch 1 to close the bobble, ch 2) × 3. Join with a sl st to the first sc. (3 sc, 3 bobbles, 3 closing ch-1 stitches, and 6 ch-2 spaces)
Shaping :
Push all three bobbles toward the right side and tighten the MR gently until they form a compact cluster. Keep the spaces relaxed enough that the cluster does not fold in half.
Finishing :
Fasten off, leaving a sewing tail. Secure the MR tail through several stitches on the underside before trimming it.
— Golden Flower Centers: Make 8 :
Round 1 :
With gold, work 6 sc in an MR. Tighten the ring and join with a sl st to the first sc. (6 sc)
Round 2 :
Ch 1, inc in each st around. Join with a sl st to the first sc. (12 sc)
Finishing :
Fasten off, leaving a sewing tail. Weave in the starting tail. Leave the center unstuffed.
— Shape the Components :
Backing Circles :
Lightly dampen the backing circles according to the yarn care instructions. Pat them into flat circles without stretching the outer stitches. Allow them to dry fully.
Flower Layers :
Arrange each layer with eight evenly spaced petals. Lightly dampen and pin only as needed to relax curling, preserving a little natural lift at the petal tips. Allow the layers to dry fully.
Leaves :
Gently shape the leaves into pointed ovals. Do not stretch the foundation chain or flatten the chain point with an iron. Allow the leaves to dry fully before attaching them.
— Assemble the Runner :
Join the Backing :
Lay all eight backing circles right side up in a vertical line, with stitch 1 at the top of each circle. Butt the lower edge of one circle against the upper edge of the next. Whipstitch through both loops of these three stitch pairs: upper circle stitch 12 to lower circle stitch 2; upper circle stitch 13 to lower circle stitch 1; upper circle stitch 14 to lower circle stitch 24. Keep the seam relaxed. Repeat for all seven joins.
Attach the Leaves :
Place six leaves on each backing circle. Center their bases over outer-round stitches 4, 7, and 10 on the right side, and stitches 16, 19, and 22 on the left side. Point each tip outward, with the upper and lower leaves angled toward their nearest end of the runner. Overlap each base onto the backing by approximately the first two foundation-chain positions. Sew through the base and the next adjacent part of each side to prevent twisting.
Attach the Large Layers :
Arrange the large layers ivory, red, ivory, red, ivory, red, ivory, red. Center one over each backing circle and sew around its central two rounds, catching the backing beneath. Keep all eight petals free.
Attach the Small Layers :
Place a matching small layer on each large layer. Rotate it so its eight tips sit between the eight lower tips. Sew around the central two rounds through both flower layers and the backing, keeping the petal lengths free.
Attach the Centers :
Center one golden disc over each flower. Sew around its 12 outer stitches, catching the central flower fabric beneath. Use relaxed stitches so the center remains slightly raised without gathering the petals.
Attach the Berries :
Add four berry clusters to each unit: one between the upper and middle leaves on each side, and one between the middle and lower leaves on each side. Position each cluster over the backing edge or a leaf base, with the bobbles exposed beyond the flower petals. Sew through all three sc anchors of each cluster into the supporting fabric.
Secure the Ends :
Check every attachment from the underside. Weave each remaining tail through several stitches, reverse direction, and weave through several more before trimming. Remove every marker and pin.
— Final Finishing :
Lay Flat :
Place the runner on a flat surface and straighten its central line. If a join puckers, loosen and resew that seam rather than stretching the whole runner.
Arrange the Flowers :
Separate any trapped petal tips and gently spread the leaves. Let neighboring petals overlap naturally without sewing the tips together.
Final Shaping :
If needed, lightly dampen the completed runner according to the yarn care instructions, arrange it flat, and allow it to dry completely before placing it on furniture. Avoid pressing the raised berries and layered flowers flat.
Your poinsettia runner comes together most neatly when you treat the final arrangement as its own stage of the project. Lay out all eight flowers, check the alternating colors, and turn every leaf and berry cluster until the outline feels balanced. Sew with relaxed tension so the backing stays flat, then secure the remaining ends on the underside. A gentle final shaping will help the layered petals settle while keeping their festive texture.