๐Ÿงถ Beautiful โœจ Detailed ๐Ÿ’ Adorable

Rac the Raccoon Stretchy Amigurumi Pattern

Rac the Raccoon Stretchy Amigurumi Pattern
4.5โ˜… Rating
8-10 Hours Time Needed
2.1K Made This
โœ‚๏ธ

Intermediate Level

Ideal for those with basic knitting experience, featuring slightly more advanced stitches and techniques to expand your skills.

โฑ๏ธ

All-Day Adventure

Requires 8-10 hours, ideal for a full day of immersive knitting.

๐Ÿงธ

Cute Companion

An adorable friend to cherish, handcrafted with love to bring comfort and joy for years to come.

About This Rac the Raccoon Stretchy Amigurumi Pattern

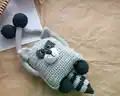
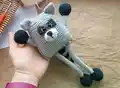
This unique raccoon pattern combines traditional amigurumi techniques with innovative construction to create stretchy limbs that provide endless entertainment. The body is worked in two pieces and assembled with integrated arm and leg attachments, creating a distinctive square-bodied design that's both sturdy and playful. The alternating grey and black color scheme perfectly captures the essence of a real raccoon while maintaining that adorable amigurumi charm.

Rac the Raccoon Stretchy Amigurumi Pattern crochet pattern - detailed view of completed project

Designed for ages 2 to 120, this pattern offers detailed assembly instructions with step-by-step photos to guide you through the more complex joining process. The finished toy measures 27cm from ears to feet, making it the perfect size for cuddles and play.

Why You'll Love This Rac the Raccoon Stretchy Amigurumi Pattern

I absolutely love how this pattern challenges traditional amigurumi construction while creating something truly special and interactive. The stretchy limbs add an element of surprise that delights both children and adults, and I find the assembly process incredibly satisfying as you watch all the pieces come together into this charming character. The attention to detail in the facial features and the clever use of color changes make this raccoon feel alive and full of personality.

Rac the Raccoon Stretchy Amigurumi Pattern step 1 - construction progress Rac the Raccoon Stretchy Amigurumi Pattern step 2 - assembly progress Rac the Raccoon Stretchy Amigurumi Pattern step 3 - details and accessories Rac the Raccoon Stretchy Amigurumi Pattern step 4 - final assembly and finishing

Switch Things Up

I love experimenting with different color combinations to create unique raccoon variations - try using brown and cream for a different woodland feel, or even fantasy colors like purple and silver for a magical twist. You could also modify the body shape by working it in the round instead of flat pieces for a more traditional amigurumi construction, though you'd need to adjust the assembly process accordingly.

For added sensory appeal, I sometimes incorporate different textures by using a fuzzy yarn for the tail stripes or adding small bells inside the stuffed end pieces (securely enclosed of course). The ear placement can be adjusted slightly forward or backward to change the raccoon's expression, and you could even add embroidered eyelashes or cheek details for extra personality.

Consider making a whole family by scaling the pattern up or down with different hook sizes, or create seasonal versions with tiny crocheted accessories like winter scarves or spring flower crowns. The stretchy mechanism also works beautifully if you want to adapt this technique for other long-limbed animals like monkeys or sloths.

Common Mistakes & How to Fix Them

โœ— Forgetting to stuff the limb ends tightly before continuing with the grey stretchy section โœ— Not maintaining consistent tension when switching between yarn colors during the tail construction โœ— Placing safety eyes incorrectly - they should go between rows 16-22 in the middle section โœ— Rushing the assembly process without proper pin placement for arm and leg positioning

Rac the Raccoon Stretchy Amigurumi Pattern

Create an adorable stretchy raccoon toy that will captivate children and adults alike with its unique extending limbs. This charming amigurumi pattern features innovative construction techniques that allow the arms and legs to stretch up and down, making it perfect for sensory play and fine motor skill development. The distinctive raccoon design includes classic grey and black striping, safety eyes, and detailed facial features that bring personality to this cuddly companion.

Intermediate 8-10 Hours

Materials Needed for Rac the Raccoon Stretchy Amigurumi Pattern

โ€” Main Fabric

  • 01
    YarnArt Jeans yarn in grey (shade 80), black (shade 28), and white (shade 62)
  • 02
    Alize Cotton Gold in dark grey (shade 87)
  • 03
    Cotton-acrylic blend yarns recommended for durability and washability

โ€” Tools Required

  • 01
    2mm crochet hook
  • 02
    3mm crochet hook
  • 03
    8mm safety eyes
  • 04
    Fiber filler stuffing
  • 05
    Scissors
  • 06
    Large eye needle for sewing
  • 07
    Stitch markers (if necessary)

Progress Tracker

0% Complete

โ€” Arms and Legs (make 2) :

Round 1 :

6 MR (6)

Round 2 :

INC *6 (12)

Round 3 :

(1 SC, INC)*6 (18)

Round 4 :

(2 SC, INC)*6 (24)

Round 5 :

(3 SC, INC)*6 (30)

Round 6-9 :

4 rnds straight: 30 SC

Round 10 :

(DEC, 3 SC)*6 (24)

Round 11 :

(DEC, 2 SC)*6 (18)

Round 12 :

(DEC, 1 SC)*6 (12)

Info :

Stuff tightly

Round 13 :

(DEC, 4 SC)*2 (10)

Info :

Switch to grey yarn. Don't stuff the grey piece

Round 14-65 :

52 rnds straight: 10 SC

Info :

Switch to black yarn

Round 66 :

(INC, 4 SC)*2 (12)

Round 67 :

(1 SC, INC)*6 (18)

Round 68 :

(2 SC, INC)*6 (24)

Round 69 :

(3 SC,INC)*6 (30)

Round 70-73 :

4 rnds straight: 30 SC

Round 74 :

(DEC, 3 SC)*6 (24)

Round 75 :

(DEC, 2 SC)*6 (18)

Round 76 :

(DEC, 1 SC)*6 (12)

Info :

Stuff the piece

Round 77 :

DEC*6 fasten off

โ€” Ears (make 2) :

Round 1 :

6 MR (6)

Round 2 :

(1 SC, INC)*3 (9)

Round 3 :

1 rnd straight: 9 SC (9)

Round 4 :

(2 SC, INC)*3 (12)

Round 5 :

(3 SC, INC)*3 (15)

Round 6 :

1 rnd straight: 15 SC

Round 7 :

(4 SC, INC)*3 (18)

Round 8 :

1 rnd straight: 18 SC

Info :

Fold in half and single crochet 9 through both edges. Leave a long yarn tail for sewing

โ€” Snout (nose) :

Round 1 :

6 MR (6)

Round 2 :

INC*6 (12)

Round 3 :

INC*12 (24)

Round 4-6 :

3 rnds straight: 24 SC

Info :

Leave a long yarn tail for sewing. Stuff the piece

โ€” Eyes (make 2) :

Row 1, 2 :

2 rows straight: 4 SC

Row 3 :

INC, 2 SC, INC (6)

Row 4-5 :

2 rows straight: 6 SC

Info :

Chain 4, work in turning rows. Make 1 turning CH at the end of each row. Leave a long yarn tail for sewing

โ€” Tail :

Round 1 :

6 MR (6) in black

Round 2 :

(1 SC, INC)*3 (9)

Round 3 :

1 rnd straight: 9 SC (9)

Round 4 :

INC*9 (18)

Round 5 :

1 rnd straight: 18 SC (18). Switch to grey

Round 6 :

(1 SC, INC)*9 (27)

Round 7-8 :

2 rnds straight: 27 SC . Switch to black

Round 9-11 :

3 rnds straight: 27 SC. Switch to grey

Round 12-14 :

3 rnds straight: 27 SC. Switch to black

Round 15 :

(1 SC, DEC)*9 (18)

Round 16-17 :

2 rnds straight: 18 SC. Switch to grey

Round 18-20 :

3 rnds straight: 18 SC. Switch to black

Round 21-23 :

3 rnds straight: 18 SC. Switch to grey

Round 24-25 :

2 rnds straight: 18 SC

Round 26 :

(1 SC, DEC)*6 (12). Switch to black

Round 27-29 :

3 rnds straight: 12 SC in black

Info :

Fold in half and single crochet 6 through both edges. Leave a long yarn tail for sewing

โ€” Body (make 2) :

Foundation :

Chain 25, and starting into the 2nd stitch from hook work 24 SC

Row 1-19 :

19 rows straight: 24 SC, make 1 turning CH at the end of each row

Row 20 :

1 SC, DEC, 18 SC, DEC, 1 SC (22)

Round 21 :

1 rnd straight: 22 SC

Round 22 :

1 SC, DEC, 16 SC, DEC, 1 SC (20)

Round 23-25 :

3 rnds straight: 20 SC

Info :

Fasten off and cut yarn

Assembly Instructions

  • Begin joining the body parts together from the right upper corner using 2mm hook, working 19 SC through both parts' stitches
  • Insert arm-leg pieces between rows 11 and 15 on the side edges, working around them carefully
  • Work 10 SC through both body parts, then 3 SC across front part only, insert arm-leg piece, continue with 11 SC across both parts
  • At bottom edge: 5 SC through both parts, 3 SC across front only, insert arm-leg piece, 6 SC across both parts, 3 SC front only, insert second arm-leg piece
  • Stuff the body firmly before completing the final seaming around the remaining edges
  • Sew ears on outer corners and attach safety eyes between rows 16-22 in the middle
  • Attach the striped tail on the back center and embroider nose details in black yarn

Important Notes

  • ๐Ÿ’กMaintain consistent tension when switching between yarn colors, especially during the tail construction
  • ๐Ÿ’กDon't stuff the grey stretchy middle sections of the arms and legs - only stuff the black end pieces
  • ๐Ÿ’กUse stitch markers to keep track of color changes and round counts during assembly
  • ๐Ÿ’กPin all body parts in place before sewing to ensure proper alignment and positioning
  • ๐Ÿ’กThe toy is designed for ages 2-120, but ensure all pieces are securely attached for younger children

This innovative Rac the Raccoon pattern brings together traditional amigurumi charm with modern interactive design, creating a toy that's both cuddly and entertaining. The stretchy limbs provide sensory engagement while the detailed construction teaches advanced assembly techniques that will enhance your crochet skills. With its distinctive square body and classic raccoon coloring, this pattern creates a truly unique companion that will be treasured for years. The comprehensive instructions and step-by-step photos make even the complex assembly process achievable and enjoyable for intermediate crocheters ready to take on an exciting challenge.

You ask,

we answer.

FAQs

Why don't the arms and legs stuff in the middle grey section?

The grey middle sections are left unstuffed intentionally to create the stretchy effect. Only the black end pieces should be stuffed tightly to maintain the toy's unique stretching ability.

Can I use different yarn weights for this pattern?

The pattern is specifically designed for the recommended yarn weights. Using different weights may affect the proportions and the stretchy mechanism of the limbs.

How do I ensure the safety eyes are secure for young children?

Make sure to install safety eyes with the washers pressed firmly in place. For children under 3, consider embroidering eyes instead for additional safety.

What's the best way to maintain the striped pattern in the tail?

Keep track of your color changes by marking them on paper, and maintain consistent tension throughout. The pattern alternates every 3 rounds between grey and black.

How long do the stretchy limbs typically last with regular play?

With proper construction and quality yarn, the stretchy limbs should maintain their function through regular play. The cotton-acrylic blend provides good durability and stretch recovery.