๐Ÿงถ Beautiful โœจ Detailed ๐Ÿ’ Adorable

Snuggle Bunny Amigurumi Pattern

Snuggle Bunny Amigurumi Pattern
4.8โ˜… Rating
4-6 Hours Time Needed
3.9K Made This
โœ‚๏ธ

Beginner Friendly Level

Perfect for those just starting their sewing journey, with clear instructions and simple techniques

โฑ๏ธ

Weekend Treat

Takes 5-7 hours, making it an enjoyable project to finish over a couple of days.

๐Ÿงธ

Cute Companion

An adorable friend to cherish, handcrafted with love to bring comfort and joy for years to come.

About This Snuggle Bunny Amigurumi Pattern

This delightful snuggle bunny pattern creates the perfect comfort toy for babies and young children. The design features an adorable bunny head with floppy ears and sweet embroidered features, complete with little arms that attach to a gorgeous granny square blanket. The combination of soft textures and gentle colors makes this an ideal first lovey. The blanket portion uses a classic granny square technique with beautiful color transitions that create visual interest while remaining soothing.

Snuggle Bunny Amigurumi Pattern crochet pattern - detailed view of completed project

Made with baby-safe yarn in champagne white and misty grey, this pattern is both beautiful and practical. The finished size of 30cm square makes it perfect for little hands to hold and snuggle.

Why You'll Love This Snuggle Bunny Amigurumi Pattern

I absolutely love how this pattern combines two classic crochet techniques - amigurumi and granny squares - into one absolutely precious project. There's something so satisfying about watching the bunny's personality emerge as you shape the head and embroider those sweet little features. The granny square blanket portion works up quickly and creates the most beautiful texture that babies love to touch and explore. What really makes my heart sing is knowing that this little lovey will become a treasured companion, providing comfort during nap times and bedtime snuggles for years to come.

Snuggle Bunny Amigurumi Pattern step 1 - construction progress Snuggle Bunny Amigurumi Pattern step 2 - assembly progress Snuggle Bunny Amigurumi Pattern step 3 - details and accessories Snuggle Bunny Amigurumi Pattern step 4 - final assembly and finishing

Switch Things Up

I love how versatile this pattern can be with just a few simple modifications. You could easily swap out the bunny for other adorable animals - imagine a sleepy bear with round ears or a sweet lamb with curly textured yarn for the head. The granny square blanket portion is perfect for experimenting with color combinations too.

For a more modern look, try using contemporary color palettes like sage green and cream, or dusty pink and grey. You could even create seasonal versions - think autumn oranges and browns, or spring pastels in yellow and lavender.

I also love adding personal touches like embroidering the baby's name on one corner of the blanket, or using variegated yarn to create subtle color changes throughout the granny square portion. For extra texture, consider working some rounds in different stitches like shell stitch or popcorn stitch.

Common Mistakes & How to Fix Them

โœ— Forgetting to stuff the head firmly enough which can cause it to lose its shape over time โœ— Not securing the embroidered features tightly enough creating a safety hazard for babies โœ— Making the blanket portion too tight which reduces the soft drape and cuddliness โœ— Skipping the tension gauge which can result in a finished size different from pattern specifications

Snuggle Bunny Amigurumi Pattern

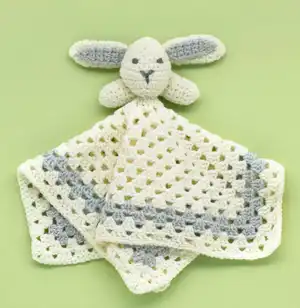
Create the most adorable snuggle companion with this charming bunny lovey pattern. Perfect for babies and toddlers, this sweet design combines a soft crocheted bunny head with arms attached to a beautiful granny square-style blanket. The gentle color combination of champagne white and misty grey creates a timeless, elegant look that works perfectly for any nursery. This lovey provides comfort and security while being machine washable for easy care.

Beginner Friendly 4-6 Hours

Materials Needed for Snuggle Bunny Amigurumi Pattern

โ€” Main Fabric

  • 01
    Paintbox Yarns Baby DK in Champagne White (50g ball)
  • 02
    Paintbox Yarns Baby DK in Misty Grey (50g ball)
  • 03
    Small amount of Paintbox Yarns Baby DK in Slate Grey for embroidery

โ€” Tools Required

  • 01
    3mm (UK 11 โ€“ US C2/D3) crochet hook
  • 02
    4mm (UK 8 โ€“ US G6) crochet hook
  • 03
    Washable toy filling
  • 04
    Yarn needle for sewing
  • 05
    Scissors
  • 06
    Stitch markers

Progress Tracker

0% Complete

โ€” Main Section :

Foundation :

Make 4 ch using 4mm hook and A, join with ss to form ring

Round 1 :

3 ch (counts as first st), 2 tr into ring, (2 ch, 3 tr into ring) 3 times, 1 ch, 1 dc into top of 3 ch at beg

Round 2 :

3 ch (counts as first st), 2 tr into ch sp partly formed by dc at end of previous round, *1 ch, miss 3 tr, (3 tr, 2 ch and 3 tr) into next ch sp, rep from * twice more, 1 ch, 3 tr into same ch sp as used at beg, 1 ch, 1 dc into top of 3 ch at beg

Rounds 3-11 :

Continue granny square pattern increasing by one group of 3 tr on each side per round

Info :

Break off A and join in B at end of round 11

Rounds 12-13 :

Continue pattern using B

Info :

Break off B and join in A at end of round 13

Rounds 14-15 :

Continue pattern using A, ending round 15 with 2 ch, ss to top of 3 ch at beg

Round 16 :

1 ch, 1 dc into st at base of 1 ch, 1 dc into each of next 2 tr, *(1 dc into next ch sp, 1 dc into each of next 3 tr) 14 times, 3 dc into next ch sp**, 1 dc into each of next 3 tr, rep from * to end, ending last rep at **, ss to first dc. Fasten off.

โ€” Head :

Foundation :

Make 2 ch using 3mm hook and A

Round 1 :

6 dc into 2nd ch from hook, ss to first dc, turn (6 sts)

Round 2 :

1 ch, 2 dc into st at base of 1 ch, 2 dc into each of next 5 dc, ss to first dc, turn (12 sts)

Rounds 3-10 :

Continue increasing and shaping head following pattern instructions

Rounds 11-16 :

Begin decreasing to close head, stuff firmly during decreasing rounds

Info :

Fasten off leaving long end for sewing

โ€” Ears (Make 2) :

Foundation :

Make 2 ch using 3mm hook and A

Round 1 :

4 dc into 2nd ch from hook, ss to first dc, turn (4 sts)

Rounds 2-16 :

Shape ear following pattern instructions, creating oval ear shape

โ€” Ear Patches (Make 2) :

Foundation :

Make 2 ch using 3mm hook and B

Rows 1-12 :

Create small oval patches for inside of ears using B

โ€” Arms (Make 2) :

Foundation :

Make 2 ch using 3mm hook and A

Round 1 :

6 dc into 2nd ch from hook, ss to first dc, turn (6 sts)

Round 2 :

1 ch, 2 dc into st at base of 1 ch, 2 dc into each of next 5 dc, ss to first dc, turn (12 sts)

Rounds 3-9 :

Work even in dc for arm length

Assembly Instructions

  • Insert toy filling into head until firmly filled but still soft, with beginning and end of rounds at center back
  • Sew ear patches centrally on one side of each ear with foundation chain edge level with final round
  • Attach ears to head so they flop forward with patches towards front of head
  • Embroider satin stitch eyes and straight stitch Y-shape nose using slate grey yarn
  • Fill arms firmly but keep them soft, then fold flat at top and sew to neck edge of head
  • Sew completed bunny head and arms to center of main section blanket

Important Notes

  • ๐Ÿ’กEnsure all stitching is very secure to avoid baby pulling sections apart
  • ๐Ÿ’กUse washable toy filling suitable for baby items
  • ๐Ÿ’กCheck tension carefully as incorrect gauge will affect finished size
  • ๐Ÿ’กPress main section only very carefully to maintain texture
  • ๐Ÿ’กAll embroidered features must be securely fastened for baby safety

This precious snuggle bunny pattern creates the perfect first lovey for any little one. Combining the comfort of a soft granny square blanket with an adorable bunny friend, this design will quickly become a treasured companion. The gentle color palette and classic techniques make this a timeless piece that can be passed down through generations. ๐Ÿงถ Happy crocheting! ๐Ÿฐโœจ

You ask,

we answer.

FAQs

Can I use different colors for this pattern?

Yes, you can substitute any baby-safe DK weight yarn. Just maintain the same color contrast between light and darker shades for the best visual effect.

Is this pattern safe for newborns?

Yes, when made with the recommended materials and with all parts securely attached. Always supervise babies during use and regularly check that all embroidered features are secure.

Can I make this larger or smaller?

You can adjust size by adding or removing rounds on the blanket portion, but you'll need to adjust yarn quantities accordingly.

How do I wash the finished lovey?

Machine wash on gentle cycle with baby-safe detergent and air dry flat to maintain shape.