🧢 Beautiful ✨ Detailed πŸ’ Adorable

Spider Coaster Crochet Pattern

Spider Coaster Crochet Pattern
4.5β˜… Rating
2-3 Hours Time Needed
1.3K Made This
βœ‚οΈ

Beginner Friendly Level

Perfect for those just starting their sewing journey, with clear instructions and simple techniques

⏱️

Bite-Sized Project

Complete in under 2 hoursβ€”quick, fun, and perfect for a little creative escape.

🏑

Cozy Accent

A warm touch for your space that transforms ordinary corners into inviting nooks filled with handmade charm.

About This Spider Coaster Crochet Pattern

This delightful spider coaster combines functionality with Halloween flair, perfect for protecting your surfaces while adding a touch of spooky charm to your home. Made with durable raffia yarn, this coaster is both practical and adorable with its eight perfectly positioned legs and sweet white eyes. The pattern includes detailed photo instructions and a helpful video tutorial to guide you through each step of the process.

Spider Coaster Crochet Pattern crochet pattern - detailed view of completed project

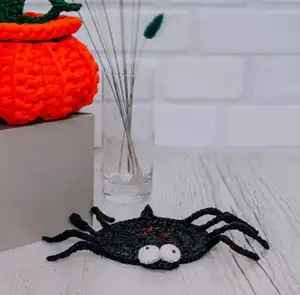
The finished spider measures 4.5 inches in diameter with 9-inch legs, making it substantial enough for everyday use. The raffia yarn creates a sturdy, heat-resistant surface that's perfect for hot beverages.

Why You'll Love This Spider Coaster Crochet Pattern

I absolutely love how this pattern transforms a simple coaster into a conversation starter! The combination of practicality and whimsy makes it perfect for Halloween entertaining or adding Gothic charm to your everyday decor. The raffia yarn gives it wonderful texture and durability, while the step-by-step photos make it incredibly easy to follow along.

Spider Coaster Crochet Pattern step 1 - construction progress Spider Coaster Crochet Pattern step 2 - assembly progress Spider Coaster Crochet Pattern step 3 - details and accessories Spider Coaster Crochet Pattern step 4 - final assembly and finishing

Switch Things Up

I love experimenting with different color combinations for this spider coaster pattern! While the traditional black creates that classic spooky vibe, I've had amazing results using deep purple raffia for a more mystical look, or even metallic gold for an elegant Halloween decoration. You could also try making a family of spiders in different sizes by adjusting your hook size.

For a more whimsical approach, consider using bright colors like hot pink or electric blue to create a friendly cartoon-style spider that kids would love. I've also found that adding small rhinestones or glitter to the eyes instead of beads creates a magical sparkly effect.

If you want to make it extra special for Halloween, try embroidering a small spider web design in the center of the body using metallic thread, or add tiny orange pumpkin-shaped beads around the edges. The possibilities are endless, and each variation brings its own unique charm to this versatile pattern!

Common Mistakes & How to Fix Them

βœ— Not straightening raffia yarn before starting - always prepare your raffia properly for best results βœ— Pulling working thread too tight when crocheting with raffia - keep tension even for smooth fabric βœ— Skipping stitch markers when placing legs - accurate placement is crucial for symmetrical spider appearance βœ— Forgetting to stuff eyes firmly enough - proper stuffing creates the perfect rounded eye shape

Spider Coaster Crochet Pattern

Create an adorable yet spooky spider coaster perfect for Halloween decorations or year-round Gothic charm. This beginner-friendly pattern uses raffia yarn to create a sturdy, functional coaster with eight detailed legs and charming white eyes. The finished piece measures 4.5 inches in diameter with 9-inch legs, making it both practical and eye-catching for your home decor.

Beginner Friendly 2-3 Hours

Materials Needed for Spider Coaster Crochet Pattern

β€” Main Fabric

  • 01
    Raffia yarn (Fibranatura recommended) in black or brown colors, 1/3 of skein
  • 02
    White or ivory yarn 160m/50gr, 1.76 Oz/174yds (Yarn Art Jeans recommended)
  • 03
    Red yarn 280m/50gr, 1.76 Oz/305yds for embroidery details

β€” Tools Required

  • 01
    Crochet hook N2 (2mm)
  • 02
    Crochet hook N3 (3mm)
  • 03
    Soft stuffing
  • 04
    2 black beads (diameter 1.5-2mm)
  • 05
    9 stitch markers
  • 06
    Black sewing thread
  • 07
    Scissors
  • 08
    Sewing needle
  • 09
    Thick needle
  • 10
    Iron and damp cloth

Progress Tracker

0% Complete

β€” Crochet Base (Circle) :

Step 1 :

Crochet 3 CH

Round 1 :

Crochet 15 DC in the 3rd loop from the hook, SlSt. Crochet ECS like on the video or 3 CH

Info :

Cut and hide the end of the thread

Round 2 :

(1 Inc)*15= 30, SlSt, ECS

Round 3 :

(1 DC, 1 Inc)*15 = 45, SlSt, ECS

Round 4 :

(2 DC, 1 Inc)*15 = 60, SlSt. The thread don't cut

Info :

Diameter of the circle is 4Β½ inches (11cm). Steam the circle with an iron. Then, shape with hands. The raffia yarn easily takes shape

β€” Crochet the Base Trim :

Setup :

Place markers in 8th, 12th, 16th, 20th, 30th, 40th, 44th, 48th, 52nd loops

Trim Instructions :

8 SlSt, 12 CH, crochet 6 SC from the 2nd loop, 3 SC in 1, 4 SC, SlSt in 8th loop, 3 SlSt, 12 CH, crochet 6 SC from the 2nd loop, 3 SC in 1, 4 SC, SlSt in 12th loop, 3 SlSt, 12 CH, crochet 6 SC from the 2nd loop, 3 SC in 1, 4 SC, SlSt in 16th loop, 3 SlSt, 12 CH, crochet 6 SC from the 2nd loop, 3 SC in 1, 4 SC, SlSt in 20th loop, 7 SlSt, skip 2 loops, crochet 8 DC in 30th loop, skip 2 loops, 8 SlSt, 12 CH, crochet 6 SC from the 2nd loop, 3 SC in 1, 4 SC, SlSt in 40th loop, 3 SlSt, 12 CH, crochet 6 SC from the 2nd loop, 3 SC in 1, 4 SC, SlSt in 44th loop, 3 SlSt, 12 CH, crochet 6 SC from the 2nd loop, 3 SC in 1, 4 SC, SlSt in 48th loop, 3 SlSt, 12 CH, crochet 6 SC from the 2nd loop, 3 SC in 1, 4 SC, SlSt in 52nd loop, 7 SlSt, 3 DC together

Info :

Cut and hide the end of the thread. Fold the legs to one side. Can be steamed with an iron

β€” Eye (Make 2) :

Setup :

Crochet 2 CH

Round 1 :

Crochet 6 SC in the 2nd loop from the hook

Round 2 :

(1 Inc)*6 (12). Pull the thread on the front side and hide the end

Round 3 :

12 SC

Round 4 :

12 SC

Info :

Fill the eye with stuffing

Round 5 :

(1 Dec)*6 (6)

Info :

Pull the hole. Cut and hide the end of the thread

β€” Assembly :

Step 1 :

Sew eyes together with beads

Step 2 :

Embroider a few stitches with the red thread, on the 2nd and 3rd rows

Step 3 :

Tie the knot from the wrong side. Cut and hide the ends of the thread

Assembly Instructions

  • Position the two completed eyes on the spider body where desired for the face
  • Sew each eye securely to the body using the black sewing thread and beads for pupils
  • Using red yarn, embroider decorative stitches on the 2nd and 3rd rows of the spider body
  • Tie off all knots on the wrong side and carefully hide all thread ends
  • Steam the completed spider with iron to shape the legs and body if needed

Important Notes

  • πŸ’‘Always straighten raffia yarn before starting to crochet for best results and even stitches
  • πŸ’‘When working with raffia, pull the working thread to hook level to avoid holes in fabric
  • πŸ’‘Use stitch markers carefully to ensure accurate leg placement for a symmetrical spider
  • πŸ’‘Steam and shape the spider with iron and hands while the raffia is still warm for best results
  • πŸ’‘Stuff eyes firmly but not too tightly to maintain the proper rounded shape
  • πŸ’‘The gauge is important: 18 stitches and 20 rows = 4x4 inches for correct sizing

This charming spider coaster brings Halloween magic to your home while serving as a practical and durable drink coaster. The combination of sturdy raffia yarn and adorable design details makes it perfect for seasonal decorating or year-round Gothic charm. With clear photo instructions and a helpful video tutorial, this pattern is ideal for beginners looking to create something both functional and fun. πŸ•·οΈ Happy crocheting! 🧢✨

You ask,

we answer.

FAQs

What type of raffia yarn works best for this pattern?

Fibranatura raffia yarn is recommended, but any quality raffia yarn in black or brown will work. Make sure to straighten the yarn before starting to crochet.

Can I make this spider larger or smaller?

Yes! Use a larger hook and thicker yarn for a bigger spider, or smaller hook and finer yarn for a mini version. Just maintain the same gauge proportions.

How do I prevent holes when crocheting with raffia?

Pull the working thread to the level of the hook when crocheting single crochet stitches. This technique is shown in the accompanying video tutorial.

Is this pattern suitable for complete beginners?

Absolutely! This beginner-friendly pattern includes detailed photos and a 40-minute video tutorial to guide you through each step.

Can I use different colors for the spider?

Yes! While black or brown are traditional spider colors, you can use any color you prefer. Purple, dark green, or even bright colors would create a fun variation.