🧢 Beautiful ✨ Detailed πŸ’ Adorable

Succulent Turtle Amigurumi Pattern

Succulent Turtle Amigurumi Pattern
4.4β˜… Rating
3-4 Hours Time Needed
3.8K Made This
βœ‚οΈ

Intermediate Level

Ideal for those with basic knitting experience, featuring slightly more advanced stitches and techniques to expand your skills.

⏱️

Bite-Sized Project

Complete in under 2 hoursβ€”quick, fun, and perfect for a little creative escape.

🐾

Pocket Pal

A mini friend to carry anywhere, providing comfort and companionship in a perfectly portable size.

About This Succulent Turtle Amigurumi Pattern

This Succulent Turtle pattern brings together the best of both worlds with an innovative design that features a dimensional succulent shell made from carefully crafted leaves. The pattern uses super bulky chenille yarn which creates a wonderfully soft and cuddly texture that's perfect for home decor or gifting. You'll work through interesting techniques including back loop only stitching to create the raised succulent details, and learn how to attach legs directly into rounds for a seamless finish.

Succulent Turtle Amigurumi Pattern crochet pattern - detailed view of completed project

The finished turtle measures approximately 7 inches long by 9 inches wide and stands 4.5 inches tall, making it a substantial decorative piece. The combination of terracotta, sand, and agave colors creates an authentic succulent garden aesthetic that brings natural beauty into any space.

Why You'll Love This Succulent Turtle Amigurumi Pattern

I absolutely love this pattern because it transforms simple crochet techniques into something truly special and unique. The succulent shell detail is what really makes this project shine, and watching those dimensional leaves come to life as you work in the front loops is incredibly satisfying. I find the use of chunky chenille yarn makes the stitching go quickly while creating that irresistibly soft, huggable texture that everyone loves to touch. The color combination of earthy greens and warm terracotta brings such a calming, natural vibe to any room. What I appreciate most is how the pattern cleverly attaches the legs and tail directly into the body rounds, which saves time on assembly and creates a sturdy, well-constructed toy that will last for years to come.

Succulent Turtle Amigurumi Pattern step 1 - construction progress Succulent Turtle Amigurumi Pattern step 2 - assembly progress Succulent Turtle Amigurumi Pattern step 3 - details and accessories Succulent Turtle Amigurumi Pattern step 4 - final assembly and finishing

Switch Things Up

I love how versatile this succulent turtle pattern is for customization! You can easily switch up the colors to create different succulent varieties - try using purple and pink tones for an echeveria-inspired look, or deep burgundy for a dramatic effect. If you want to make your turtle more playful, consider adding small embroidered details like a smile or rosy cheeks with pink yarn.

For a larger version, simply use an even chunkier yarn weight with a bigger hook, or double-strand your worsted weight yarn for a super plush finish. I've experimented with adding small wire armatures inside the legs before attaching them, which allows you to pose your turtle in different positions - just be mindful if gifting to children.

Another fun variation I enjoy is creating seasonal versions by changing the shell color scheme. Imagine autumn colors with burnt orange, deep red, and golden yellow for fall, or icy blues and whites for a winter wonderland turtle. You could even add tiny crochet flowers or butterflies nestled in the succulent leaves for extra whimsy.

If you want to make this turtle more interactive for children, consider adding a small pocket or pouch under the shell where little treasures can be hidden. I've also seen crafters turn this into a pincushion by using a firmer stuffing and adding a felt base, making it both decorative and functional for your craft room.

Common Mistakes & How to Fix Them

βœ— Losing track of rounds when working with fluffy chenille yarn - use multiple stitch markers to mark the beginning of each round and your front loops βœ— Pulling the succulent leaves too tight which flattens them - leave them slightly loose so they maintain their dimensional, petal-like appearance and natural flow βœ— Forgetting to stuff the body before closing - stuff firmly at round 13 before continuing with decreases to ensure proper shaping and structure βœ— Attaching legs with incorrect curve orientation - double-check photos to ensure front leg curves face right on first side and left on second side

Succulent Turtle Amigurumi Pattern

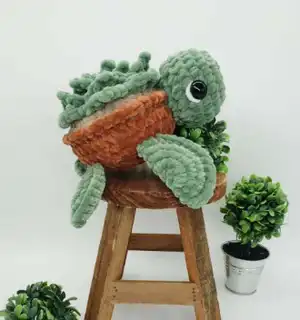
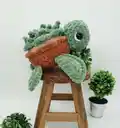
Create this absolutely adorable succulent turtle that combines the charm of nature with playful crochet design. This delightful pattern features a turtle with a beautiful succulent shell made from textured leaves, bringing together two beloved elements into one unique amigurumi. Working with super bulky chenille yarn, you'll craft a cuddly companion that's approximately 7 inches long and 9 inches wide, perfect for home decor or as a thoughtful handmade gift. The pattern includes detailed instructions for creating the distinctive succulent top, complete with dimensional leaves that give your turtle personality and style.

Intermediate 3-4 Hours

Materials Needed for Succulent Turtle Amigurumi Pattern

β€” Main Fabric

  • 01
    Size 6 Super Bulky Yarn in Agave (green), Terracotta (orange-brown), and Sand (beige) colors
  • 02
    Chenille Home Slim yarn recommended in Terracotta, Sand, and Agave shades

β€” Tools Required

  • 01
    Crochet hook size 6mm
  • 02
    Safety eyes 18mm
  • 03
    Tapestry needle
  • 04
    Scissors
  • 05
    Poly-Fil stuffing
  • 06
    Stitch markers

Progress Tracker

0% Complete

β€” Front Legs :

Info :

Using Agave, Make 2

Round 1 :

8 SC in MR (8)

Round 2 :

Inc (16)

Round 3 :

SC, Inc (24)

Round 4 :

3 SC, Inc (30)

Info :

Fold your circle in half to make a half circle. Working around the half circle and through both sides, SC through both stitches (about 15 SC). Continue until you reach the end of the half circle. FO, there is no need to leave a tail for sewing, you will SC the legs into a round of the body.

β€” Back Legs :

Info :

Using Agave, Make 2

Round 1 :

8 SC in MR (8)

Round 2 :

Inc (16)

Round 3 :

SC, Inc (24)

Info :

Fold your circle in half to make a half circle. Working around the half circle and through both sides, SC through both stitches (about 12 SC). Continue until you reach the end of the half circle. FO, there is no need to leave a tail for sewing, you will SC the legs into a round of the body.

β€” Tail :

Info :

Using Agave

Round 1 :

6 SC in MR (6)

Round 2-3 :

SC (6)

Info :

FO, there is no need to leave a tail for sewing, you will SC the tail piece into a round of the body.

β€” Head :

Info :

Using Agave

Round 1 :

8 SC in MR (8)

Round 2 :

Inc (16)

Round 3 :

SC, Inc (24)

Round 4-6 :

SC (24)

Round 7 :

SC, Dec (16)

Round 8 :

2 SC, Dec (12)

Info :

FO, leave a long tail for sewing (about 8-9 inches). Add eyes and stuff the head. Eyes should be placed at around rounds 5-6 and about 8 stitches apart across the front of the face.

β€” Shell/Body :

Info :

Using Agave. Part of the top of the shell is worked in the BLO (back loops only) of the previous round. The succulent is formed in the front unworked loops once the top of the shell is completed.

Round 1 :

8 SC in MR (8)

Round 2 :

Working in BLO: Inc (16)

Info :

Highly suggest stitch markers to mark your front loops, at least one in the front loop of the first stitch of each round.

Round 3 :

Working in BLO: SC, Inc (24)

Round 4 :

Working in BLO: 3 SC, Inc (30)

Info :

Color change to Sand

Round 5 :

Working in BLO: 4 SC, Inc (36)

Round 6 :

SC (36)

Info :

Drop your working yarn, the rest of the body will be finished after completing the succulent top.
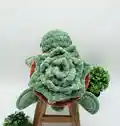
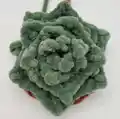
β€” Succulent Top :

Info :

To make the succulent, you will be working in a continuous spiral on top of the shell in the unworked front loops of each round. Grab your Agave yarn and attach it with a SS in the very first unworked front loop of round 2.

Pattern Repeat :

Working into the remaining front loops, place each stitch into individual stitches: [HDC, DC, CH2 SS into 2nd CH from the hook, DC, HDC, SS, HDC, TC, CH2 SS into 2nd CH from the hook, TC, HDC, SS] x 8

Info :

You should have 16 leaves at the end. If you missed or skipped some stitches that is ok as long as you are happy with how your succulent looks. Feel free to pull on the leaves and move them how you like them to look. FO, weave in the ends.

β€” Continuing Shell/Body :

Info :

Picking up where you left off in round 6. Color change to Terracotta

Round 7 :

Working in FLO of round 6: SC (36)

Info :

It will help for the next round to place a stitch marker in the first back loop of round 6

Round 8 :

Working in BLO of round 6, that were left behind from round 7: SC (36)

Round 9-10 :

SC (36)

Round 11 :

Grab your legs and tail, this is the round you will SC your pieces into. You place your pieces in front of the stitches of the body, pushing your hook through the leg/tail first then through the body stitch. 4 SC, Grab the first front (big) leg attach using 3 SC (curve of the leg should be on your right), 5 SC, Grab the first back (small) leg attach using 2 SC (curve of the leg should be on your right), 3 SC, Grab your tail and attach using 3 SC, 3 SC, Grab the second back (small) leg attach using 2 SC (curve of the leg should be on your left), 5 SC, Grab the second front (big) leg attach using 3 SC (curve of the leg should be on your left), 3 SC (36)

Round 12 :

Working in BLO: 4 SC, Dec (30)

Round 13 :

3 SC, Dec (24)

Info :

Stuff the body to your desired firmness

Round 14 :

SC, Dec (16)

Round 15 :

Dec (8)

Info :

SS, cut yarn leaving a short tail to sew the hole closed. Weave the yarn tail back and forth into the stitches around then pull tight to close. Tie to secure and weave the rest of the yarn tail into the body.

Assembly Instructions

  • Sew the head onto the body, positioning it mostly over the bottom part of the body around rounds 6-10 using the long tail left from the head
  • For eye detail, use white yarn to embroider a curved line on each safety eye by inserting needle at middle bottom and bringing it up to top middle
  • Ensure all legs are securely attached with correct curve orientation - front legs should have curves facing outward on each side
  • Check that the tail is centered at the back and all appendages are firmly attached before final use
  • Weave in all remaining yarn ends securely throughout the body and succulent top
  • Gently shape and arrange the succulent leaves on top of the shell to create a natural, dimensional appearance

Important Notes

  • πŸ’‘Use stitch markers generously when working with fluffy chenille yarn as stitches can be difficult to see and identify
  • πŸ’‘Mark your front loops in rounds 2-5 of the shell before creating the succulent to make it easier to find them later
  • πŸ’‘The succulent top is worked in a continuous spiral without joining, creating 16 dimensional leaves in the unworked front loops
  • πŸ’‘Stuff the body firmly but not too tightly at round 13 before continuing with final decreases for best shape
  • πŸ’‘Take care to attach legs and tail in the correct positions with proper curve orientations as shown in the pattern photos
  • πŸ’‘The finished size may vary slightly depending on yarn thickness, hook size, and personal tension

This charming Succulent Turtle pattern was designed to bring the beauty of nature into your crochet projects with an innovative twist on traditional amigurumi. The combination of a cuddly turtle with a dimensional succulent shell creates a unique decorative piece that works beautifully as home decor or a thoughtful handmade gift. Using soft chenille yarn in earthy tones, you'll create a huggable companion that measures about 7 inches long and brings natural elegance to any space. The pattern cleverly uses back loop only techniques to create raised details and attaches all appendages seamlessly for a polished, professional finish. 🧢 Happy crocheting! 🌱✨

You ask,

we answer.

FAQs

Can I use regular worsted weight yarn instead of super bulky chenille yarn?

Yes, you can use worsted weight yarn with a smaller hook (3.5-4mm), but your finished turtle will be much smaller, approximately 4-5 inches long instead of 7 inches. Adjust your safety eye size to 12mm or smaller accordingly.

How do I prevent losing track of my rounds when working with fluffy chenille yarn?

Use multiple stitch markers to mark the beginning of each round and especially mark your front loops in rounds 2-5 before creating the succulent. The fluffy texture makes stitches harder to see, so markers are essential for this pattern.

Can I make the succulent leaves in a different color than the body?

Absolutely! You can use any color combination you prefer. Try using variegated green yarn for the succulent to create a more realistic multi-toned effect, or use contrasting colors for a more whimsical look.

What if my succulent leaves are flat instead of dimensional?

Make sure you're not pulling too tightly on the chain stitches and tall stitches that form the leaves. Leave them slightly loose so they maintain their petal-like shape. You can also gently pull and arrange them after finishing.

Do I need to stuff the legs and tail?

No, the legs and tail should not be stuffed. They are folded flat and attached directly into the body rounds, which gives them structure while keeping them lightweight and properly positioned.

How do I attach the legs with the correct orientation?

Pay close attention to the pattern photos. For the first side legs, the curve should face your right as you attach them. For the second side legs, the curve should face your left. This creates the natural leg positioning for the turtle.