🧢 Beautiful ✨ Detailed πŸ’ Adorable

Tuk Tuk Armadillo Amigurumi Pattern

Tuk Tuk Armadillo Amigurumi Pattern
4.5β˜… Rating
8-10 Hours Time Needed
3.1K Made This
βœ‚οΈ

Intermediate Level

Ideal for those with basic knitting experience, featuring slightly more advanced stitches and techniques to expand your skills.

⏱️

All-Day Adventure

Requires 8-10 hours, ideal for a full day of immersive knitting.

🧸

Cute Companion

An adorable friend to cherish, handcrafted with love to bring comfort and joy for years to come.

About This Tuk Tuk Armadillo Amigurumi Pattern

This Tuk Tuk armadillo pattern brings Disney magic to your crochet hook! Named after the famous Thai three-wheeled carts, this little companion features a removable armor shell that opens and closes. The pattern includes detailed instructions for creating both the soft armadillo body and the protective outer shell with intricate sectioned panels.

Tuk Tuk Armadillo Amigurumi Pattern crochet pattern - detailed view of completed project

Standing at 9cm (3.5 inches) tall, this project combines multiple advanced techniques including color changes, joining techniques, and detailed embroidery work. The finished piece creates a functional toy that can transform from cute armadillo to protective ball.

Why You'll Love This Tuk Tuk Armadillo Amigurumi Pattern

I absolutely love how this pattern captures the essence of Tuk Tuk's personality from the movie! The interactive armor feature makes it so much more than just a regular amigurumi - it's a functional toy that brings the Disney magic to life. The detailed construction process teaches valuable skills like color transitions and complex assembly techniques that will elevate your crochet abilities.

Tuk Tuk Armadillo Amigurumi Pattern step 1 - construction progress Tuk Tuk Armadillo Amigurumi Pattern step 2 - assembly progress Tuk Tuk Armadillo Amigurumi Pattern step 3 - details and accessories Tuk Tuk Armadillo Amigurumi Pattern step 4 - final assembly and finishing

Switch Things Up

I love how this pattern pushes the boundaries of traditional amigurumi by incorporating that brilliant removable armor feature! The engineering behind making those eight armor panels connect seamlessly while still allowing the shell to open and close is absolutely fascinating. What really gets me excited is how the color transition techniques taught here can be applied to so many other projects - those smooth gradients between the beige body and brown armor create such professional-looking results.

The threaded bracing method for leg attachment is another game-changer that I've started using in other sturdy toy patterns. It creates such a durable connection compared to standard sewing methods. I also appreciate how the pattern teaches you to work with multiple hook sizes for different elements - using the smaller hook for those delicate antennas adds such lovely detail contrast.

This Tuk Tuk isn't just about following instructions; it's about mastering advanced construction techniques that will elevate every future project you tackle!

Common Mistakes & How to Fix Them

βœ— Forgetting to mark the beginning of rounds which leads to uneven shaping and misaligned features βœ— Not maintaining consistent tension throughout color changes resulting in visible gaps or loose stitches βœ— Overstuffing the body parts making it difficult to achieve the proper curved armadillo shape βœ— Misaligning the armor panels during assembly causing the shell to not close properly around the body

Tuk Tuk Armadillo Amigurumi Pattern

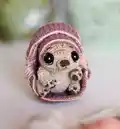
Create this adorable Tuk Tuk armadillo inspired by Disney's Raya and the Last Dragon! This charming pattern features a cute armadillo that can roll up into its protective armor shell, just like in the movie. The removable armor adds an interactive element that makes this amigurumi extra special. Perfect for Disney fans and anyone who loves unique, functional crochet creations that bring beloved characters to life.

Intermediate 8-10 Hours

Materials Needed for Tuk Tuk Armadillo Amigurumi Pattern

β€” Main Fabric

  • 01
    Alize Cotton Gold Batik yarn (330m/100g) in variegated color A
  • 02
    Gazzal Baby Cotton yarn (165m/50g) in pink/beige color B
  • 03
    Gazzal Jeans yarn (170m/50g) in brown color C

β€” Tools Required

  • 01
    Crochet hook 1.75mm (for main body)
  • 02
    Crochet hook 1.5mm (for details and antennas)
  • 03
    12mm safety eyes
  • 04
    Black, white and brown embroidery floss
  • 05
    Yarn needle with blunt end
  • 06
    Needles for cutting with beads
  • 07
    2 pins or stitch markers
  • 08
    Polyester fiberfill stuffing
  • 09
    Scissors
  • 10
    Regular sewing needle

Progress Tracker

0% Complete

β€” TUMMY (Yarn A) :

Round 1 :

2 loops, 6sc in 2nd loop from hook (amigurumi ring) (6l)

Round 2 :

[inc]Ρ…6 (12l)

Round 3 :

[sc, inc]Ρ…6 (18l)

Round 4 :

[2sc, inc]Ρ…6 (24l)

Round 5 :

[3sc, inc]Ρ…6 (30l)

Round 6 :

[4sc, inc]Ρ…6 (36l)

Round 7 :

[5sc, inc]Ρ…6 (42l)

Round 8 :

[6sc, inc]Ρ…6 (48l)

Info :

Cut and fix the thread. Pin marks beginning of round where tummy connects to head.

β€” MUZZLE (Yarn A) :

Round 1 :

6 loops, turning, 5sc (starting from 2nd loop from hook), 5sc (from back of chain) (10l)

Round 2 :

[4sc, inc]Ρ…2 (12l)

Round 3 :

12sc, sl st in 1st sc (12l)

Info :

Cut and fix thread, leaving long end for sewing. Embroider nose with brown floss, divide floss in half for mouth.

β€” HEAD (Yarn A) :

Round 1 :

10 loops, turning, 9sc (starting from 2nd loop from hook), 9sc (from back of chain) (18l)

Round 2 :

3sc in next loop, 7sc, 3sc in next loop, 3sc, inc, sc, inc, 3sc (24l)

Round 3 :

sc, 3sc in next loop, 9sc, 3sc in next loop, 5sc, inc, 2sc, inc, 3sc (30l)

Round 4 :

2sc, 3sc in next loop, 11sc, 3sc in next loop, 7sc, inc, 3sc, inc, 3sc (36l)

Round 5 :

3sc, 3sc in next loop, 13sc, 3sc in next loop, 9sc, inc, 4sc, inc, 3sc (42l)

Round 6 :

4sc, 3sc in next loop, 15sc, 3sc in next loop, 11sc, inc, 5sc, inc, 3sc (48l)

Round 7 :

48sc (48l)

Info :

Insert safety eyes between rounds 3-4, distance 15 stitches apart. Add white and black embroidery details around eyes.

Round 8-9 :

48sc (48l)

Round 10 :

4sc, {sc3tog}, 15sc, {sc3tog}, 11sc, dec, 5sc, dec, 3sc (42l)

Info :

Connect head with tummy in next round by inserting hook through both pieces.

Round 11 :

crochet 8sc along head, 12sc head together with 12sc tummy, 22sc along head

Round 12 :

8sc on head, 36sc on tummy, 22sc on head (66l)

Round 13 :

8sc - incomplete round, move pin marker, count 30 loops for armor connection point

β€” INNER ARMOR (Yarn B) :

Row 1 :

2 loops, turning, inc (starting from 2nd loop) (2l)

Row 2 :

1 loop, turning, inc, sc (3l)

Row 3 :

1 loop, turning, sc, inc, sc (4l)

Row 4 :

1 loop, turning, sc, inc, 2sc (5l)

Row 5 :

1 loop, turning, 2sc, inc, 2sc (6l)

Row 6-11 :

1 loop, turning, 6sc (6l)

Row 12 :

1 loop, turning, 2sc, inc, 3sc (7l)

Row 13 :

1 loop, turning, 7sc (7l)

Row 14 :

1 loop, turning, 3sc, inc, 3sc (8l)

Row 15-16 :

1 loop, turning, 8sc (8l)

Row 17 :

1 loop, turning, 3sc, dec, 3sc (7l)

Row 18 :

1 loop, turning, 7sc (7l)

Row 19 :

1 loop, turning, 2sc, dec, 3sc (6l)

Row 20-25 :

1 loop, turning, 6sc (6l)

Row 26 :

1 loop, turning, 2sc, dec, 2sc (5l)

Row 27 :

1 loop, turning, sc, dec, 2sc (4l)

Row 28 :

1 loop, turning, sc, dec, sc (3l)

Row 29 :

1 loop, turning, dec, sc (2l)

Row 30 :

1 loop, turning, dec (1l)

Row 31 :

Crochet 30sc down side (Yarn B + C), attach to head and crochet 30sc armor with 30sc head (Yarn B)

Row 32 :

36sc on tummy (Yarn A + B), 30sc on armor (Yarn B) (66l)

Round 33-35 :

66sc (66l)

Round 36 :

[9sc, dec]Ρ…6 (60l)

Round 37 :

[8sc, dec]Ρ…6 (54l)

Round 38 :

[7sc, dec]Ρ…6 (48l)

Round 39 :

[6sc, dec]Ρ…6 (42l)

Round 40 :

[5sc, dec]Ρ…6 (36l)

Round 41 :

[4sc, dec]Ρ…6 (30l)

Info :

Start stuffing body with synthepus.

Round 42 :

[3sc, dec]Ρ…6 (24l)

Round 43 :

[2sc, dec]Ρ…6 (18l)

Round 44 :

[sc, dec]Ρ…6 (12l)

Round 45 :

[dec]Ρ…6 (6l)

Info :

Trim thread, pass through all loops, tighten and secure.

β€” LEGS (Make 4, Yarn A) :

Round 1 :

4 loops, turning, 3sc (starting from 2nd loop), 3sc (from back of chain) (6l)

Round 2 :

[inc]Ρ…6 (12l)

Round 3 :

12sc (12l)

Round 4 :

3 sl st, 6sc, 3 sl st (12l)

Round 5 :

[dec]Ρ…2, sc, [inc]Ρ…2, sc, [dec]Ρ…2 (10l)

Round 6-7 :

10sc (10l)

Info :

Start stuffing hand with synthepus.

Round 8 :

inc, 8sc, inc (12l)

Round 9 :

12sc (12l)

Info :

Completely fill the hand.

Round 10 :

[dec]Ρ…6 (6l)

Info :

Trim thread, pass through loops, tighten and secure.

β€” SPOT (Brown floss) :

Round 1 :

4 loops, turning, 3sc (starting from 2nd loop), 3sc (from back of chain) (6l)

Info :

Sew spot to foot, make 3 French knots, embroider 4 stripes with half thickness floss.

β€” ANTENNAS (Make 2, Yarn A) :

Info :

Divide thread in half, crochet cord with 1.5mm hook. Make 2 loops, crochet 4 more loops same way. Sew to head.
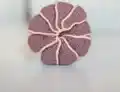
β€” OUTER ARMOR (Yarn B) :

Detail 1 Row 1 :

6 loops, turning, 5sc (starting from 2nd loop) (5l)

Row 2 :

1 loop, turning, 5sc (5l)

Row 3 :

1 loop, turning, sc, {sc3tog}, sc (3l)

Row 4-6 :

1 loop, turning, 3sc (3l)

Row 7 :

1 loop, turning, inc, sc, inc (5l)

Row 8 :

1 loop, turning, 5sc (5l)

Row 9 :

1 loop, turning, inc, 3sc, inc (7l)

Row 10-27 :

1 loop, turning, 7sc (7l)

Row 28 :

1 loop, turning, dec, 3sc, dec (5l)

Row 29 :

1 loop, turning, 5sc (5l)

Row 30 :

1 loop, turning, dec, sc, dec (3l)

Row 31-33 :

1 loop, turning, 3sc (3l)

Row 34 :

1 loop, turning, sc, 3sc in next loop, sc (5l)

Row 35-36 :

1 loop, turning, 5sc (5l)

Row 37 :

36sc down, 5sc straight, [4sc, dec]x3, [dec, 4sc]x3 up, 5sc straight, sl st (Yarn B + C) (76l)

β€” Details 2-8 :

Row 1 :

8 loops, turning, 7sc (starting from 2nd loop) (7l)

Row 2 :

1 loop, turning, 7sc (7l)

Row 3 :

1 loop, turning, 2sc, {sc3tog}, 2sc (5l)

Continue :

Continue pattern similar to Detail 1, joining each piece around perimeter with previous detail

Info :

Ensure line with decreases on previous detail is on left side when connecting.

β€” ASSEMBLY :

Step 1 :

Attach legs using needles for cutting between rounds 9-10 for front legs, 8 stitches lower for back legs

Step 2 :

Use threaded bracing technique to securely sew legs to body

Step 3 :

Thread needle through body from back to front leg attachment point

Step 4 :

Pass through two loops on inner surface of leg with needle for cutting in middle

Step 5 :

Insert needle into body at leg attachment point and pull out at second leg point

Step 6 :

Repeat sewing process two more times for strength

Step 7 :

Repeat entire process for back legs

Step 8 :

Tie knots and hide thread ends securely

Assembly Instructions

  • Attach front legs to body between rounds 9-10 using needles for cutting, positioning them approximately 15 stitches apart
  • Position back legs 8 stitches lower than front legs and secure with same needle technique
  • Use threaded bracing method with round-nosed pliers to securely sew legs by passing needle through body from back to front
  • Thread needle through two loops on inner leg surface with cutting needle positioned in the middle for stability
  • Sew each leg attachment two additional times using the same path for maximum strength and durability
  • Sew antennas to top of head using divided yarn threads and 1.5mm hook for delicate cord construction
  • Place completed Tuk Tuk inside the outer armor shell and ensure proper fit and closure mechanism

Important Notes

  • πŸ’‘Use stitch markers consistently to track round beginnings, especially during complex color changes and assembly phases
  • πŸ’‘Maintain even tension throughout the project to ensure proper shaping and prevent gaps in color transition areas
  • πŸ’‘Stuff body parts firmly but not overly tight to maintain the characteristic armadillo shape and allow armor closure
  • πŸ’‘Take extra care with the threaded bracing technique for leg attachment as this determines the toy's durability
  • πŸ’‘Pay attention to armor panel alignment during construction to ensure the shell closes properly around the body
  • πŸ’‘Use the recommended yarn weights and hook sizes for best results, as the armor fit depends on accurate gauge

This enchanting Tuk Tuk armadillo pattern captures the magic of Disney's beloved character in adorable miniature form! The unique removable armor feature makes this more than just an amigurumi - it's an interactive toy that transforms from cute companion to protective shell. With detailed instructions for advanced techniques like color transitions and complex assembly, this pattern will challenge and delight experienced crocheters. Create your own pocket-sized piece of Disney magic! 🧢✨

You ask,

we answer.

FAQs

Can I use different yarn weights for this pattern?

While you can substitute yarns, it's recommended to use sport weight yarns as specified to ensure the armor fits properly around the body. If using different weights, you may need to adjust hook sizes accordingly.

How do I ensure the armor closes properly around the armadillo?

Careful attention to gauge and following the stitch counts exactly is crucial. The pattern includes specific shaping techniques and panel connections that create the proper fit.

What's the most challenging part of this pattern?

The threaded bracing technique for leg attachment and the color transition work require patience and precision. The armor assembly with 8 connected panels also needs careful attention to alignment.

Can children play safely with this finished toy?

Yes, when properly constructed with secure safety eyes and well-hidden thread ends. However, adult supervision is recommended for very young children due to small parts.

How long does it take to complete this project?

Expect 8-10 hours total time, depending on your experience level. The armor construction and detailed assembly work take considerable time to complete properly.