๐Ÿงถ Beautiful โœจ Detailed ๐Ÿ’ Adorable

Turtle Memory Game Amigurumi Pattern

Turtle Memory Game Amigurumi Pattern
4.2โ˜… Rating
8-10 Hours Time Needed
2.4K Made This
โœ‚๏ธ

Intermediate Level

Ideal for those with basic knitting experience, featuring slightly more advanced stitches and techniques to expand your skills.

โฑ๏ธ

All-Day Adventure

Requires 8-10 hours, ideal for a full day of immersive knitting.

๐Ÿงธ

Cute Companion

An adorable friend to cherish, handcrafted with love to bring comfort and joy for years to come.

About This Turtle Memory Game Amigurumi Pattern

This charming Turtle Memory Game pattern brings together creativity and functionality in one delightful project. The mama turtle features a spacious shell that stores up to twenty baby turtles, each with colorful matching spots that create an engaging memory game. The pattern uses simple rounds and increases to create perfectly shaped turtle shells, with innovative construction techniques that allow the mama's shell to open and close securely with a button fastener.

Turtle Memory Game Amigurumi Pattern crochet pattern - detailed view of completed project

Perfect for gift-giving or educational play, this pattern creates a complete game set that children will treasure. The modular design allows you to customize the number of baby turtles to suit your needs.

Why You'll Love This Turtle Memory Game Amigurumi Pattern

I absolutely love this pattern because it's so much more than just a cute amigurumi project. The mama turtle becomes a functional toy storage solution that encourages interactive play and learning. Watching children match the colorful baby turtles while developing their memory skills brings such joy! The pattern is cleverly designed with the button closure that makes it feel like a real treasure chest. Plus, you can customize it with as many baby turtles as you want, making each game unique to your creation.

Turtle Memory Game Amigurumi Pattern step 1 - construction progress Turtle Memory Game Amigurumi Pattern step 2 - assembly progress Turtle Memory Game Amigurumi Pattern step 3 - details and accessories Turtle Memory Game Amigurumi Pattern step 4 - final assembly and finishing

Switch Things Up

I love experimenting with color combinations to make each turtle memory game uniquely special and personalized for the recipient. Instead of using traditional green for all the baby turtle shells, I sometimes create rainbow baby turtles where each matching pair has its own shell color, making the game even more visually exciting for children.

For a seasonal twist, I've made autumn-themed versions using burnt orange, deep red, and golden yellow for the mama turtle's shell, with baby turtles in coordinating fall colors. A beach-themed version with turquoise and sandy beige colors looks absolutely stunning and perfect for summer gifts.

You can also adjust the size by using bulky weight yarn with a larger hook for a super-sized version that's easier for toddlers to manipulate, or try fingering weight yarn with a tiny hook for an adorable miniature version. Some crafters add embroidered details like tiny flowers or patterns on the mama turtle's shell for extra personality.

Consider using textured yarns like chenille or velvet yarn for the baby turtle shells to create a sensory experience that helps with tactile development. I've also seen beautiful versions where crafters add small bells inside some baby turtles to create sound matching games alongside color matching.

For an advanced customization, embroider numbers or letters on the baby turtle bottoms to transform this into a multi-functional learning tool. The button closure can be replaced with a large decorative button shaped like a flower or star for added whimsy and charm.

Common Mistakes & How to Fix Them

โœ— Forgetting to work in the back loops only when attaching the baby turtle shells can make them difficult to close properly and create uneven edges โœ— Not stuffing the mama turtle's head firmly enough before attaching it to the shell can result in a floppy appearance that affects the overall structure โœ— Miscounting stitches between leg placements on the mama turtle's bottom shell can cause legs to be unevenly spaced and affect the turtle's balance โœ— Working the wrong side facing up when joining legs to the bottom shell creates messy visible stitches that detract from the finished appearance

Turtle Memory Game Amigurumi Pattern

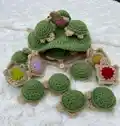
Discover the joy of crafting your very own Turtle Memory Game with this adorable amigurumi pattern! Create a mama turtle shell that holds up to twenty colorful baby turtles, making this project perfect for teaching color matching and memory skills to little ones. This functional and playful design combines practical storage with engaging gameplay, offering endless hours of entertainment while showcasing your crochet skills. The pattern includes detailed instructions for creating both the mama turtle with an innovative button closure and multiple baby turtles in vibrant matching colors.

Intermediate 8-10 Hours

Materials Needed for Turtle Memory Game Amigurumi Pattern

โ€” Main Fabric

  • 01
    Weight 4 green yarn (less than 7 oz)
  • 02
    Weight 4 tan yarn (less than 7 oz)
  • 03
    Scraps of 10 different colors for baby turtle matches

โ€” Tools Required

  • 01
    4mm crochet hook
  • 02
    3.5mm crochet hook (for mama's head)
  • 03
    Yarn needle
  • 04
    Safety eyes (12mm) - 2 pieces
  • 05
    Polyfil stuffing
  • 06
    Scissors
  • 07
    Button (1 piece)
  • 08
    Pins

Progress Tracker

0% Complete

โ€” Baby Bottom (make 2 of each color) :

Round 1 :

With match color, start a magic circle and chain 2 (does not count as stitch). 12 dc into magic circle. Ss to top of first dc. Chain 1 and cut yarn (12)

Round 2 :

In tan, join to any st on previous round. Chain 2 and dc inc into same st and each st around. Ss to first dc (24)

Round 3 :

Worked in FLO. Chain 2. Dc and tr into same st as ss. Tr and dc into next st. Chain 2 and ss into same st. Ss into next 2 st. (ss, ch1, 2hdc, ch1, ss) into next st. Ss into next 5 st. (ss, ch1, 2hdc, ch1, ss) into next st. Ss into next 4 st. (ss, ch1, 2hdc, ch1, ss) into next st. Ss into next 5 st. (ss, ch1, 2hdc, ch1, ss) into next st. Ss into next 2 st. Cut yarn and fasten off

โ€” Baby Shell :

Round 1 :

In green, starting with magic circle, ch1 and sc 6 into ring. Ss in 1st st, ch 1 (6)

Round 2 :

Hdc inc in all, ss to 1st st, ch 1 (12)

Round 3 :

(hdc, hdc inc) x6, ss to 1st st, ch1 (18)

Round 4 :

(hdc 2, hdc inc) x6, ss to 1st st, ch 1 (24)

Info :

Chain 1 and line up with shell bottom (right side facing outward). Work through both shell loops and FLO of shell bottom. SC all the way around, pausing toward end to stuff with polyfil, then join and sew in tail
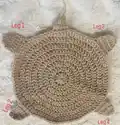
โ€” Mama Turtle Bottom Shell :

Info :

Ch2 does not count as dc. Always start round by working into same st as ss. Ss to beginning ch after each round

Round 1 :

In tan, starting with magic circle, ch2 and dc 12 into ring. Ss to top of first dc (12)

Round 2 :

Ch2, dc inc x12 (24)

Round 3 :

Ch2, (dc, dc inc) x12 (36)

Round 4 :

Ch2, (dc2, dc inc) x12 (48)

Round 5 :

Ch2, (dc3, dc inc) x12 (60)

Round 6 :

Ch2, (dc4, dc inc) x12 (72)

Round 7 :

Ch2, (dc5, dc inc) x12 (84)

Round 8 :

Ch2, (dc6, dc inc) x12 (96)

Info :

Ss to top of first dc and do not cut yarn. Immediately move onto making the tail

โ€” Mama Turtle Tail :

Row 1 :

Ch 1 and sc 4. Ch 1 turn (4)

Row 2 :

Sc 4 across. Ch 1 turn (4)

Row 3 :

Sc dec x2. Ch 1 turn (2)

Row 4 :

Sc 2. Ch 1 turn (2)

Row 5 :

Sc dec (1)

Info :

Chain 1 and cut off yarn, leave 8 inch tail for securing button later

โ€” Mama Turtle Legs (make 4) :

Infos :

All 4 legs worked in BLO for row 1. First leg: count 9 st from left of tail. Second leg: count 16 st from left of first leg. Third leg: count 14 st to right from right of tail. Fourth leg: count 21 st to right of third leg. Make sure wrong side is facing up before joining legs

Row 1 :

With tan yarn, join yarn ch1, sc in same st, sc 5. Ch1 turn (6)

Row 2-4 :

Ch1, sc 6 across. Ch1 turn (6)

Row 5 :

Sc dec, sc2, sc dec. Ch1 turn (4)

Row 6 :

(Sc dec) x2, ch 1 to secure yarn and cut off (2). Weave in yarn tails and cut ends

Info :

When finished, there will be 15 st unworked between front and back leg, and 8 st unworked between back legs and tail

โ€” Mama's Head (make 2 pieces) :

Info :

Use 3.5mm hook. In tan, ch 9

Row 1 :

Starting in 2nd ch from hook, sc 8 across. Ch1 turn (8)

Row 2-3 :

Sc 8. Ch 1 turn (8)

Row 4 :

Sc inc, sc 6, sc inc. Ch 1 turn (10)

Row 5 :

Sc inc, sc 8, sc inc. Ch 1 turn (12)

Row 6-9 :

Sc 12. Ch 1 turn (12)

Row 10 :

Sc dec, sc 8, sc dec. Ch 1 turn (10)

Row 11 :

Sc 10. Ch 1 turn (10)

Row 12 :

Sc dec, sc 6, sc dec. Ch 1 turn (8)

Row 13 :

Sc dec, sc 4, sc dec. Ch 1 turn (6)

Infos :

Ch 1, cut yarn and weave in tails. On second piece, insert safety eyes between rows 9 and 10, 4 st apart. Put piece with eyes on top of other piece and join yarn at turtle's neck on right side

Joining Pieces :

Sc 3, sc inc, (sc 2, sc inc) x3, sc 4 across top of head, (sc inc, sc 2) x3, sc inc, sc3 back down other side of neck. Leave long tail to sew head to bottom shell. Stuff head with polyfil

Info :

Find middle of front legs (7 unworked stitches on either side). Using tail from head, sew head to BLO of middle 8 stitches, going through both loops of head pieces AND BLO of shell. Weave in ends and cut yarn
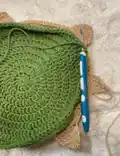
โ€” Mama's Top Shell :

Info :

Use 4mm hook. Ch2 does not count as dc. Always start round by working into same st as ss. Ss to beginning ch after each round

Round 1 :

In green, starting with magic circle, ch2 and dc 12 into ring. Ss to top of first dc (12)

Round 2 :

Ch2, dc inc x12 (24)

Round 3 :

Ch2, (dc, dc inc) x12 (36)

Round 4 :

Ch2, (dc2, dc inc) x12 (48)

Round 5 :

Ch2, (dc3, dc inc) x12 (60)

Round 6 :

Ch2, (dc2, dc inc, dc2) x12 (72)

Round 7 :

Ch2, (dc5, dc inc) x12 (84)

Round 8 :

Ch2, (dc6, dc inc) x12 (96)

Round 9 :

Ch2 and dc 96 around (96)

Optional Round 10 :

If making more matches for extra storage space, go around another time with 96 dc (96)

Infos :

Chain 1 but do not cut yarn. Place top shell onto bottom shell. Starting in first st of right back leg, join yarn. Work through both loops of shell and FLO, sc x76 all the way until last exposed stitch of 4th leg (20 unworked stitches remain for baby turtle storage). Cut yarn and sew in tail

โ€” Final Assembly :

Button Attachment :

Sew button to tail using yarn tail that was left. Button will go through whatever dc falls above it as the hole. Hide tail and cut yarn

Assembly Instructions

  • Create 20 baby turtles (2 of each matching color) by completing the baby bottom and baby shell for each turtle
  • Construct the mama turtle's bottom shell including all 8 rounds, then immediately create the tail without cutting yarn
  • Add all four legs to the mama turtle's bottom shell, ensuring proper spacing with 9 stitches from tail to first leg, 16 stitches between first and second leg, 14 stitches from tail to third leg, and 21 stitches between third and fourth leg
  • Make two head pieces using the smaller 3.5mm hook, attach safety eyes to one piece between rows 9-10 with 4 stitches apart, then join both pieces together and stuff firmly with polyfil
  • Sew the stuffed head to the middle 8 stitches between the front legs using the BLO of the bottom shell and going through both loops of the head pieces
  • Create the mama turtle's top shell with 9 rounds (or optional 10 rounds for extra storage), then attach it to the bottom shell by working through both loops of top shell and FLO of bottom shell, leaving 20 unworked stitches at the back opening
  • Attach button to the tail using the reserved yarn tail, ensuring it aligns with a dc stitch on the top shell to create the closure mechanism

Important Notes

  • ๐Ÿ’กThe starting chain 2 at the beginning of each round does NOT count as a stitch throughout the entire pattern
  • ๐Ÿ’กWhen working baby turtle shells, don't worry about hiding yarn tails as they will be concealed inside the finished turtle
  • ๐Ÿ’กMake sure the wrong side is facing up when joining legs to the mama turtle's bottom shell for a cleaner finished appearance
  • ๐Ÿ’กWork baby turtle round 3 entirely in the front loops only to create the distinctive head and leg shapes
  • ๐Ÿ’กLeave 15 unworked stitches between the front and back legs and 8 unworked stitches between the back legs and tail for proper structure
  • ๐Ÿ’กStuff the mama turtle's head firmly with polyfil before attaching to ensure it maintains its shape and doesn't become floppy
  • ๐Ÿ’กThe 20 unworked stitches at the back of the mama turtle shell create the opening where baby turtles are stored and retrieved

This delightful Turtle Memory Game pattern creates an interactive educational toy that children will absolutely treasure for years to come. The mama turtle's clever design with a button closure keeps all the baby turtles safe inside while providing endless matching and memory game fun. With vibrant color combinations and adorable turtle shapes, this project showcases your crochet skills while creating something both beautiful and functional. The modular construction allows you to customize the number of baby turtles to match your vision perfectly. ๐Ÿงถ Happy crocheting and enjoy watching little ones learn through play! ๐Ÿขโœจ

You ask,

we answer.

FAQs

How many baby turtles should I make for this memory game?

The pattern recommends making 10 matching pairs (20 baby turtles total), but you can adjust this number based on your preference. If you make more than 20 turtles, consider adding the optional round 10 to the mama turtle's top shell for extra storage space.

What's the difference between the no-sew version and the traditional method for assembling baby turtles?

The no-sew version joins the baby shell to the bottom by crocheting through both pieces without cutting the yarn, which is faster and creates a seamless join. The traditional method involves cutting yarn and using a needle to sew the pieces together, which works better if you want to prepare all components ahead of time before assembly.

Why do I need two different hook sizes for this pattern?

The 4mm hook is used for most of the project including the baby turtles and mama turtle's body and shells. The smaller 3.5mm hook is specifically used for the mama turtle's head to create tighter, more defined stitches that give the head better structure and detail.

How do I ensure the legs are evenly spaced on the mama turtle?

Follow the specific stitch counts provided in the pattern: count 9 stitches from the left of the tail for the first leg, 16 stitches from the left of the first leg for the second leg, 14 stitches to the right from the tail for the third leg, and 21 stitches to the right of the third leg for the fourth leg. This spacing ensures balanced placement.

Can I use different yarn weights for this project?

While the pattern specifically calls for weight 4 yarn, you can use different yarn weights if you adjust your hook size accordingly. Keep in mind that using lighter weight yarn will create smaller turtles, while heavier yarn will make them larger. The most important thing is maintaining consistent tension throughout the project.

What's the purpose of leaving unworked stitches on the mama turtle?

The unworked stitches serve important structural purposes: 15 stitches between front and back legs provide flexibility for the turtle's body shape, 8 stitches between back legs and tail allow proper positioning, and the 20 unworked stitches at the back opening create the pocket where baby turtles are stored.