🧢 Beautiful ✨ Detailed πŸ’ Adorable

Twinkletoes Tiny Gecko Amigurumi Pattern

Twinkletoes Tiny Gecko Amigurumi Pattern
4.3β˜… Rating
2-3 Hours Time Needed
1.5K Made This
βœ‚οΈ

Beginner Friendly Level

Perfect for those just starting their sewing journey, with clear instructions and simple techniques

⏱️

Bite-Sized Project

Complete in under 2 hoursβ€”quick, fun, and perfect for a little creative escape.

🧸

Tiny Treasure

Small, sweet, and gift-worthy creations that fit perfectly in the palm of your hand with detailed charm.

About This Twinkletoes Tiny Gecko Amigurumi Pattern

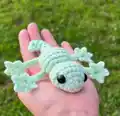
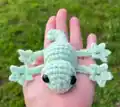
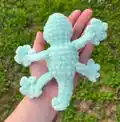
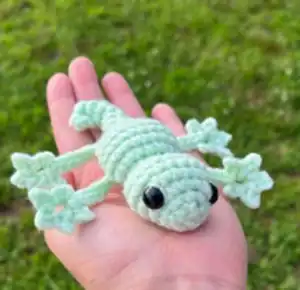
This delightful gecko pattern showcases the beauty of no-sew amigurumi construction, working from head to tail in one continuous piece. The special leg technique creates realistic gecko toes with detailed texture, while the curved tail adds authentic reptilian character. Safety eyes bring personality to this tiny companion, making it perfect for display or gentle play.

Twinkletoes Tiny Gecko Amigurumi Pattern crochet pattern - detailed view of completed project

Designed with beginners in mind, this pattern uses basic stitches in an innovative way to create something truly special. The detailed photo tutorial guides you through the unique leg construction technique.

Why You'll Love This Twinkletoes Tiny Gecko Amigurumi Pattern

I absolutely love how this pattern transforms simple single crochet into something magical! The no-sew construction means you can focus on enjoying the meditative rhythm of stitching without worrying about assembly. I'm always amazed by how those tiny gecko toes come to life with just chain stitches and slip stitches. The size makes it perfect for tucking into a pocket or gifting to someone special - there's something so satisfying about creating a complete little creature in just a few hours!

Twinkletoes Tiny Gecko Amigurumi Pattern step 1 - construction progress Twinkletoes Tiny Gecko Amigurumi Pattern step 2 - assembly progress Twinkletoes Tiny Gecko Amigurumi Pattern step 3 - details and accessories Twinkletoes Tiny Gecko Amigurumi Pattern step 4 - final assembly and finishing

Switch Things Up

I love how versatile this little gecko pattern can be with just a few creative tweaks! You could easily turn Twinkletoes into a colorful chameleon by using variegated yarn or working in stripes. I've experimented with adding tiny spots using embroidery floss for a leopard gecko look, or even creating a family of geckos in different sizes by adjusting hook sizes.

For a magical touch, I sometimes use sparkly yarn or add tiny beads to the toes for extra texture. You could also modify the tail to be shorter and fatter for a different gecko species, or even add small fabric wings to create a fantasy dragon version!

The beauty of this pattern is that once you master the basic construction, the possibilities are endless for customization and creativity.

Common Mistakes & How to Fix Them

βœ— Forgetting to place stitch markers for eye placement and body center guidance βœ— Crocheting into leg chain stitches instead of moving limbs outward during body rounds βœ— Stuffing the tail too firmly making it difficult to curve naturally βœ— Missing the base chain reference when creating gecko toes during leg construction

Twinkletoes Tiny Gecko Amigurumi Pattern

Create your own adorable pocket-sized gecko companion with this charming no-sew amigurumi pattern! Twinkletoes features detailed toes, safety eyes, and a curled tail that brings this tiny creature to life. Perfect for beginners looking to master continuous rounds while creating something truly special. This one-piece design eliminates complex assembly, making it an enjoyable project that results in a delightful gecko friend you'll treasure forever.

Beginner Friendly 2-3 Hours

Materials Needed for Twinkletoes Tiny Gecko Amigurumi Pattern

β€” Main Fabric

  • 01
    Medium weight yarn in light green or preferred gecko color
  • 02
    Premier Parfait Chunky yarn for larger version

β€” Tools Required

  • 01
    4.0mm crochet hook (for tiny version)
  • 02
    5.0mm crochet hook (for chunky version)
  • 03
    10mm safety eyes (for tiny version)
  • 04
    14mm safety eyes (for chunky version)
  • 05
    Fiber fill stuffing
  • 06
    Yarn needle
  • 07
    Stitch markers
  • 08
    Scissors

Progress Tracker

0% Complete

β€” Body :

Round 1 :

Make 4 sc in a mc (4)

Round 2 :

Inc x 4 (8)

Round 3 :

*inc, 3 sc* x 2 (10)

Round 4 :

Inc x 5, 5 sc (15)

Round 5 :

3 sc in the next st, 8 sc, 3 sc in the next st, 5 sc (19)

Round 6 :

Sc in each st (19) *Place a SM between the 6th & 7th sc of this row. This is a guide for the center/top of the body.*

Round 7 :

Sc in in each st (19)

Info :

Insert safety eyes between r3 & r4, with 4 or 5 st visible in between them. Use the SM from r6 as a visual guide to place each eye equal distance away from the SM.

Round 8 :

Dec x 6, 7 sc (13)

Info :

Stuff head

Round 9 :

Dec x 4, 5 sc (9)

Round 10 :

3 sc in the next st, inc x 3, 3 sc in the next st, 4 sc (16)

Round 11 :

Leg, sc, inc, *2 sc, inc* x 2, sc, inc, leg, 6 sc (20)

Round 12-14 :

Sc in each st (20) *Make sure to move the limbs outward and be careful not to sc in the chain stitch from the leg*

Round 15 :

Leg, sc, *dec, sc* x 4, sc, leg, 6 sc (16)

Round 16 :

*2 sc, dec* x 3, 4 sc (13)

Info :

Stuff body

Round 17 :

*sc, dec* x 4, sc (9)

Round 18 :

Sc in each st (9)

Round 19 :

*dec, sc* x 2, 3 sc (7)

Round 20 :

Sc in each st (7)

Round 21 :

Dec, 5 sc (6)

Round 22 :

Sc in each st (6)

Round 23 :

Dec, 4 sc (5)

Round 24 :

Sc in each st (5)

Round 25 :

Dec, 3 sc (4)

Round 26 :

Sc in each st (4)

Info :

Fasten off and leave a long tail

β€” Leg Construction (Special Stitch) :

Step 1 :

Ch 10, sl st in 2nd ch from hook and the third ch. That third ch will be your "base chain".

Step 2 :

*Ch 2, sl st in 2nd ch from hook, sl st in base stitch*

Step 3 :

Repeat * * 3 more times, for a total of 5 toes

Step 4 :

Sl st in the 7 stitches back down the chain, then continue on with the round

β€” Tail Finishing :

Step 1 :

Sew the hole closed, keep the yarn on your needle.

Step 2 :

Slightly curve the tip of the gecko-tail to the side so that the tip of the gecko-tail is beside R23/R24.

Step 3 :

Insert your needle between the rounds to bring the tip of the gecko-tail to it.

Step 4 :

Weave the yarn-tail through the stitches a few more times, to secure the curl.

Assembly Instructions

  • This is a no-sew, one-piece design that requires no assembly
  • Insert safety eyes between rounds 3 and 4 before stuffing the head
  • Stuff the head firmly after round 8, then stuff the body after round 16
  • Stuff the tail lightly as you work, stopping when it becomes too narrow
  • Create the curved tail by sewing the tip to rounds 23-24 area
  • Secure the tail curve by weaving yarn through stitches multiple times

Important Notes

  • πŸ’‘Pattern is worked in continuous rounds - use stitch markers to track progress
  • πŸ’‘Move limbs outward during body rounds to avoid crocheting into leg chains
  • πŸ’‘Stuff sections as indicated in pattern, not all at once at the end
  • πŸ’‘The special leg technique creates 5 toes per leg for realistic gecko feet
  • πŸ’‘Tail should be stuffed lightly to allow for natural curving
  • πŸ’‘Eye placement uses the round 6 stitch marker as a visual guide for symmetry

This enchanting Twinkletoes gecko pattern brings the magic of tiny reptilian friends right to your fingertips! With its innovative no-sew construction and special toe technique, you'll create an adorable companion that fits perfectly in your palm. The pattern's beginner-friendly approach makes it perfect for building confidence while crafting something truly special. Get ready to fall in love with this tiny treasure! 🦎✨

You ask,

we answer.

FAQs

Can I make this pattern larger or smaller?

Yes! The pattern includes instructions for both tiny (4.0mm hook) and chunky (5.0mm hook) versions. You can also experiment with different yarn weights and hook sizes.

What if I've never made amigurumi before?

This pattern is perfect for beginners! It uses basic stitches and includes detailed photo tutorials, especially for the special leg technique.

How do I make the gecko toes look realistic?

Follow the special leg tutorial carefully - the key is creating a base chain and working multiple small toes off it using chain and slip stitch combinations.

Can I use different colored yarn?

Absolutely! While the pattern shows light green, geckos come in many colors. Try browns, grays, or even fantasy colors for a unique creation.

What if my tail won't curve properly?

Make sure you're stuffing the tail lightly and follow the finishing instructions to secure the curve by stitching the tip to rounds 23-24.