🧢 Beautiful ✨ Detailed πŸ’ Adorable

Adorable Bull Amigurumi Pattern

Adorable Bull Amigurumi Pattern
4.7β˜… Rating
8-10 Hours Time Needed
2.9K Made This
βœ‚οΈ

Intermediate Level

Ideal for those with basic crochet experience, featuring slightly more advanced stitches and techniques to expand your skills.

⏱️

All-Day Adventure

Requires 8-10 hours, ideal for a full day of immersive crocheting.

🧸

Cute Companion

An adorable friend to cherish, handcrafted with love to bring comfort and joy for years to come.

About This Adorable Bull Amigurumi Pattern

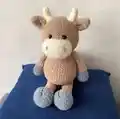
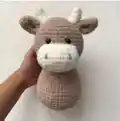
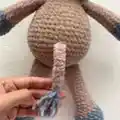
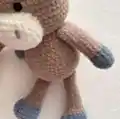
This delightful bull amigurumi pattern creates a charming farm animal friend that's perfect for cuddling and display. The pattern features detailed instructions for creating a sweet bull with cream-colored muzzle, small horns, and distinctive hooves in contrasting gray yarn. Standing at 39cm tall, this adorable companion makes an excellent gift for children or adults who love handmade toys. The design includes thoughtful details like embroidered nostrils and a realistic tail with a brush tip made from gray yarn pieces.

Adorable Bull Amigurumi Pattern crochet pattern - detailed view of completed project

Working in spiral rounds throughout, this pattern combines basic amigurumi techniques with color changes and detailed assembly instructions. The bull's sturdy construction and soft filling make it perfect for both play and decoration.

Why You'll Love This Adorable Bull Amigurumi Pattern

I absolutely love how this bull pattern brings together classic farm charm with modern amigurumi techniques! The way the cream muzzle contrasts beautifully with the beige body creates such a realistic and endearing look. What really makes me excited about this design is the attention to detail - from the perfectly positioned safety eyes to the adorable gray hooves that give it such character. The tail with its brush tip is such a clever touch that makes this bull feel authentic and special. Plus, the finished size makes it perfect for hugging while still being manageable to complete in a reasonable time frame.

Adorable Bull Amigurumi Pattern step 1 - construction progress Adorable Bull Amigurumi Pattern step 2 - assembly progress Adorable Bull Amigurumi Pattern step 3 - details and accessories Adorable Bull Amigurumi Pattern step 4 - final assembly and finishing

Switch Things Up

I love how versatile this bull pattern can be with just a few creative tweaks! You could easily transform this into a highland cow by using cream or white yarn for the body and adding some longer, shaggy texture around the head area. For a more playful version, try making it in bright, fun colors - imagine a purple bull with rainbow horns!

Another idea I'm excited about is adding seasonal accessories. A little red scarf for winter, a flower crown for spring, or even a tiny bell around the neck would make this bull absolutely adorable. You could also experiment with different yarn textures - using a fluffy yarn for the body would create an incredibly soft and cuddly feel.

For those who want to add more personality, consider embroidering some spots on the body or creating different facial expressions. The muzzle could be made in pink for a more realistic look, or you could add rosy cheeks with some light pink embroidery. The possibilities are endless when you let your creativity flow!

Common Mistakes & How to Fix Them

βœ— Forgetting to mark the beginning of each round can lead to uneven shaping and misaligned features βœ— Not stuffing the muzzle firmly enough before attaching will result in a flat, unrealistic appearance βœ— Placing safety eyes too far apart or at wrong rows creates an unbalanced facial expression βœ— Overstuffing arms and legs makes them too rigid and affects the bull's natural posture

Adorable Bull Amigurumi Pattern

Create your own charming bull companion with this detailed amigurumi pattern! This loveable farm friend features a sweet cream-colored muzzle, adorable horns, and a distinctive tail with a gray brush tip. Perfect for gifting or adding to your handmade collection, this bull stands approximately 39cm tall and combines simple techniques with delightful details. The pattern uses soft, cuddly yarn in beige, cream, and gray colors to bring this gentle character to life with personality and charm.

Intermediate 8-10 Hours

Materials Needed for Adorable Bull Amigurumi Pattern

β€” Main Fabric

  • 01
    Alize Softy yarn (115m/50g): 3 skeins of color 617 (beige)
  • 02
    Alize Softy yarn: less than half skein of color 62 (cream)
  • 03
    Alize Softy yarn: less than half skein of color 119 (gray)

β€” Tools Required

  • 01
    Crochet hook 4.5mm
  • 02
    Safety eyes 12mm
  • 03
    Holofiber stuffing
  • 04
    Wide-eye needle for sewing
  • 05
    Stitch markers
  • 06
    Scissors
  • 07
    Tapestry needle for embroidering details

Progress Tracker

0% Complete

β€” Head :

Round 1 :

6 sc in mr

Round 2 :

6 inc (12)

Round 3 :

(1 sc, inc)*6 (18)

Round 4 :

(2 sc, inc)*6 (24)

Round 5 :

(3 sc, inc)*6 (30)

Round 6 :

(4 sc, inc)*6 (36)

Round 7 :

(5 sc, inc)*6 (42)

Round 8 :

(6 sc, inc)*6 (48)

Round 9-16 :

48 sc in each row

Round 17 :

(6 sc, dec)*6 (42)

Round 18 :

(5 sc, dec)*6 (36)

Round 19 :

(4 sc, dec)*6 (30)

Round 20 :

(3 sc, dec)*6 (24)

Info :

Attach safe eyes between 11 and 12 rows, distance between eyes is 4 sc. Stuff head tight with holofiber.

β€” Muzzle :

Setup :

Crochet 9 ch, from the second loop from the hook

Round 1 :

7 sc, 3 sc in one loop, 6 sc, inc (18)

Round 2 :

inc, 6 sc, 3 inc, 6 sc, 2 inc (24)

Round 3 :

1 sc, inc, 6 sc, (1 sc, inc)*3, 6 sc, (1 sc, inc)*2 (30)

Round 4-6 :

30 sc in each row

β€” Horns :

Round 1 :

4 sc in mr

Round 2 :

4 sc

Round 3 :

(1 sc, inc)*2 (6)

Round 4 :

6 sc

Round 5 :

5 sc, inc (7)

Round 6 :

6 sc, inc (8)

Finish :

1 sl st and finish crocheting

β€” Ears :

Round 1 :

4 sc in mr

Round 2 :

4 inc (8)

Round 3 :

(3 sc, inc)*2 (10)

Round 4 :

(4 sc, inc)*2 (12)

Round 5 :

(5 sc, inc)*2 (14)

Round 6 :

14 sc

Finish :

Fold in half and crochet 7 sc

β€” Arms :

First Arm Round 1 :

7 sc in mr (gray yarn)

Round 2 :

7 inc (14)

Round 3-5 :

14 sc in each row

Round 6 :

2 sc, dec, 10 sc (13)

Round 7 :

2 sc, dec, 9 sc (12)

Round 8-18 :

12 sc in each row (change to beige)

Second Arm Round 1 :

7 sc in mr (gray yarn)

Round 2 :

7 inc (14)

Round 3-5 :

14 sc in each row

Round 6 :

6 sc, dec, 6 sc (13)

Round 7 :

6 sc, dec, 5 sc (12)

Round 8-18 :

12 sc in each row (change to beige)

β€” Legs :

Round 1 :

6 sc in mr (gray yarn)

Round 2 :

6 inc (12)

Round 3 :

(1 sc, inc)*6 (18)

Round 4 :

(2 sc, inc)*6 (24)

Round 5-7 :

24 sc in each row

Round 8 :

4 sc, 6 dec, 6 sc, change to beige and crochet 2 sc (18)

Round 9 :

5 sc, 2 dec, 9 sc (16)

Round 10 :

5 sc, dec, 9 sc (15)

Round 11 :

3 sc, 2 dec, 8 sc (13)

Round 12 :

3 sc, dec, 8 sc (12)

Round 13-23 :

12 sc in each row

Info :

Embroider imitation hooves

β€” Tail :

Setup :

Crochet 11 ch, from second loop from hook crochet 10 sc

Tail Tip :

Cut gray yarn into 8-10cm pieces, fold in half and pull through end of tail forming brush

β€” Body :

Round 1 :

6 sc in mr

Round 2 :

6 inc (12)

Round 3 :

(1 sc, inc)*6 (18)

Round 4 :

(2 sc, inc)*6 (24)

Round 5 :

(3 sc, inc)*6 (30)

Round 6 :

(4 sc, inc)*6 (36)

Round 7 :

(5 sc, inc)*6 (42)

Round 8 :

(6 sc, inc)*6 (48)

Round 9-14 :

48 sc in each row

Round 15 :

(6 sc, dec)*6 (42)

Round 16-17 :

42 sc in each row

Round 18 :

(5 sc, dec)*6 (36)

Round 19-20 :

36 sc in each row

Round 21 :

(4 sc, dec)*6 (30)

Round 22 :

30 sc

Round 23 :

(3 sc, dec)*6 (24)

Assembly Instructions

  • Stuff muzzle tightly with holofiber and sew to the head in proper position
  • Sew ears by folding them in half and attaching to sides of head
  • Attach horns securely to the top of the head using cream yarn
  • Embroider nostrils on the muzzle for realistic detail
  • Sew the completed head to the body ensuring proper alignment
  • Attach arms to body sides, stuffing them halfway before closing
  • Sew legs to bottom of body and embroider hoof details in gray
  • Attach tail to back of body and create brush tip with gray yarn pieces

Important Notes

  • πŸ’‘Work in spiral rounds throughout and mark the beginning of each round consistently
  • πŸ’‘Crochet all details with yarn held in two strands for better structure
  • πŸ’‘Stuff all parts firmly but not too tightly to maintain proper shape
  • πŸ’‘Place safety eyes between rows 11-12 with 4 single crochet spaces between them
  • πŸ’‘Change colors cleanly when switching from gray to beige in arms and legs
  • πŸ’‘Leave long tails when finishing each piece for easier assembly later

This charming bull amigurumi brings the gentle spirit of the farmyard into your home with its sweet expression and cuddly design. The combination of soft beige yarn with cream accents creates a timeless appeal that works beautifully in any nursery or as a special gift. With detailed instructions and helpful photos, this pattern guides you through creating a memorable handmade treasure that will be cherished for years to come. The finished bull's generous size makes it perfect for both play and display! Happy crocheting! 🧢✨

You ask,

we answer.

FAQs

What yarn weight works best for this bull pattern?

The pattern is designed for Alize Softy yarn, but any medium weight (4) yarn will work. Using different yarn weights will change the final size of your bull.

Can I make this pattern smaller or larger?

Yes! Use a smaller hook and thinner yarn for a miniature version, or a larger hook with chunky yarn for a bigger bull. Just ensure your safety eyes are proportional to the new size.

How do I create the brush tail tip properly?

Cut gray yarn into 8-10cm pieces, fold each piece in half, and use your hook to pull the folded end through the tail tip, then pull the loose ends through the loop to secure.

What if I don't have safety eyes?

You can embroider the eyes with black thread or yarn instead. Create small circles and add white highlights for a charming handmade look.

Should I stuff the arms and legs completely?

No, stuff arms and legs only halfway to allow for natural movement and positioning. Overstuffing makes them too rigid and affects the bull's posture.