๐Ÿงถ Beautiful โœจ Detailed ๐Ÿ’ Adorable

Iris Doll Amigurumi Pattern

Iris Doll Amigurumi Pattern
4.6โ˜… Rating
8-10 Hours Time Needed
2.0K Made This
โœ‚๏ธ

Intermediate Level

Ideal for those with basic knitting experience, featuring slightly more advanced stitches and techniques to expand your skills.

โฑ๏ธ

All-Day Adventure

Requires 8-10 hours, ideal for a full day of immersive knitting.

๐Ÿงธ

Cute Companion

An adorable friend to cherish, handcrafted with love to bring comfort and joy for years to come.

About This Iris Doll Amigurumi Pattern

This enchanting Iris Doll pattern brings together beautiful colors and textures to create a truly special amigurumi piece. With her flowing pink curly hair and elegant floral dress complete with delicate leaf details, she's designed to capture hearts. The pattern includes wire reinforcement for posability and detailed instructions for creating her signature curly hairstyle.

Iris Doll Amigurumi Pattern crochet pattern - detailed view of completed project

Standing at 29cm tall, this doll features intricate color work with purple, lilac, and white elements that create a stunning fairy-like appearance. The detailed leaf embellishments on her skirt make her truly unique.

Why You'll Love This Iris Doll Amigurumi Pattern

I absolutely love how this pattern combines classic amigurumi techniques with advanced color work and texture details. The curly hair technique creates such realistic-looking locks, and the way the leaf patterns are integrated into the dress design is simply magical. Working with multiple colors throughout keeps the project engaging, and seeing Iris come to life piece by piece is incredibly rewarding.

Iris Doll Amigurumi Pattern step 1 - construction progress Iris Doll Amigurumi Pattern step 2 - assembly progress Iris Doll Amigurumi Pattern step 3 - details and accessories Iris Doll Amigurumi Pattern step 4 - final assembly and finishing

Switch Things Up

I love how this Iris doll pattern opens up so many creative possibilities for customization! While the original uses beautiful pink hair, I've experimented with different colors like auburn, blonde, or even fantasy colors like lavender or mint green for a more whimsical look. The leaf details on the skirt can be embroidered with different shades of green yarn to create more realistic botanical effects, or you could even add tiny beads for dewdrops.

I've also found that adjusting the hair strand lengths creates different curl patterns - shorter chains give tighter curls while longer ones create loose waves. The wire reinforcement technique I use here can be applied to other doll patterns to make them poseable too. Sometimes I add a small ribbon bow to her hair or create tiny floral accessories to complement her garden fairy aesthetic.

The color palette is completely adaptable - I've made versions in earth tones for an autumn fairy, or cool blues and whites for a winter sprite. The beauty of this pattern lies in how the techniques can be modified while maintaining the elegant structure and proportions that make Iris so special.

Common Mistakes & How to Fix Them

โœ— Forgetting to stuff firmly while crocheting can result in a floppy doll that won't hold its shape properly โœ— Not placing safety eyes at the correct position between rounds 19-20 with proper spacing will affect facial proportions significantly โœ— Skipping the wire reinforcement in the body and neck makes the doll unable to pose and may cause head drooping โœ— Rushing through the curly hair strands without proper slip stitch technique results in uneven or loose curls

Iris Doll Amigurumi Pattern

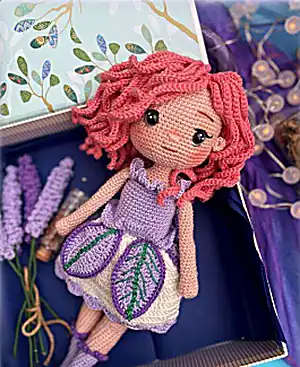
Create your own enchanting Iris doll with gorgeous pink curly hair and a stunning floral dress! This detailed pattern guides you through making a charming 29cm tall doll complete with intricate leaf details on her skirt. Perfect for intermediate crocheters who want to challenge themselves with beautiful color work and texture combinations.

Intermediate 8-10 Hours

Materials Needed for Iris Doll Amigurumi Pattern

โ€” Main Fabric

  • 01
    Etrofil Gurme nude colour 72040 for body and head
  • 02
    Alize Diva white 62 for underwear and skirt details
  • 03
    Alize Diva purple 622 for legs and dress bodice
  • 04
    Alize Diva lilac 158 for dress details and leaf borders
  • 05
    Yarnart jeans pink 20 for the beautiful curly hair

โ€” Tools Required

  • 01
    1.50 mm crochet hook (main body work)
  • 02
    1.75 mm crochet hook (hair/wig only)
  • 03
    8mm blue safety eyes
  • 04
    Wire approximately 40cm long for body and neck reinforcement
  • 05
    Small amount of green yarn for leaf embroidery
  • 06
    White, brown and black embroidery thread for facial features
  • 07
    Needle for sewing and embroidery
  • 08
    Scissors
  • 09
    Fiberfill stuffing

Progress Tracker

0% Complete

โ€” Arms :

Round 1 :

6 sc in mr with nude colour yarn (6)

Round 2 :

6 inc (12)

Round 3-5 :

12 sc (3 rows) (12)

Round 6 :

2*(4 sc, dec) (10)

Round 7-33 :

10 sc (27 rows) (10)

Info :

Stuff the arms very slightly. You can insert wire inside the arms. Cut your yarn and fasten off.
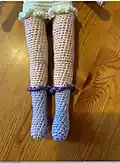
โ€” Legs :

Round 1 :

6 sc in mr with lilac colour yarn (6)

Round 2 :

6 inc (12)

Round 3-7 :

12 sc (5 rows) (12)

Round 8 :

For the heel ch 1 and turn, only crochet 5 sc

Round 9 :

Ch 1 and turn, 5 sc

Round 10 :

12 sc (heel 5 sc + foot 7 sc) (12)

Round 11-12 :

12 sc (2 rows) (12)

Round 13 :

1 dec (side), 4 sc, 1 dec (side), 4 sc (10)

Round 14 :

10 sc (10)

Round 15 :

2 sc, inc (back/middle), 7 sc (11)

Round 16 :

11 sc (11)

Round 17 :

3 sc, inc (back/middle), 7 sc (12)

Round 18 :

12 sc (12)

Round 19 :

4 sc, inc (back/middle), 7 sc (13)

Round 20 :

13 sc (13)

Round 21 :

5 sc, inc (back/middle), 7 sc (14)

Round 22 :

14 sc (14)

Round 23 :

6 sc, inc (back/middle), 7 sc (15)

Round 24 :

BLO 15 sc with nude colour yarn (15)

Round 25 :

7 sc, inc (back/middle), 7 sc (16)

Round 26-34 :

16 sc (9 rows) (16)

Round 35 :

4 inc (front/knee), 12 sc (20)

Round 36 :

20 sc (20)

Round 37 :

12 sc, 2 dec (back/middle), 4 sc (18)

Round 38-54 :

18 sc (17 rows) (18)

Round 55 :

Crochet only 5 sc and finish the first leg (inside/middle)

Infos :

You can insert wire inside the legs. Stuff the legs firmly as you go. The places of increases and decreases are indicated. You've finished the first leg. Cut your yarn and fasten off. Crochet the second leg in the same way and continue to body. Attach your purple yarn to the 24th row of the legs and crochet 15*(ch 4, slst to the next st). Complete the row.

โ€” Body :

Round 1 :

Ch 3 and join two legs with white yarn. (Your joining stitch should be on the back side of the doll) 18 sc from left leg, 3 sc on ch 3, 18 sc from right leg, 3 sc on ch 3 (42)

Round 2 :

42 sc (42)

Round 3 :

BLO 6*(6 sc, inc) (48)

Round 4-9 :

48 sc (6 rows) (48)

Round 10 :

6*(6 sc, dec) (42)

Round 11-12 :

42 sc (2 rows) (42)

Round 13 :

BLO 42 sc (42)

Round 14 :

6*(5 sc, dec) with lilac yarn (36)

Round 15 :

BLO 36 sc (36)

Round 16-25 :

36 sc (10 rows) (36)

Round 26 :

10 sc from body, 5 sc arm+body (together), 13 sc body, 5 sc arm+body (together), 3 sc body (36)

Round 27 :

10 sc body, 5 sc only arm, 13 sc body, 5 sc only arm, 3 sc body (36)

Round 28 :

BLO 6*(4 sc, dec) with nude colour yarn (30)

Round 29 :

6*(3 sc, dec) (24)

Round 30 :

6*(2 sc, dec) (18)

Round 31 :

3*(4 sc, dec) (15)

Round 32-34 :

15 sc (3 rows) (15)

Infos :

After this row, continue crocheting by joining arms to the body. You've finished the body. Leave enough long yarn tail to sew and fasten off. Attach your white yarn to the 3rd row of the body and crochet 48*(ch 4, 1 slst to the next st). Complete underwear details. Stuff the body firmly while crocheting. Place the wire inside body & neck part.

โ€” Head :

Round 1 :

6 sc in mr with nude colour yarn (6)

Round 2 :

6 inc (12)

Round 3 :

6*(sc, inc) (18)

Round 4 :

6*(2 sc, inc) (24)

Round 5 :

6*(3 sc, inc) (30)

Round 6 :

6*(4 sc, inc) (36)

Round 7 :

6*(5 sc, inc) (42)

Round 8 :

6*(6 sc, inc) (48)

Round 9 :

6*(7 sc, inc) (54)

Round 10 :

6*(8 sc, inc) (60)

Round 11-21 :

60 sc (11 rows) (60)

Round 22 :

4*(14 sc, inc) (64)

Round 23-26 :

64 sc (4 rows) (64)

Round 27 :

8*(6 sc, dec) (56)

Round 28 :

8*(5 sc, dec) (48)

Round 29 :

8*(4 sc, dec) (40)

Round 30 :

8*(3 sc, dec) (32)

Round 31 :

8*(2 sc, dec) (24)

Round 32 :

6*(2 sc, dec) (18)

Round 33 :

3*(4 sc, dec) (15)

Infos :

Insert the safety eyes between round 19 and 20 leaving a space of 10 sc between them. Stuff the head firmly as you go. Leave enough long yarn tail to sew. Embroider the eyebrows and eyelash with brown and black embroidery thread. Embroider nose in the middle of the eyes with nude colour yarn.

โ€” Ears :

Round 1 :

7 hdc, slst in mr with nude colour yarn

Info :

Leave enough long yarn tail to sew. After placing the wig on the head, sew the ears. Leave 6 sc between ears and eyes.
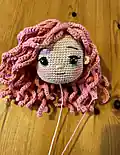
โ€” Hair / Wig :

Round 1 :

6 sc in mr with pink yarn (6)

Round 2 :

BLO 6 inc (12)

Round 3 :

BLO 6*(sc, inc) (18)

Round 4 :

BLO 6*(2 sc, inc) (24)

Round 5 :

BLO 6*(3 sc, inc) (30)

Round 6 :

BLO 6*(4 sc, inc) (36)

Round 7 :

BLO 6*(5 sc, inc) (42)

Round 8 :

BLO 6*(6 sc, inc) (48)

Infos :

Use 1.75 mm crochet hook for the wig. Crochet all the rows in BLO stitches. You've finished the wig. Continue to crochet hair strands without cutting your pink yarn. For the first row; (8th row of the wig) ch 45, from the 2nd sc 44 slst, skip 1 sc, 1 slst to the next sc. You've made the first hair strand. Complete the row in the same way. (24 hair strands in total) Skip 1 row and continue to crocheting hair strands to the 6th row of the wig. Ch 47, from the 2nd sc 46 slst, skip 1 sc, 1 slst to the next sc. Complete the row in the same way. (18 hair strands in total) Skip 1 row and continue to crocheting hair strands to the 4th row of the wig. Ch 49, from the 2nd sc 48 slst, skip 1 sc, 1 slst to the next sc. Complete the row in the same way. (12 hair strands in total) Skip 1 row and continue to crocheting hair strands to the 2nd row of the wig. Ch 51, from the 2nd sc 50 slst, skip 1 sc, 1 slst to the next sc. Complete the row in the same way. (6 hair strands in total) Sew the wig 11 rows above the eyes.

โ€” Skirt :

Round 1 :

Attach your white yarn to the 13th row of the body and crochet 42 dc inc, slst (84)

Round 2-11 :

Ch 1, 84 dc, slst (10 rows) (84)

Round 12 :

Attach your lilac yarn for the last row of skirt. 1 sc, skip 2 sc, into the same sc (3 dc, ch 1, 3 dc), complete the row in the same way.
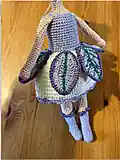
โ€” Leaves :

Round 1 :

With lilac yarn ch 15, from the 2nd sc 1 sc, 2 hdc, 3 dc, 4 trc, 2 dc, 1 hdc, inc to the last sc, on the opposite side 2 sc, 1 hdc, 2 dc, 4 trc, 2 dc, 1 hdc, 1 sc, slst

Round 2 :

Ch 1, 1 sc, inc, hdc inc, hdc, dc, dc inc, trc, trc inc, 2 trc, dc inc, hdc, hdc inc, 1 sc, inc, inc, hdc inc, hdc, 2 dc, dc inc, dc, dc inc, dc, hdc inc, hdc, inc, 1 sc, slst

Round 3 :

With purple yarn crochet 1 single crochet around the piece.

Infos :

Crochet 6 pieces and leave enough long yarn tail to sew. Increases will be crocheted in the same st. You may embroider the leaves with green yarn. Place the leaves onto the body as shown in the picture. (just above the skirt) (2 pieces on the front, 2 pieces on the back, 2 pieces on the sides) Sew the leaves to the body only from the ends. Attach your lilac yarn to the 15th row of the body to complete the skirt detail and crochet 36 dc inc, slst. (just above the leaves). Fasten off. Attach your lilac yarn 28th row of the body to complete arm detail and 30 dc inc, slst. Fasten off.

Assembly Instructions

  • Sew the completed head securely to the neck opening of the body, ensuring proper alignment and stability
  • Attach the arms to the body at rounds 26-27, making sure they are positioned symmetrically and at the correct height
  • Position and sew the wig 11 rows above the eye placement, ensuring it covers the head properly
  • Attach the ears after the wig is in place, leaving 6 sc between the ears and eyes for proper proportion
  • Sew the 6 leaf pieces onto the body above the skirt (2 front, 2 back, 2 sides), securing only the ends to allow natural draping
  • Embroider facial features including eyebrows, eyelashes, and nose using brown, black, and nude colored threads
  • Add the final decorative elements including the arm and skirt detail trim using lilac yarn

Important Notes

  • ๐Ÿ’กUse 1.50mm hook for the entire doll except the wig, which requires 1.75mm hook for proper texture
  • ๐Ÿ’กInsert wire reinforcement in body, neck, arms, and legs for posability and structural support
  • ๐Ÿ’กWork all wig rows in back loop only (BLO) to create the proper texture for hair attachment
  • ๐Ÿ’กStuff all parts firmly but not overly tight to maintain proper shape and proportions
  • ๐Ÿ’กPlace safety eyes between rounds 19-20 with exactly 10 sc spacing for correct facial proportions
  • ๐Ÿ’กCreate hair strands using slip stitch technique for realistic curly hair texture

This enchanting Iris Doll pattern combines intermediate amigurumi techniques with beautiful color work and texture details to create a truly magical companion. Her flowing pink curls and elegant floral dress make her perfect for display or imaginative play. The wire reinforcement allows for posing, while the intricate leaf details on her skirt showcase advanced crochet artistry. ๐Ÿงถ Happy crocheting! ๐Ÿงตโœจ

You ask,

we answer.

FAQs

What makes this pattern intermediate level?

This pattern involves multiple color changes, wire reinforcement techniques, detailed leaf construction, and complex hair strand creation using slip stitches. The combination of different stitch types and assembly requirements make it more challenging than beginner patterns.

Can I make this doll without the wire reinforcement?

While possible, the wire is highly recommended for the body, neck, and limbs as it provides structural support and allows the doll to be posed. Without it, the doll may be floppy and the head may not stay upright properly.

How do I achieve the curly hair effect?

The curly hair is created using chains of varying lengths followed by slip stitches back down the chain. Use the 1.75mm hook and work in back loop only on the wig base. The different chain lengths (44, 46, 48, 50 stitches) create natural-looking curl variation.

What's the purpose of the BLO (back loop only) stitches?

BLO stitches are used in specific areas like the wig base and color transition points to create texture and clean color changes. This technique also provides the proper foundation for attaching hair strands and creates visual interest in the fabric.

How should I position the leaf details on the skirt?

Place 6 leaves total: 2 on the front, 2 on the back, and 2 on the sides, just above the white skirt portion. Sew them only at the ends to allow natural draping and movement, and consider adding green embroidery for realistic leaf veining.