๐Ÿงถ Beautiful โœจ Detailed ๐Ÿ’ Adorable

Cowboy Cat Hat Pattern

Cowboy Cat Hat Pattern
4.5โ˜… Rating
3-4 Hours Time Needed
3.0K Made This
โœ‚๏ธ

Intermediate Level

Ideal for those with basic knitting experience, featuring slightly more advanced stitches and techniques to expand your skills.

โฑ๏ธ

Weekend Treat

Takes 5-7 hours, making it an enjoyable project to finish over a couple of days.

๐Ÿพ

Pocket Pal

A mini friend to carry anywhere, providing comfort and companionship in a perfectly portable size.

About This Cowboy Cat Hat Pattern

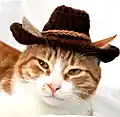
This Cowboy Cat Hat pattern brings western charm to your pet's wardrobe with authentic details and comfortable fit. Designed specifically for adult cats (7-15 lbs) and toy/miniature dog breeds, it features strategic ear holes and an optional chin strap for security. The pattern uses a combination of double crochet and single crochet techniques to create the classic cowboy hat shape with proper crown indentation.

Cowboy Cat Hat Pattern crochet pattern - detailed view of completed project

The finished hat measures 3.5 inches tall with a 12-inch circumference, providing the perfect fit for most cats. Optional chin straps can be added for extra security during photo sessions or costume events.

Why You'll Love This Cowboy Cat Hat Pattern

I absolutely love this pattern because it combines my passion for pets with classic western style! The satisfaction of seeing your furry friend transformed into an adorable cowpoke is unmatched. I appreciate how the pattern includes thoughtful details like proper ear hole positioning and sizing guidance for different pets. The intermediate skill level makes it challenging enough to be engaging while remaining achievable for most crocheters.

Cowboy Cat Hat Pattern step 1 - construction progress Cowboy Cat Hat Pattern step 2 - assembly progress Cowboy Cat Hat Pattern step 3 - details and accessories Cowboy Cat Hat Pattern step 4 - final assembly and finishing

Switch Things Up

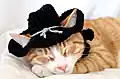
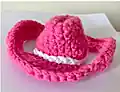
I love experimenting with different color combinations for this cowboy hat pattern! Try making it in classic black with a silver band for a sophisticated look, or go bold with bright pink and white for a fun twist on western wear. You could even create seasonal versions - think orange and brown for autumn, or red and green for holiday photos.

For added personality, consider embellishing the band with tiny crocheted flowers, stars, or even a miniature sheriff's badge. I've also had success making matching bandanas to complete the western ensemble. The beauty of this pattern is how easily it adapts to your creative vision while maintaining that authentic cowboy charm your pet will love wearing.

Common Mistakes & How to Fix Them

โœ— Not maintaining proper gauge can result in a hat that's too large or small for your pet โœ— Forgetting to create the ear holes in the correct position will make the hat uncomfortable
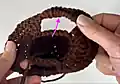
 โœ— Pulling stitches too tight during the crown shaping can prevent proper indentation formation โœ— Skipping the final round that creates the upturned brim edge will lose the authentic cowboy look

Cowboy Cat Hat Pattern

Transform your feline friend into the cutest cowpoke in town with this adorable Cowboy Cat Hat! This charming pattern creates a miniature western-style hat that's perfect for adult cats and small dogs. Featuring authentic cowboy hat details including ear holes, an optional chin strap, and that classic indented crown, this project combines practicality with playful design. Your pet will be ready for any wild west adventure while staying comfortable and stylish.

Intermediate 3-4 Hours

Materials Needed for Cowboy Cat Hat Pattern

โ€” Main Fabric

  • 01
    Bulky 5 weight yarn - Red Heart Saver Chunky or similar, Brown (20gr/75oz, 34m/38yd)
  • 02
    Worsted 4 weight yarn - Red Heart Super Saver or similar, Tan (>1gr/1oz, >2m/yd)

โ€” Tools Required

  • 01
    4.5mm / 7 crochet hook or as needed to obtain gauge
  • 02
    Yarn needle for finishing
  • 03
    Scissors
  • 04
    Stitch markers (optional but helpful)

Progress Tracker

0% Complete

โ€” Hat :

Round 1 :

In brown, form a magic ring, 6 sc in the magic ring [6]

Info :

Note: do not ss to join, you will work continuously in the round until Round 11

Round 2 :

2 sc in each st all the way around [12]

Round 3 :

1 sc in each st all the way around [12]

Round 4 :

1 sc in the next 1 sts, 2 sc in the next st, repeat from * 5 more times [18]

Round 5 :

1 sc in each st all the way around [18]

Round 6 :

1 sc in the next 2 sts, 2 sc in the next st, repeat from * 5 more times [24]

Round 7 :

1 sc in each st all the way around, ss into the next st [24]

Round 8 :

Repeat round 7, ss to join [24]

Round 9 :

This round forms the ear holes. Ch 3 (does not count as stitch). Dc 5 in each of the next 5 sts. Ch 3, sk the next 3 sts. Dc 5 in each of the next 5 sts. Ch 3, sk the next 3 sts, ss to join [24]

Round 10 :

Ch 1, 1 sc in the first 5 sts, 2 sc in the next st, repeat from * 2 more times. Working around the ch 3 sp: hdc 1, dc 3, hdc 1. 1 sc in the first 5 sts, 2 sc in the next st, repeat from * 2 more times. Working around the next ch 3 sp: hdc 1, dc 3, hdc 1, ss to join [36]

Round 11 :

Turn, ch 1, 1 sc in each st all the way around (creates a solid edge and helps the edges of the hat turn up like a cowboy hat). Ss to join and fasten off [36]

โ€” Band :

Band :

In tan, ch 30, ss to join. Place the band around the center of the hat and sew on the hat

โ€” Chin Straps (Optional) :

Chin Straps :

Attach your yarn to the underside of the hat around the center dc stitches from Round 9 (above should be the 11th and 13th dc located at the middle of the ear hole). Ch 15, fasten off. Repeat on the other side

โ€” Finishing :

Finishing :

Weave in any ends. Turn the sides of the hat near the ear holes upwards. Push the top of the hat in down slightly so that it is indented about 1/2" and pinch the sides together to create the "cowboy" look. Alternately, to make the indent permanent, turn the hat inside out, fold in half so the ear holes line up and sew both sides together along Round 9. Turn right side out

Assembly Instructions

  • Place the tan band around the center of the hat between the crown and brim sections
  • Sew the band securely to the hat using matching thread and small stitches
  • If adding chin straps, attach them to the underside at the middle of each ear hole opening
  • Create the cowboy hat shape by gently pushing down the crown center and pinching sides
  • For permanent shaping, fold hat inside out and sew along Round 9 before turning right side out

Important Notes

  • ๐Ÿ’กMaintain consistent gauge throughout the project for proper fit on your pet
  • ๐Ÿ’กTest fit the hat on your pet during construction to ensure ear holes are properly positioned
  • ๐Ÿ’กThe hat is designed for adult cats (7-15 lbs) and small toy dog breeds
  • ๐Ÿ’กFor smaller pets, use a 3.5mm hook and worsted weight yarn throughout
  • ๐Ÿ’กTurn up the brim edges near ear holes to create the authentic cowboy hat silhouette

This delightful Cowboy Cat Hat pattern transforms your beloved pet into an adorable western character! The thoughtful design includes proper ear hole placement and optional chin straps for comfort and security. Whether for photos, costume parties, or just everyday fun, this hat brings out your pet's playful side while showcasing your crochet skills. Saddle up for a wonderful crafting adventure! ๐Ÿค ๐Ÿฑโœจ

You ask,

we answer.

FAQs

What size pets will this hat fit?

This pattern is designed for adult cats weighing 7-15 pounds and toy or miniature dog breeds. The finished hat measures 3.5 inches tall with a 12-inch circumference.

Can I make this hat smaller for kittens?

Yes! Use a 3.5mm (E-4) hook and worsted weight yarn throughout the pattern instead of the bulky yarn to create a smaller version.

Are the chin straps necessary?

The chin straps are optional. They help keep the hat secure during photos or active wear, but many pets are comfortable without them.

How do I create the cowboy hat shape?

After completing the pattern, push the crown center down about 1/2 inch and pinch the sides together. For permanent shaping, you can sew along Round 9 as described in the finishing instructions.

What if my gauge doesn't match exactly?

Adjust your hook size - use a larger hook if your gauge is too tight, or a smaller hook if it's too loose. Proper gauge ensures the hat will fit your pet correctly.