🧢 Beautiful ✨ Detailed πŸ’ Adorable

Adorable Ladybug Keychain Pattern

Adorable Ladybug Keychain Pattern
4.6β˜… Rating
1-1.5 Hours Time Needed
2.3K Made This
βœ‚οΈ

Beginner Friendly Level

Perfect for those just starting their sewing journey, with clear instructions and simple techniques

⏱️

Bite-Sized Project

Complete in under 2 hoursβ€”quick, fun, and perfect for a little creative escape.

🐞

Tiny Treasure

Small, sweet, and gift-worthy creations that fit perfectly in the palm of your hand with detailed charm.

About This Adorable Ladybug Keychain Pattern

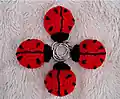
This delightful ladybug keychain pattern brings nature's charm to your accessories with its classic red and black spotted design. The pattern uses simple stitches and techniques, making it perfect for beginners while still creating an impressive finished piece. Each ladybug is carefully constructed with a back, tummy, and head section, then finished with beautiful embroidered details including the signature stripe and spots that make these little creatures so recognizable and beloved.

Adorable Ladybug Keychain Pattern crochet pattern - detailed view of completed project

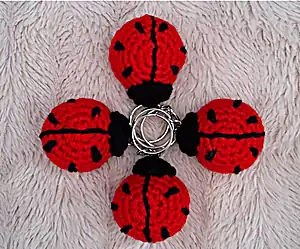
The compact size makes these keychains quick to complete, perfect for using up yarn scraps or creating thoughtful handmade gifts. The attached keychain hardware makes them practical and portable, ready to add a touch of handcrafted charm to keys, bags, or anywhere you want a little ladybug luck.

Why You'll Love This Adorable Ladybug Keychain Pattern

I absolutely love how these tiny ladybugs capture so much personality in such a small package! The embroidered details really bring them to life, and there's something so satisfying about creating these perfect little spotted creatures. I find myself making them in batches because they work up so quickly and make wonderful gifts that people always treasure. The bright colors are cheerful and uplifting, and every time I see one on my keys, it brings a little smile to my day.

Adorable Ladybug Keychain Pattern step 1 - construction progress Adorable Ladybug Keychain Pattern step 2 - assembly progress Adorable Ladybug Keychain Pattern step 3 - details and accessories Adorable Ladybug Keychain Pattern step 4 - final assembly and finishing

Switch Things Up

I love experimenting with different approaches to make each ladybug unique and special. Sometimes I switch up the spot placement, creating asymmetrical patterns that look more natural and organic. I've tried using metallic thread for the embroidery details, which adds a lovely shimmer and makes the ladybugs feel more luxurious.

For seasonal variations, I might use darker reds or even burgundy for autumn-themed ladybugs, or add tiny beads to some of the spots for extra texture and visual interest. I've also experimented with slightly larger hooks to create a more relaxed, softer look, though I always stick with the recommended stuffing guidelines.

When making them as gifts, I love creating sets in slightly different sizes by adjusting the number of increase rounds, giving each recipient a family of ladybugs rather than just one. The embroidery is where I really let my creativity shine - sometimes I add tiny French knots between the larger spots, or use variegated thread for the back stripe to create subtle color changes.

Common Mistakes & How to Fix Them

βœ— Overstuffing the body which causes the stitches to stretch and stuffing to show through βœ— Not securing the embroidery thread properly when creating the back stripe and spots βœ— Cutting the yarn ends too short making it difficult to weave them through the body βœ— Forgetting to use stitch markers which can cause uneven shaping in the rounds

Adorable Ladybug Keychain Pattern

Create these charming little ladybug keychains that are perfect for adding a touch of nature-inspired cuteness to your keys, bags, or as delightful gifts! This pattern guides you through making sweet spotted ladybugs with embroidered details and attached keychains. The compact size makes them quick to work up, and the bright red and black color combination captures the classic ladybug look beautifully. Whether you're making one for yourself or creating a batch as thoughtful handmade gifts, these tiny treasures are sure to bring smiles wherever they go.

Beginner Friendly 1-1.5 Hours

Materials Needed for Adorable Ladybug Keychain Pattern

β€” Main Fabric

  • 01
    Hayfield Bonus DK weight yarn in Ladybird red color (0698) - approximately 5g
  • 02
    Hayfield Bonus DK weight yarn in Black color (0965) - small amount for embroidery

β€” Tools Required

  • 01
    3mm crochet hook
  • 02
    Wool needle for sewing and embroidery
  • 03
    Stitch markers
  • 04
    Hi-Loft quality toy stuffing
  • 05
    Keychain hardware
  • 06
    Scissors

Progress Tracker

0% Complete

β€” Ladybug Back :

Row 1 :

ch2, sc 6 into 2nd st from hook (alternatively sc 6sts into magic ring) (6)

Row 2 :

inc x6 (12)

Row 3 :

(sc into next st, inc) x6 (18)

Row 4 :

sc (18)

Row 5 :

(sc into next 2sts, inc) x6 (24)

Row 6 :

sc (24)

Info :

F/O leaving a short end. Weave short end through back of bun. DO NOT CUT FLUSH.

β€” Ladybug Tummy :

Row 1 :

ch2, sc 6 into 2nd st from hook (alternatively sc 6sts into magic ring) (6)

Row 2 :

inc x6 (12)

Row 3 :

(sc into next st, inc) x6 (18)

Row 4 :

(sc into next 2sts, inc) x6 (24)

β€” Joining Row :

Row 5 :

place the 2 halves of the ladybug wrong sides together and sl st to join, ch1, hdc into next 23sts (24, ch1 counts as 1st st) sl st to join

Info :

F/O leaving a 15cm end. Secure ends with a couple of small sts. Weave end through body and cut flush to finish.

β€” Ladybug Head :

Row 1 :

leaving a 15cm end, ch2, sc 6 into 2nd st from hook (alternatively sc 6sts into magic ring) (6)

Row 2 :

flip 15cm end to front of work, inc x6 (12)

Row 3 :

sc (12)

Info :

F/O leaving a 50cm end.

β€” Attaching Head :

Step 1 :

Using 50cm end from head, thread through tummy section just behind the F/O join

Step 2 :

Working straight up from entry point, come out through the ladybugs back, 3 rows above the hdc join row

Step 3 :

Catch in opposite edge of head and pull tight to position

Step 4 :

Using small mattress sts attach head to body. DO NOT CUT END.

β€” Back Stripe and Spots :

Step 1 :

Using remainder of 50cm end and small running sts, embroider a straight line down the ladybug's back making sure that you go across the starting circle

Step 2 :

Using a split st (small running sts that catch in each end of previous running st), work back along the back finishing up at head join

Step 3 :

Using small embroidery daisy (ch) sts sew 3 spots on each side of back making sure that they are fairly symmetrical

Info :

Weave ends through inside of ladybug's body and cut flush to finish.

β€” Attaching Keychain :

Step 1 :

Thread keychain onto 15cm end

Step 2 :

Do 3 small back sts to attach the keychain to top of head

Step 3 :

Secure end with a couple of small sts. Weave end through body and cut flush to finish.

Assembly Instructions

  • Create the ladybug back piece by working in rounds and finishing with a short end for weaving
  • Make the tummy piece following the same initial rounds as the back
  • Join the back and tummy pieces wrong sides together using slip stitch, then work half double crochet around the edge
  • Construct the head separately, leaving a long tail for attachment and embroidery work
  • Attach the head by threading the tail through the tummy section and securing with mattress stitches
  • Embroider the signature back stripe using running stitches, then add the characteristic spots with daisy stitches
  • Finally, attach the keychain hardware to the head using the reserved yarn end and secure all ends

Important Notes

  • πŸ’‘Use stitch markers to keep track of rounds and maintain even shaping throughout the project
  • πŸ’‘Don't overstuff the body - it should be firm but squeezable when pinched
  • πŸ’‘Leave long tails as specified in the pattern for proper assembly and embroidery work
  • πŸ’‘Keep embroidery stitches small and even for the best professional-looking finish
  • πŸ’‘Secure all yarn ends properly by weaving through the body before cutting flush

These adorable ladybug keychains combine simplicity with charm, making them perfect for crafters of all skill levels who want to create something special. The classic red and black color scheme with embroidered details captures the essence of these beloved garden creatures in miniature form. Whether you're making them as gifts, for yourself, or to brighten someone's day, these little ladybugs are guaranteed to spread joy wherever they go. 🐞 Happy crocheting! 🧢✨

You ask,

we answer.

FAQs

Can I use different colors for my ladybug?

Absolutely! While the classic red and black combination is traditional, you could create ladybugs in any colors you prefer. Just maintain good contrast between the main body color and the embroidery details.

How do I prevent the stuffing from showing through my stitches?

The key is not to overstuff. Fill the body just enough that it feels firm but can still be squeezed when pinched. If stuffing shows through, remove some and redistribute it more evenly.

Can I make these without the keychain attachment?

Yes! You can omit the keychain hardware and use these as decorative items, bag charms, or even sew them onto clothing or accessories as appliques.

What if my embroidered spots don't look symmetrical?

Don't worry about perfect symmetry - real ladybugs have varying spot patterns too! Focus on making the spots roughly the same size and evenly distributed for the best look.